31.高级地形AdvancedTerrainSceneNode类
AdvancedTerrainSceneNode类的代码主要参考自3D系列4.4 多纹理地形,与这篇文章的不同之处在于它创建的是TriangleList类型的顶点,而我使用的是数据量更少的TriangleStrip,使用TriangleStrip的解释可参见27.简单地形SimpleTerrainSceneNode类,代码如下,关键步骤请见代码注释:
namespace StunEngine.SceneNodes
{
// 高级地形使用的自定义顶点格式,储存了顶点位置、法线和纹理坐标,还有每个顶点的4个权重
public struct VertexMultitextured
{
public Vector3 Position;
public Vector3 Normal;
public Vector2 TextureCoordinate;
public Vector4 TexWeights;
public static int SizeInBytes = (3 + 3 + 2 + 4) * sizeof(float);
public static VertexElement[] VertexElements = new VertexElement[]
{
new VertexElement( 0, 0, VertexElementFormat.Vector3, VertexElementMethod.Default, VertexElementUsage.Position, 0 ),
new VertexElement( 0, sizeof(float) * 3, VertexElementFormat.Vector3, VertexElementMethod.Default, VertexElementUsage.Normal, 0 ),
new VertexElement( 0, sizeof(float) * 6, VertexElementFormat.Vector2, VertexElementMethod.Default, VertexElementUsage.TextureCoordinate, 0 ),
new VertexElement( 0, sizeof(float) * 8, VertexElementFormat.Vector4, VertexElementMethod.Default, VertexElementUsage.TextureCoordinate, 1 ),
};
}
///
/// 基于高度图的地形。
///
public class AdvancedTerrainSceneNode : Renderable3DSceneNode
{
#region 构造函数和成员变量
///
/// 地形使用的材质
///
private AdvancedTerrainMaterial material;
///
/// 高度图文件名称
///
string heightMapName;
///
/// 高度图
///
Texture2D heightMap;
///
/// 地形最小高度
///
private float minimumHeight = float.MaxValue;
///
/// 地形最大高度
///
private float maximumHeight = float.MinValue;
///
/// 地形高度,默认为30,即高度介于0至30之间
///
private float height = 30.0f;
///
/// 地形纹理宽度
///
private int terrainWidth;
///
/// 地形纹理高度
///
private int terrainHeight;
///
/// 高度数据数组
///
float[,] heightData;
///
/// 创建一个默认AdvancedTerrainSceneNode对象。使用引擎中的高度图和四张纹理,不进行缩放
///
/// 引擎
/// 所属场景
public AdvancedTerrainSceneNode(StunXnaGE game, Scene setScene)
: this(game, setScene, "Textures/heightmap128", "Textures/sand", "Textures/Grass", "Textures/rock", "Textures/snow", Vector3.One)
{
}
///
/// 创建一个AdvancedTerrainSceneNode对象。这个对象放置在(0,0,0) - (heightmap width, maxheight, -heightmap height)范围内
///
/// 引擎
/// 所属场景
/// 高度贴图名称
/// 纹理1(沙地)
/// 纹理2(草地)
/// 纹理3(岩石)
/// 纹理4(雪地)
/// 地形缩放
public AdvancedTerrainSceneNode(StunXnaGE game, Scene setScene,string setHeightMapName, string setTexture1,string setTexture2,string setTexture3,string setTexture4, Vector3 setScale): base(game,setScene)
{
// 设置材质
material = new AdvancedTerrainMaterial(engine, engine.Content.Load("Effects\\AdvancedTerrain"));
material .DiffuseTextureName=setTexture1;
material .DetailTextureName =setTexture2;
material .Texture3Name =setTexture3 ;
material .Texture4Name =setTexture4 ;
//将每张纹理平铺次数设为4次
this.Material.DiffuseUVTile = this.Material.DetailUVTile =this.Material.Texture3UVTile =this.Material .Texture4UVTile =new Vector2(4.0f, 4.0f);
// 实现IMaterial接口
Imaterial = (IMaterial)material;
this.heightMapName = setHeightMapName;
//不对地形进行剔除操作
this.DisableCulling = true;
this.DisableUpdateCulling = true;
this.pose.SetScale(ref setScale);
}
#endregion
#region 属性
///
/// 获取地形使用的材质
///
public AdvancedTerrainMaterial Material
{
get { return material; }
}
///
/// 返回高度数据数组
///
public float[,] HeightData { get { return heightData; } }
///
/// 获取或设置地形高度的缩放值,默认为30,即高度介于0至30之间。这个值发生改变后需要重新创建地形顶点
///
public float Height
{
get { return height; }
set
{
height = value;
//加载高度图数据
heightData = Utility.LoadHeightData(heightMap, ref terrainWidth, ref terrainHeight, ref minimumHeight, ref maximumHeight, height);
CreateTerrain();
}
}
///
/// 获取范围在[0, infinite]之间的地形最小高度。
///
public float MinHeight
{ get { return minimumHeight; } }
///
/// 获取范围在[0, infinite]之间的地形最大高度。
///
public float MaxHeight{ get { return maximumHeight; } }
#endregion
public override void Initialize()
{
this.UpdateOrder = SceneNodeOrdering.Terrain.GetValue();
base.Initialize();
CreateTerrain();
}
internal override void LoadContent()
{
base.LoadContent();
//加载高度图
heightMap = engine.Content.Load(heightMapName);
//加载高度图数据
heightData = Utility.LoadHeightData(heightMap, ref terrainWidth, ref terrainHeight, ref minimumHeight, ref maximumHeight, height);
}
///
/// 绘制地形。
///
///
public override int Draw(GameTime gameTime,bool useReflection)
{
// 因为地形上施加了缩放,所以WorldPose.WorldMatrix不正确,需要修正。
this.pose.WorldMatrix = pose.TranslateMatrix;
return base.Draw(gameTime, useReflection);
}
///
/// 如果重置了地形缩放则重新建立地形。
///
public override void OnScaleChange()
{
CreateTerrain();
}
#region 生成地形使用的方法
///
/// 基于高度图和缩放创建顶点缓冲和索引缓冲。
///
private void CreateTerrain()
{
略...
}
///
/// 创建地形顶点
///
///
/// 创建地形顶点索引
///
///
/// 计算法线
///
private void GenerateNormals(ref VertexMultitextured[] vertices, ref int[] indices)
{
略...
}
///
/// 判断是否在地形上
///
/// 给定x坐标
/// 给定z坐标
///
/// 通过双线性插值获取指定点的精确高度
///
///
///
///
/// 测试AdvancedTerrainSceneNode类
///
public static void TestAdvancedTerrainSceneNode()
{
AdvancedTerrainSceneNode terrain = null;
// 相机上一帧的位置。
Vector3 oldPosition=Vector3 .Zero;
TestGame.Start("测试AdvancedTerrainSceneNode类",
delegate
{
//
terrain = new AdvancedTerrainSceneNode(TestGame.engine, TestGame.scene);
TestGame.scene.AddNode(terrain);
//将地形中心放置在坐标原点
Vector3 position=new Vector3(-64,0,64);
terrain.Pose.SetPosition(ref position);
// 开启地形的雾化
terrain .Material.FogEnabled = true;
// 设置雾化颜色
TestGame.scene.FogColor = new Vector4(0.8f, 0.8f, 0.8f, 1.0f);
TestGame.engine.BackGroundColor = Color.CornflowerBlue;
//不显示光标
TestGame.scene.IsShowMouse = false;
// 设置点光源和聚光灯
TestGame.scene.sunModel.Visible = false;
position=new Vector3(-15, 20, 0);
TestGame.scene.pointLight.Position = position;
TestGame.scene.pointLightModel.Pose.SetPosition(ref position);
position = new Vector3(-5, 15, 0);
TestGame.scene.spotLight .Position = position;
TestGame.scene.spotLightModel .Pose.SetPosition(ref position);
TestGame.scene.floor.Visible = false;
},
delegate
{
// 按数字1键则切换地形上的纹理
if (Input.KeyboardKeyJustPressed(Keys.D1))
{
if (terrain.Material.DiffuseTextureName == "Textures\\sand")
terrain.Material.DiffuseTextureName = "Textures\\Rock";
else
terrain.Material.DiffuseTextureName = "Textures\\sand";
}
// 按数字2键切换地形的高度
if (Input.KeyboardKeyJustPressed(Keys.D2))
{
if (terrain.Height == 30.0f)
terrain.Height = 60.0f;
else
terrain.Height = 30.0f;
}
// 按数字3键切换地形的缩放
if (Input.KeyboardKeyJustPressed(Keys.D3))
{
Vector3 scale=Vector3 .One ;
Vector3 position = new Vector3(-64f, 0f, 64f);
if (terrain.Pose.Scale == scale)
{
scale = new Vector3(2.0f, 2.0f, 2.0f);
terrain.Pose.SetScale(ref scale);
position = new Vector3(-128f, 0f, 128f);
terrain.Pose.SetPosition(ref position);
}
else
{
scale = Vector3.One;
terrain.Pose.SetScale(ref scale );
terrain.Pose.SetPosition(ref position);
}
}
// 实现相机跟随地形的移动
Vector3 camPosition, tempPosition;
TestGame.scene.Camera.GetPosition(out camPosition);
// 如果相机发生移动
if ((camPosition - oldPosition) != Vector3.Zero)
{
// 检查相机与地形的高度差
float height = 5.0f + terrain.GetExactHeightAt(camPosition.X, -camPosition.Z);
float diff = height - camPosition.Y;
if (diff != 0)
{
tempPosition = new Vector3(camPosition.X, height, camPosition.Z);
TestGame.scene.Camera.Pose.SetPosition(ref tempPosition);
TestGame.scene.Camera.UpdateViewMatrix(false);
}
TestGame.scene.Camera.GetPosition(out oldPosition);
}
});
}
#endif
#endregion
}
}
其中创建顶点的方法与27.简单地形SimpleTerrainSceneNode类是类似的,不同之处在于使用了自定义的顶点结构VertexMultitextured,额外添加了纹理的权重信息,但3D系列4.4 多纹理地形一文中自定义顶点结构有个问题:TextureCoordinate数据类型应是Vector2,此文中设为了Vector4,好像没有必要,增加了数据量,我改成了Vector2没有发生问题。而SimpleTerrain中使用的是XNA框架预定义的VertexPositionNormalTexture结构。
创建地形顶点索引的CreateTerrainIndices方法、计算法线的GenerateNormals方法、判断是否在地形上的IsValidPosition方法和通过双线性插值获取指定点的精确高度的GetExactHeightAt方法与27.简单地形SimpleTerrainSceneNode类是相同的,不再赘述。(好像应该创建一个地形基类让代码可以重用,还是以后实现吧)
高级地形使用的effect文件AdvancedTerrain.fx代码如下:
#include "Standard.inc"
#include "Lights.inc"

uniform extern texture	gTexture3;		//	第三张纹理
uniform extern  float2 gTexture3UVTile;	//  第三张纹理在UV方向的平铺次数
uniform extern texture	gTexture4;		//	第四张纹理
uniform extern  float2 gTexture4UVTile;	//  第四张纹理在UV方向的平铺次数

//	第三张纹理的采样器
sampler2D texture3Sampler = sampler_state
{
    Texture =
;
    magfilter = LINEAR;
    minfilter = LINEAR;
    mipfilter = LINEAR;
    AddressU = mirror;
    AddressV = mirror;
};

//	第四张纹理的采样器
sampler2D texture4Sampler = sampler_state
{
    Texture = ;
    magfilter = LINEAR;
    minfilter = LINEAR;
    mipfilter = LINEAR;
    AddressU = mirror;
    AddressV = mirror;
};

// 顶点着色器的输入结构
struct VS_INPUT
{
	float4 Position         : POSITION0;
    float3 Normal           : NORMAL;
    float2 TextureCoords    : TEXCOORD0;
    float4 TextureWeights   : TEXCOORD1;
};

// 顶点着色器的输出结构
struct VS_OUTPUT
{
    float4 Position         : POSITION0;
    float3 WorldNormal      : TEXCOORD0;
    float2 TextureCoords    : TEXCOORD1;
    float4 WorldPosition    : TEXCOORD2;
    float4 TextureWeights   : TEXCOORD3;
    float Depth             : TEXCOORD4;	 // 像素的深度值
};


VS_OUTPUT MultiTexturedVS(VS_INPUT Input)
{
    VS_OUTPUT Output = (VS_OUTPUT)0;
    float4x4 preViewProjection = mul (gView, gProjection);
    float4x4 preWorldViewProjection = mul (gWorld, preViewProjection);

    Output.Position = mul(Input.Position, preWorldViewProjection);
    Output.WorldNormal = mul(normalize(Input.Normal), gWorld);
    Output.TextureCoords = Input.TextureCoords;

    float4 worldPosition =  mul(Input.Position, gWorld);
    Output.WorldPosition = worldPosition / worldPosition.w;

    Output.TextureWeights = Input.TextureWeights;

    // 深度值就是顶点在屏幕空间中的z坐标,因为这是一个4x4矩阵乘法的结果,所以使用前需要首先除以w分量:
    Output.Depth = Output.Position.z/Output.Position.w;

    return Output;
}

float4 MultiTexturedPS(VS_OUTPUT Input):COLOR0
{
    // 定义两个变量处理混合:混合开始时离开相机的距离blendDistance,混合初末位置的范围blendWidth
    float blendDistance = 0.99f;
    float blendWidth = 0.005f;

    // 所有像素都有一个介于0和1之间的深度值,0对应近裁平面,1对应远裁平面。
    // 使用以下代码,所有离开相机的距离小于0.99的像素的blendfactor为0,所有大于0.99+0.005=0.995的像素的blendfactor为1,两者之间的像素会获得一个经过线性插值的blendfactor
    float blendFactor = clamp((Input.Depth-blendDistance)/blendWidth, 0, 1);

    // 计算每个像素的颜色
    float4 farColor;
    farColor = tex2D(textureSampler, Input.TextureCoords* gDiffuseUVTile)*Input.TextureWeights.x;
    farColor += tex2D(detailSampler, Input.TextureCoords* gDetailUVTile)*Input.TextureWeights.y;
    farColor += tex2D(texture3Sampler, Input.TextureCoords*gTexture3UVTile)*Input.TextureWeights.z;
    farColor += tex2D(texture4Sampler, Input.TextureCoords*gTexture4UVTile)*Input.TextureWeights.w;

    // 对近距离的像素,将纹理坐标乘以3,这样纹理会缩小3倍,即细节增加3倍。
    float4 nearColor;
    float2 nearTextureCoords = Input.TextureCoords*3;
    nearColor = tex2D(textureSampler, nearTextureCoords*gDiffuseUVTile)*Input.TextureWeights.x;
    nearColor += tex2D(detailSampler, nearTextureCoords* gDetailUVTile)*Input.TextureWeights.y;
    nearColor += tex2D(texture3Sampler, nearTextureCoords*gTexture3UVTile)*Input.TextureWeights.z;
    nearColor += tex2D(texture4Sampler, nearTextureCoords*gTexture4UVTile)*Input.TextureWeights.w;

    // 有了像素的nearColor和farColor,根据混合因子blendFactor将它们混合在一起获得漫反射颜色
    float4 diffuseColor = lerp(nearColor, farColor, blendFactor);

    // 将最终输出的颜色设为0
    float3 finalColor = 0;

    // 归一化法线
    float3 N = normalize(Input.WorldNormal);

	//----------------------------
	//	遍历所有光源
	//----------------------------
	for(int i=0; i < gTotalLights; i++)
	{
		// 只处理可用的光源
		if(gLights[i].enabled)
		{
			finalColor+= CalculateSingleLight(gLights[i], Input.WorldPosition, N,diffuseColor,gMaterialSpecular,gMaterialSpecPower);
		}
	}

	//----------------------------------------
	//	添加环境光颜色和自发光颜色
	//----------------------------------------
	finalColor += (gAmbient * diffuseColor.rgb);
	finalColor += gMaterialEmissive;

	//---------------------------------------------------------------------------------
	//	如果打开雾化,则计算雾化颜色
	//---------------------------------------------------------------------------------
	if(gFogEnabled)
		finalColor = LinearFog(finalColor, Input.WorldPosition);

	return float4(finalColor, diffuseColor.a);
}

technique MultiTextured
{
    pass Pass0
    {
        VertexShader = compile vs_3_0 MultiTexturedVS();
        PixelShader = compile ps_3_0 MultiTexturedPS();
    }
}
具体解释还是请参见3D系列4.4 多纹理地形和3D系列4.5 在靠近相机的地方添加更多细节,还有代码的注释。
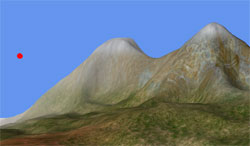
单元测试截图如下:
发布时间:2010/4/29 16:08:55 阅读次数:7879