30.公告牌BillboardSceneNode类
BillboardSceneNode类的代码主要参考自3.11 Billboarding:在3D世界绘制2D图像使它们总是面向相机,使用的是这篇文章中的第二个方法,即在GPU中实现Billboard,只实现了圆柱形Billboard。代码如下:
namespace StunEngine.SceneNodes
{
    ///
    /// BillboardSceneNode是一个始终朝向相机的带纹理的平面。
    ///
    public class BillboardSceneNode :GenericMaterialSceneNode
    {

        ///
        /// BillboardSceneNode旋转轴方向,默认为向上
        ///
        private Vector3 allowedRotDir = Vector3.Up ;

        ///
        /// 获取或设置BillboardSceneNode旋转轴方向,默认为向上
        ///
        public Vector3 AllowedRotDir
        {
            get { return allowedRotDir; }
            set
            {
                allowedRotDir = value;
                material.EffectInstance.Parameters["gAllowedRotDir"].SetValue(allowedRotDir);
            }
        }

        ///
        /// 创建一个BillboardSceneNode对象。
        ///
        /// 引擎
        /// 所属场景
        /// 漫反射纹理名称
        public BillboardSceneNode(StunXnaGE engine, Scene setScene,string setDiffuseTextureName)
            : base(engine, setScene, setDiffuseTextureName, Vector2 .One , null, Vector2 .Zero )
        {
            // 设置材质和默认effect参数
            material.CurrentTechniqueName  ="CylBillboard";
            material.EffectInstance.Parameters["gAllowedRotDir"].SetValue(allowedRotDir);
        }

        ///
        /// 初始化
        ///
        public override void Initialize()
        {
            this.UpdateOrder = SceneNodeOrdering.TransparentNode.GetValue();
            base.Initialize();
            // 创建Billboard顶点数据
            this.mesh =MeshBuilder .CreatBillBoard (engine .GraphicsDevice );
        }

        public override int Draw(GameTime gameTime, bool useReflection)
        {
            int tris = base.Draw(gameTime, useReflection);

            // 绘制完成后需将图形设备的状态重置为默认值
            engine.GraphicsDevice.RenderState.AlphaBlendEnable = false;
            engine.GraphicsDevice.RenderState.DepthBufferWriteEnable = true;
            engine.GraphicsDevice.RenderState.AlphaTestEnable = false;

            //返回绘制的三角形数量
            return tris;
        }

        #region 单元测试

#if DEBUG

        ///
        /// 测试BillboardSceneNode类
        ///
        public static void TestBillboardSceneNode()
        {
            TestGame.Start("测试BillboardSceneNode类",
                delegate
                {
                    for (int x = -6; x <= 6;x+=2)
                        for (float  y=1f;y<=13;y+=2)
                            for (int z=-6;z<=6;z+=2)
                    {
                        BillboardSceneNode bb = new BillboardSceneNode(TestGame.engine, TestGame.scene, "Textures\\tree");
                        TestGame.scene.AddNode(bb);
                        Vector3 position = new Vector3(x, y, z);
                        bb.Pose.SetPosition(ref position);
                    }

                    TestGame.scene.IsShowMouse = false;
                });
        }
#endif
        #endregion
    }
}
在MeshBuilder中的静态方法CreatBillBoard中创建billboard的顶点,这个方法与创建平面顶点的方法类似,不同之处在于顶点坐标默认为(0,0,0),实际顶点坐标是根据该顶点的纹理坐标在shader中自动计算得出的,代码如下:
////// 创建BillBoard /// /// 图形设备 ///public static Mesh CreatBillBoard(GraphicsDevice g) { VertexDeclaration bbVertexDeclaration = new VertexDeclaration(g, VertexPositionNormalTexture.VertexElements); //创建地形4个顶点 VertexPositionNormalTexture[] bbVertices = new VertexPositionNormalTexture[4]; Vector3 center = Vector3.Zero ; // 左下顶点 bbVertices[0].Position = center; bbVertices[0].TextureCoordinate = new Vector2(0, 1); bbVertices[0].Normal = Vector3.Backward; // 左上顶点 bbVertices[1].Position = center; bbVertices[1].TextureCoordinate = new Vector2(0, 0); bbVertices[1].Normal = Vector3.Backward; // 右下顶点 bbVertices[2].Position = center; bbVertices[2].TextureCoordinate = new Vector2(1, 1); bbVertices[2].Normal = Vector3.Backward; // 右上顶点 bbVertices[3].Position = center; bbVertices[3].TextureCoordinate = new Vector2(1, 0); bbVertices[3].Normal = Vector3.Backward; // 创建顶点缓冲和索引缓冲 VertexBuffer bbVertexBuffer = new VertexBuffer(g, VertexPositionNormalTexture.SizeInBytes * bbVertices.Length, BufferUsage.WriteOnly); bbVertexBuffer.SetData(bbVertices, 0, 4); return new Mesh(PrimitiveType.TriangleStrip, bbVertexBuffer, bbVertexDeclaration, 4, 2); }
真正有趣的部分在effect文件中,我把它放在了Generic.fx中:
// Billboard的旋转轴
uniform extern float3 gAllowedRotDir;

// Billboard使用额顶点着色器输入结构
struct BBVS_INPUT
{
    float3 Position : POSITION0;
    float2 TexCoord : TEXCOORD0;
};

// Billboard使用额顶点着色器输出结构
struct BBVS_OUTPUT
{
    float4 Position : POSITION0;
    float2 TexCoord : TEXCOORD0;
};

//------- Technique: CylBillboard --------
BBVS_OUTPUT CylBillboardVS(BBVS_INPUT Input)
{
	BBVS_OUTPUT Output = (BBVS_OUTPUT)0;

	// 将billboard的中心点位置根据世界矩阵平移,世界矩阵的第4行前三个数字就是x,y,z方向的平移
	float3 center=gWorld._m30_m31_m32;

	// 计算相机指向中心点的向量
	float3 eyeVector = center - gCameraPos;

	// 根据billboard的向上方向计算向右方向
	float3 upVector = gAllowedRotDir;
	upVector = normalize(upVector);
	float3 sideVector = cross(eyeVector,upVector);
	sideVector = normalize(sideVector);

	// 根据顶点的纹理坐标计算顶点的坐标
	// 例如顶点的纹理坐标是(0,0)表示这个顶点位于左上角,由下面的代码可以计算出它的坐标为(-0.5,0.5,0)
	// 还要施加缩放。缩放的数据位于世界矩阵的对角线上,即第一行第一个数据是x方向的缩放值,第二行第二个数据是y方向的缩放
	float3 finalPosition = center;
	finalPosition += (Input.TexCoord.x-0.5f)*sideVector*gWorld._m00;
	finalPosition += (0.5f-Input.TexCoord.y)*upVector*gWorld._m11;

	float4 finalPosition4 = float4(finalPosition, 1);

	float4x4 preViewProjection = mul (gView, gProjection);
	Output.Position = mul(finalPosition4, preViewProjection);

	Output.TexCoord = Input.TexCoord;

	return Output;
}

float4 BillboardPS(BBVS_OUTPUT Input) : COLOR0
{
	return tex2D(textureSampler, Input.TexCoord);
}

technique CylBillboard
{
	// 首先绘制billboard中不透明的像素,本例中为alpha值大于245的像素
	pass RenderOpaquePixels
    {
        VertexShader = compile vs_3_0 CylBillboardVS();
        PixelShader = compile ps_3_0 BillboardPS();

        AlphaBlendEnable = false;

        AlphaTestEnable = true;
        AlphaFunc = Greater;
        AlphaRef = 245;

        ZEnable = true;
        ZWriteEnable = true;
    }
	// 然后绘制billboard中透明的像素,本例中为alpha值小于245的像素
    pass RenderAlphaBlendedFringes
    {
        VertexShader = compile vs_3_0 CylBillboardVS();
        PixelShader = compile ps_3_0 BillboardPS();

        AlphaBlendEnable = true;
        SrcBlend = SrcAlpha;
        DestBlend = InvSrcAlpha;

        AlphaTestEnable = true;
        AlphaFunc = LessEqual;
        AlphaRef = 245;

        ZEnable = true;
        ZWriteEnable = false;
    }
}
为了简单起见,billboard并没有实现光照,如果想实现并不难,可参考Generic.fx中的TexturedLights的做法。
让billboard始终面向相机的方法位于顶点着色器中,具体解释可参见3.11 Billboarding:在3D世界绘制2D图像使它们总是面向相机,在这篇文章的最后还介绍了如何通过在自定义顶点格式中添加一个Vector4改变billboard的大小,但我的引擎中billboard大小是存储在节点的pose的世界矩阵中的,所以处理方法有所不同,请见代码中的注释。
最后,因为billboard通常包含透明部分,要让它们正确显示需要使用一些技巧,具体解释请参见3D系列4.17 设置Alpha混合的Renderstate,核心思想就是每个billboard都要绘制两次,一次只绘制不透明部分,第二次再绘制透明部分。3D系列4.17 设置Alpha混合的Renderstate这个操作是在Draw方法中进行的,我把这个操作移到了shader的technique CylBillboard中,第一个Pass绘制不透明部分,第二个Pass绘制透明部分,这个方法是参考自XNA官网的billboard示例:http://creators.xna.com/en-US/sample/billboard,源代码BillboardSample.rar下载。以上两种方法结果是相同的,帧数也差不多。
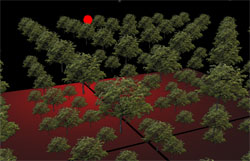
单元测试截图如下:
发布时间:2010/4/28 8:05:01 阅读次数:7667