DirectX 10 教程22:绘制到纹理
原文地址:Tutorial 22: Render to Texture(http://www.rastertek.com/dx10tut22.html)。
源代码下载:dx10tut22.zip。
本教程介绍如何实现绘制到纹理,代码基于教程7绘制3D模型和教程11绘制2D图像。
绘制到纹理可以将场景绘制到纹理中而不是通常的后备缓存中,然后你就可以使用这张纹理实现许多效果。例如,你可以从相机的不同角度绘制场景,然后将绘制的纹理作为一个镜像或小屏幕。你也可以对这张纹理进行后期处理或使用shader进行绘制获取独特的效果。利用绘制到纹理所能达到的效果几乎是无限的,因此它也几乎是DirectX 10中威力最大的工具。
但是,因为你将场景绘制了多遍,所以绘制到纹理开销也是巨大的。3D引擎往往在这个阶段开始速度降低,但是相比于它能达到的效果还是物有所值的。
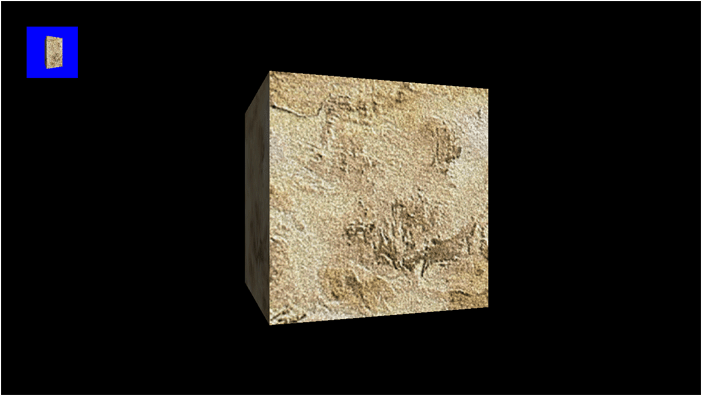
本教程中我们首先将一个旋转的立方体绘制到纹理中,然后将这张纹理绘制到屏幕左上角。立方体也会绘制到屏幕上。纹理的背景设为蓝色。首先看一下更新过的框架。
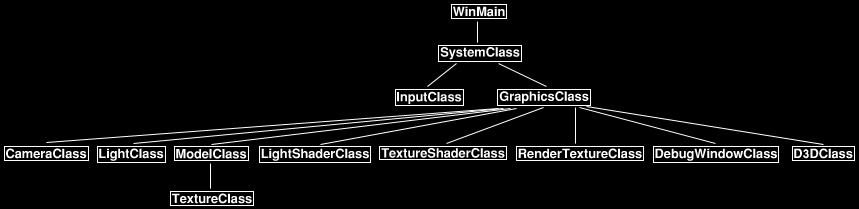
框架
框架中新添了RenderTextureClass和DebugWindowClass。RenderTextureClass封装了DirectX 10中绘制到纹理的功能。DebugWindowClass只是前面教程中BitmapClass类修改个名称而已,但是没有包含纹理,因为我们需要将绘制的纹理作为参数传递到这个类中。我将它命名为DebugWindowClass的原因是我经常使用这个类帮助我调试shader的效果,它可以帮助我看到shader每个阶段的效果。
Rendertextureclass.h
RenderTextureClass将渲染目标设置到纹理而不是常规的后备缓存,还可以从这个类获取以ID3D10ShaderResourceView形式.得到的纹理数据。
////////////////////////////////////////////////////////////////////////////////
// Filename: rendertextureclass.h
////////////////////////////////////////////////////////////////////////////////
#ifndef _RENDERTEXTURECLASS_H_
#define _RENDERTEXTURECLASS_H_


//////////////
// INCLUDES //
//////////////
#include <d3d10.h>


////////////////////////////////////////////////////////////////////////////////
// Class name: RenderTextureClass
////////////////////////////////////////////////////////////////////////////////
class RenderTextureClass
{
public:
	RenderTextureClass();
	RenderTextureClass(const RenderTextureClass&);
	~RenderTextureClass();

	bool Initialize(ID3D10Device*, int, int);
	void Shutdown();

	void SetRenderTarget(ID3D10Device*, ID3D10DepthStencilView*);
	void ClearRenderTarget(ID3D10Device*, ID3D10DepthStencilView*, float, float, float, float);
	ID3D10ShaderResourceView* GetShaderResourceView();

private:
	ID3D10Texture2D* m_renderTargetTexture;
	ID3D10RenderTargetView* m_renderTargetView;
	ID3D10ShaderResourceView* m_shaderResourceView;
};

#endif
Rendertextureclass.cpp
////////////////////////////////////////////////////////////////////////////////
// Filename: rendertextureclass.cpp
////////////////////////////////////////////////////////////////////////////////
#include "rendertextureclass.h"
构造函数中将私有指针初始化为null。
RenderTextureClass::RenderTextureClass()
{
	m_renderTargetTexture = 0;
	m_renderTargetView = 0;
	m_shaderResourceView = 0;
}


RenderTextureClass::RenderTextureClass(const RenderTextureClass& other)
{
}


RenderTextureClass::~RenderTextureClass()
{
}
Initialize方法的参数width和height表示要绘制的纹理的大小。注意:如果绘制的是整个屏幕,必须将渲染目标的长宽比设置得和屏幕一样,否则图像会变形。
首先设置纹理描述创建一个渲染目标纹理,然后使用这张纹理创建一个渲染目标视图,这样这张纹理就会以渲染目标的形式进行绘制。最后创建纹理的shader资源视图,这样调用对象就可以访问到这个数据了。
bool RenderTextureClass::Initialize(ID3D10Device* device, int textureWidth, int textureHeight)
{
	D3D10_TEXTURE2D_DESC textureDesc;
	HRESULT result;
	D3D10_RENDER_TARGET_VIEW_DESC renderTargetViewDesc;
	D3D10_SHADER_RESOURCE_VIEW_DESC shaderResourceViewDesc;


	// Initialize the render target texture description.
	ZeroMemory(&textureDesc, sizeof(textureDesc));

	// Setup the render target texture description.
	textureDesc.Width = textureWidth;
	textureDesc.Height = textureHeight;
	textureDesc.MipLevels = 1;
	textureDesc.ArraySize = 1;
	textureDesc.Format = DXGI_FORMAT_R32G32B32A32_FLOAT;
	textureDesc.SampleDesc.Count = 1;
	textureDesc.Usage = D3D10_USAGE_DEFAULT;
	textureDesc.BindFlags = D3D10_BIND_RENDER_TARGET | D3D10_BIND_SHADER_RESOURCE;
	textureDesc.CPUAccessFlags = 0;
    textureDesc.MiscFlags = 0;

	// Create the render target texture.
	result = device->CreateTexture2D(&textureDesc, NULL, &m_renderTargetTexture);
	if(FAILED(result))
	{
		return false;
	}

	// Setup the description of the render target view.
	renderTargetViewDesc.Format = textureDesc.Format;
	renderTargetViewDesc.ViewDimension = D3D10_RTV_DIMENSION_TEXTURE2D;
	renderTargetViewDesc.Texture2D.MipSlice = 0;

	// Create the render target view.
	result = device->CreateRenderTargetView(m_renderTargetTexture, &renderTargetViewDesc, &m_renderTargetView);
	if(FAILED(result))
	{
		return false;
	}

	// Setup the description of the shader resource view.
	shaderResourceViewDesc.Format = textureDesc.Format;
	shaderResourceViewDesc.ViewDimension = D3D10_SRV_DIMENSION_TEXTURE2D;
	shaderResourceViewDesc.Texture2D.MostDetailedMip = 0;
	shaderResourceViewDesc.Texture2D.MipLevels = 1;

	// Create the shader resource view.
	result = device->CreateShaderResourceView(m_renderTargetTexture, &shaderResourceViewDesc, &m_shaderResourceView);
	if(FAILED(result))
	{
		return false;
	}

	return true;
}
Shutdown释放创建的三个接口。
void RenderTextureClass::Shutdown()
{
	if(m_shaderResourceView)
	{
		m_shaderResourceView->Release();
		m_shaderResourceView = 0;
	}

	if(m_renderTargetView)
	{
		m_renderTargetView->Release();
		m_renderTargetView = 0;
	}

	if(m_renderTargetTexture)
	{
		m_renderTargetTexture->Release();
		m_renderTargetTexture = 0;
	}

	return;
}
SetRenderTarget方法将这个类中的渲染目标视图作为当前所有图形绘制的目标。
void RenderTextureClass::SetRenderTarget(ID3D10Device* device, ID3D10DepthStencilView* depthStencilView)
{
	// Bind the render target view and depth stencil buffer to the output render pipeline.
	device->OMSetRenderTargets(1, &m_renderTargetView, depthStencilView);

	return;
}
ClearRenderTarget类似于D3DClass::BeginScene方法,只不过它操作的对象是这个类中的渲染目标视图,这个方法每帧都需要在绘制到渲染目标前进行调用。
void RenderTextureClass::ClearRenderTarget(ID3D10Device* device, ID3D10DepthStencilView* depthStencilView,
										   float red, float green, float blue, float alpha)
{
	float color[4];


	// Setup the color to clear the buffer to.
	color[0] = red;
	color[1] = green;
	color[2] = blue;
	color[3] = alpha;

	// Clear the back buffer.
	device->ClearRenderTargetView(m_renderTargetView, color);

	// Clear the depth buffer.
	device->ClearDepthStencilView(depthStencilView, D3D10_CLEAR_DEPTH, 1.0f, 0);

	return;
}
GetShaderResourceView方法以shader资源视图的方式返回绘制到纹理的数据,这样绘制到渲染目标视图的数据就可以作为一张纹理被其他shader使用。你通常会直接将一张纹理传递到shader中,但现在可以调用这个方法达到同样的效果。
ID3D10ShaderResourceView* RenderTextureClass::GetShaderResourceView()
{
	return m_shaderResourceView;
}
Debugwindowclass.h
DebugWindowClass几乎就是BitmapClass,但没有了TextureClass类。代码和前面教程中的BitmapClass几乎一样,所以这个类的详细解释可参见前面的教程。
////////////////////////////////////////////////////////////////////////////////
// Filename: debugwindowclass.h
////////////////////////////////////////////////////////////////////////////////
#ifndef _DEBUGWINDOWCLASS_H_
#define _DEBUGWINDOWCLASS_H_


//////////////
// INCLUDES //
//////////////
#include <d3d10.h>
#include <d3dx10.h>


////////////////////////////////////////////////////////////////////////////////
// Class name: DebugWindowClass
////////////////////////////////////////////////////////////////////////////////
class DebugWindowClass
{
private:
	struct VertexType
	{
		D3DXVECTOR3 position;
	    D3DXVECTOR2 texture;
	};

public:
	DebugWindowClass();
	DebugWindowClass(const DebugWindowClass&);
	~DebugWindowClass();

	bool Initialize(ID3D10Device*, int, int, int, int);
	void Shutdown();
	bool Render(ID3D10Device*, int, int);

	int GetIndexCount();

private:
	bool InitializeBuffers(ID3D10Device*);
	void ShutdownBuffers();
	bool UpdateBuffers(int, int);
	void RenderBuffers(ID3D10Device*);

private:
	ID3D10Buffer *m_vertexBuffer, *m_indexBuffer;
	int m_vertexCount, m_indexCount;
	int m_screenWidth, m_screenHeight;
	int m_bitmapWidth, m_bitmapHeight;
	int m_previousPosX, m_previousPosY;
};

#endif
Debugwindowclass.cpp
////////////////////////////////////////////////////////////////////////////////
// Filename: debugwindowclass.cpp
////////////////////////////////////////////////////////////////////////////////
#include "debugwindowclass.h"


DebugWindowClass::DebugWindowClass()
{
	m_vertexBuffer = 0;
	m_indexBuffer = 0;
}


DebugWindowClass::DebugWindowClass(const DebugWindowClass& other)
{
}


DebugWindowClass::~DebugWindowClass()
{
}


bool DebugWindowClass::Initialize(ID3D10Device* device, int screenWidth, int screenHeight, int bitmapWidth, int bitmapHeight)
{
	bool result;


	// Store the screen size.
	m_screenWidth = screenWidth;
	m_screenHeight = screenHeight;

	// Store the size in pixels that this bitmap should be rendered at.
	m_bitmapWidth = bitmapWidth;
	m_bitmapHeight = bitmapHeight;

	// Initialize the previous rendering position to zero.
	m_previousPosX = 0;
	m_previousPosY = 0;

	// Initialize the vertex and index buffer that hold the geometry for the triangle.
	result = InitializeBuffers(device);
	if(!result)
	{
		return false;
	}

	return true;
}


void DebugWindowClass::Shutdown()
{
	// Release the vertex and index buffers.
	ShutdownBuffers();

	return;
}


bool DebugWindowClass::Render(ID3D10Device* device, int positionX, int positionY)
{
	bool result;


	// Re-build the dynamic vertex buffer for rendering to possibly a different location on the screen.
	result = UpdateBuffers(positionX, positionY);
	if(!result)
	{
		return false;
	}

	// Put the vertex and index buffers on the graphics pipeline to prepare them for drawing.
	RenderBuffers(device);

	return true;
}


int DebugWindowClass::GetIndexCount()
{
	return m_indexCount;
}


bool DebugWindowClass::InitializeBuffers(ID3D10Device* device)
{
	VertexType* vertices;
	unsigned long* indices;
	D3D10_BUFFER_DESC vertexBufferDesc, indexBufferDesc;
    D3D10_SUBRESOURCE_DATA vertexData, indexData;
	HRESULT result;
	int i;


	// Set the number of vertices in the vertex array.
	m_vertexCount = 6;

	// Set the number of indices in the index array.
	m_indexCount = m_vertexCount;

	// Create the vertex array.
	vertices = new VertexType[m_vertexCount];
	if(!vertices)
	{
		return false;
	}

	// Create the index array.
	indices = new unsigned long[m_indexCount];
	if(!indices)
	{
		return false;
	}

	// Initialize vertex array to zeros at first.
	memset(vertices, 0, (sizeof(VertexType) * m_vertexCount));

	// Load the index array with data.
	for(i=0; i<m_indexCount; i++)
	{
		indices[i] = i;
	}

	// Set up the description of the dynamic vertex buffer.
    vertexBufferDesc.Usage = D3D10_USAGE_DYNAMIC;
    vertexBufferDesc.ByteWidth = sizeof(VertexType) * m_vertexCount;
    vertexBufferDesc.BindFlags = D3D10_BIND_VERTEX_BUFFER;
    vertexBufferDesc.CPUAccessFlags = D3D10_CPU_ACCESS_WRITE;
    vertexBufferDesc.MiscFlags = 0;

	// Give the subresource structure a pointer to the vertex data.
    vertexData.pSysMem = vertices;

	// Now finally create the vertex buffer.
    result = device->CreateBuffer(&vertexBufferDesc, &vertexData, &m_vertexBuffer);
	if(FAILED(result))
	{
		return false;
	}

	// Set up the description of the index buffer.
    indexBufferDesc.Usage = D3D10_USAGE_DEFAULT;
    indexBufferDesc.ByteWidth = sizeof(unsigned long) * m_indexCount;
    indexBufferDesc.BindFlags = D3D10_BIND_INDEX_BUFFER;
    indexBufferDesc.CPUAccessFlags = 0;
    indexBufferDesc.MiscFlags = 0;

	// Give the subresource structure a pointer to the index data.
    indexData.pSysMem = indices;

	// Create the index buffer.
	result = device->CreateBuffer(&indexBufferDesc, &indexData, &m_indexBuffer);
	if(FAILED(result))
	{
		return false;
	}

	// Release the arrays now that the vertex and index buffers have been created and loaded.
	delete [] vertices;
	vertices = 0;

	delete [] indices;
	indices = 0;

	return true;
}


void DebugWindowClass::ShutdownBuffers()
{
	// Release the index buffer.
	if(m_indexBuffer)
	{
		m_indexBuffer->Release();
		m_indexBuffer = 0;
	}

	// Release the vertex buffer.
	if(m_vertexBuffer)
	{
		m_vertexBuffer->Release();
		m_vertexBuffer = 0;
	}

	return;
}


bool DebugWindowClass::UpdateBuffers(int positionX, int positionY)
{
	float left, right, top, bottom;
	VertexType* vertices;
	void* verticesPtr;
	HRESULT result;


	// If the position we are rendering this bitmap to has not changed then don't update the vertex buffer since it
	// currently has the correct parameters.
	if((positionX == m_previousPosX) && (positionY == m_previousPosY))
	{
		return true;
	}

	// If it has changed then update the position it is being rendered to.
	m_previousPosX = positionX;
	m_previousPosY = positionY;

	// Calculate the screen coordinates of the left side of the bitmap.
	left = (float)((m_screenWidth / 2) * -1) + (float)positionX;

	// Calculate the screen coordinates of the right side of the bitmap.
	right = left + (float)m_bitmapWidth;

	// Calculate the screen coordinates of the top of the bitmap.
	top = (float)(m_screenHeight / 2) - (float)positionY;

	// Calculate the screen coordinates of the bottom of the bitmap.
	bottom = top - (float)m_bitmapHeight;

	// Create the vertex array.
	vertices = new VertexType[m_vertexCount];
	if(!vertices)
	{
		return false;
	}

	// Load the vertex array with data.
	// First triangle.
	vertices[0].position = D3DXVECTOR3(left, top, 0.0f);  // Top left.
	vertices[0].texture = D3DXVECTOR2(0.0f, 0.0f);

	vertices[1].position = D3DXVECTOR3(right, bottom, 0.0f);  // Bottom right.
	vertices[1].texture = D3DXVECTOR2(1.0f, 1.0f);

	vertices[2].position = D3DXVECTOR3(left, bottom, 0.0f);  // Bottom left.
	vertices[2].texture = D3DXVECTOR2(0.0f, 1.0f);

	// Second triangle.
	vertices[3].position = D3DXVECTOR3(left, top, 0.0f);  // Top left.
	vertices[3].texture = D3DXVECTOR2(0.0f, 0.0f);

	vertices[4].position = D3DXVECTOR3(right, top, 0.0f);  // Top right.
	vertices[4].texture = D3DXVECTOR2(1.0f, 0.0f);

	vertices[5].position = D3DXVECTOR3(right, bottom, 0.0f);  // Bottom right.
	vertices[5].texture = D3DXVECTOR2(1.0f, 1.0f);

	// Initialize the vertex buffer pointer to null first.
	verticesPtr = 0;

	// Lock the vertex buffer.
	result = m_vertexBuffer->Map(D3D10_MAP_WRITE_DISCARD, 0, (void**)&verticesPtr);
	if(FAILED(result))
	{
		return false;
	}

	// Copy the data into the vertex buffer.
	memcpy(verticesPtr, (void*)vertices, (sizeof(VertexType) * m_vertexCount));

	// Unlock the vertex buffer.
	m_vertexBuffer->Unmap();

	// Release the vertex array as it is no longer needed.
	delete [] vertices;
	vertices = 0;

	return true;
}


void DebugWindowClass::RenderBuffers(ID3D10Device* device)
{
	unsigned int stride;
	unsigned int offset;


	// Set vertex buffer stride and offset.
    stride = sizeof(VertexType);
	offset = 0;

	// Set the vertex buffer to active in the input assembler so it can be rendered.
	device->IASetVertexBuffers(0, 1, &m_vertexBuffer, &stride, &offset);

    // Set the index buffer to active in the input assembler so it can be rendered.
    device->IASetIndexBuffer(m_indexBuffer, DXGI_FORMAT_R32_UINT, 0);

    // Set the type of primitive that should be rendered from this vertex buffer, in this case triangles.
    device->IASetPrimitiveTopology(D3D10_PRIMITIVE_TOPOLOGY_TRIANGLELIST);

	return;
}
D3dclass.h
D3Dclass的变化很小。
//////////////////////////////////////////////////////////////////////////////// // Filename: d3dclass.h //////////////////////////////////////////////////////////////////////////////// #ifndef _D3DCLASS_H_ #define _D3DCLASS_H_ ///////////// // LINKING // ///////////// #pragma comment(lib, "d3d10.lib") #pragma comment(lib, "d3dx10.lib") #pragma comment(lib, "dxgi.lib") ////////////// // INCLUDES // ////////////// #include#include //////////////////////////////////////////////////////////////////////////////// // Class name: D3DClass //////////////////////////////////////////////////////////////////////////////// class D3DClass { public: D3DClass(); D3DClass(const D3DClass&); ~D3DClass(); bool Initialize(int, int, bool, HWND, bool, float, float); void Shutdown(); void BeginScene(float, float, float, float); void EndScene(); ID3D10Device* GetDevice();
添加一个新方法用于访问深度模板视图。
	ID3D10DepthStencilView* GetDepthStencilView();

	void GetProjectionMatrix(D3DXMATRIX&);
	void GetWorldMatrix(D3DXMATRIX&);
	void GetOrthoMatrix(D3DXMATRIX&);

	void TurnZBufferOn();
	void TurnZBufferOff();
新添了一个方法用于设置渲染目标。
	void SetBackBufferRenderTarget();

private:
	bool m_vsync_enabled;
	ID3D10Device* m_device;
	IDXGISwapChain* m_swapChain;
	ID3D10RenderTargetView* m_renderTargetView;
	ID3D10Texture2D* m_depthStencilBuffer;
	ID3D10DepthStencilState* m_depthStencilState;
	ID3D10DepthStencilView* m_depthStencilView;
	ID3D10RasterizerState* m_rasterState;
	D3DXMATRIX m_projectionMatrix;
	D3DXMATRIX m_worldMatrix;
	D3DXMATRIX m_orthoMatrix;
	ID3D10DepthStencilState* m_depthDisabledStencilState;
};

#endif
D3dclass.cpp
下面的代码只包含与上一个教程不同的部分。
////////////////////////////////////////////////////////////////////////////////
// Filename: d3dclass.cpp
////////////////////////////////////////////////////////////////////////////////
#include "d3dclass.h"
GetDepthStencilView让调用对象可以访问深度模板视图。
ID3D10DepthStencilView* D3DClass::GetDepthStencilView()
{
	return m_depthStencilView;
}
SetBackBufferRenderTarget方法会将这个类中的后备缓存作为当前的渲染目标,这个方法通常在绘制到纹理完成后进行,此时我们需要重新将场景绘制到后备缓存中。
void D3DClass::SetBackBufferRenderTarget()
{
	// Bind the render target view and depth stencil buffer to the output render pipeline.
	m_device->OMSetRenderTargets(1, &m_renderTargetView, m_depthStencilView);

	return;
}
Graphicsclass.h
////////////////////////////////////////////////////////////////////////////////
// Filename: graphicsclass.h
////////////////////////////////////////////////////////////////////////////////
#ifndef _GRAPHICSCLASS_H_
#define _GRAPHICSCLASS_H_


/////////////
// GLOBALS //
/////////////
const bool FULL_SCREEN = true;
const bool VSYNC_ENABLED = true;
const float SCREEN_DEPTH = 1000.0f;
const float SCREEN_NEAR = 0.1f;


///////////////////////
// MY CLASS INCLUDES //
///////////////////////
#include "d3dclass.h"
#include "cameraclass.h"
#include "modelclass.h"
#include "lightshaderclass.h"
#include "lightclass.h"
#include "rendertextureclass.h"
#include "debugwindowclass.h"
#include "textureshaderclass.h"


////////////////////////////////////////////////////////////////////////////////
// Class name: GraphicsClass
////////////////////////////////////////////////////////////////////////////////
class GraphicsClass
{
public:
	GraphicsClass();
	GraphicsClass(const GraphicsClass&);
	~GraphicsClass();

	bool Initialize(int, int, HWND);
	void Shutdown();
	bool Frame();
	bool Render();
新添了两个私有方法,我们需要将绘制分成两个pass(一次绘制到纹理,一次普通绘制)。
private:
	void RenderToTexture();
	void RenderScene();

private:
	D3DClass* m_D3D;
	CameraClass* m_Camera;
	ModelClass* m_Model;
	LightShaderClass* m_LightShader;
	LightClass* m_Light;
	RenderTextureClass* m_RenderTexture;
	DebugWindowClass* m_DebugWindow;
	TextureShaderClass* m_TextureShader;
};

#endif
Graphicsclass.cpp
下面的代码只包含与上一个教程不同的部分。
////////////////////////////////////////////////////////////////////////////////
// Filename: graphicsclass.cpp
////////////////////////////////////////////////////////////////////////////////
#include "graphicsclass.h"
在构造函数中将私有变量初始化为null。
GraphicsClass::GraphicsClass()
{
	m_D3D = 0;
	m_Camera = 0;
	m_Model = 0;
	m_LightShader = 0;
	m_Light = 0;
	m_RenderTexture = 0;
	m_DebugWindow = 0;
	m_TextureShader = 0;
}


GraphicsClass::GraphicsClass(const GraphicsClass& other)
{
}


GraphicsClass::~GraphicsClass()
{
}


bool GraphicsClass::Initialize(int screenWidth, int screenHeight, HWND hwnd)
{
	bool result;


	// Create the Direct3D object.
	m_D3D = new D3DClass;
	if(!m_D3D)
	{
		return false;
	}

	// Initialize the Direct3D object.
	result = m_D3D->Initialize(screenWidth, screenHeight, VSYNC_ENABLED, hwnd, FULL_SCREEN, SCREEN_DEPTH, SCREEN_NEAR);
	if(!result)
	{
		MessageBox(hwnd, L"Could not initialize Direct3D.", L"Error", MB_OK);
		return false;
	}

	// Create the camera object.
	m_Camera = new CameraClass;
	if(!m_Camera)
	{
		return false;
	}

	// Create the model object.
	m_Model = new ModelClass;
	if(!m_Model)
	{
		return false;
	}

	// Initialize the model object.
	result = m_Model->Initialize(m_D3D->GetDevice(), L"../Engine/data/seafloor.dds", "../Engine/data/cube.txt");
	if(!result)
	{
		MessageBox(hwnd, L"Could not initialize the model object.", L"Error", MB_OK);
		return false;
	}

	// Create the light shader object.
	m_LightShader = new LightShaderClass;
	if(!m_LightShader)
	{
		return false;
	}

	// Initialize the light shader object.
	result = m_LightShader->Initialize(m_D3D->GetDevice(), hwnd);
	if(!result)
	{
		MessageBox(hwnd, L"Could not initialize the light shader object.", L"Error", MB_OK);
		return false;
	}

	// Create the light object.
	m_Light = new LightClass;
	if(!m_Light)
	{
		return false;
	}

	// Initialize the light object.
	m_Light->SetDiffuseColor(1.0f, 1.0f, 1.0f, 1.0f);
	m_Light->SetDirection(0.0f, 0.0f, 1.0f);
创建并初始化render to texture对象。初始化的参数中纹理的大小我使用的是屏幕的大小,表示我想将整个屏幕的画面绘制到相同大小的纹理中。
	// Create the render to texture object.
	m_RenderTexture = new RenderTextureClass;
	if(!m_RenderTexture)
	{
		return false;
	}

	// Initialize the render to texture object.
	result = m_RenderTexture->Initialize(m_D3D->GetDevice(), screenWidth, screenHeight);
	if(!result)
	{
		return false;
	}
创建并初始化debug window对象。注意我将窗口大小设置为100x100,显然这样做会使图像变形,想要不变形,你只需将上述大小的长宽比设置得和屏幕的长宽比一致即可。
	// Create the debug window object.
	m_DebugWindow = new DebugWindowClass;
	if(!m_DebugWindow)
	{
		return false;
	}

	// Initialize the debug window object.
	result = m_DebugWindow->Initialize(m_D3D->GetDevice(), screenWidth, screenHeight, 100, 100);
	if(!result)
	{
		MessageBox(hwnd, L"Could not initialize the debug window object.", L"Error", MB_OK);
		return false;
	}

	// Create the texture shader object.
	m_TextureShader = new TextureShaderClass;
	if(!m_TextureShader)
	{
		return false;
	}

	// Initialize the texture shader object.
	result = m_TextureShader->Initialize(m_D3D->GetDevice(), hwnd);
	if(!result)
	{
		MessageBox(hwnd, L"Could not initialize the texture shader object.", L"Error", MB_OK);
		return false;
	}

	return true;
}


void GraphicsClass::Shutdown()
{
	// Release the texture shader object.
	if(m_TextureShader)
	{
		m_TextureShader->Shutdown();
		delete m_TextureShader;
		m_TextureShader = 0;
	}
在Shutdown方法中释放DebugWindowClass和RenderTextureClass对象。
	// Release the debug window object.
	if(m_DebugWindow)
	{
		m_DebugWindow->Shutdown();
		delete m_DebugWindow;
		m_DebugWindow = 0;
	}

	// Release the render to texture object.
	if(m_RenderTexture)
	{
		m_RenderTexture->Shutdown();
		delete m_RenderTexture;
		m_RenderTexture = 0;
	}

	// Release the light object.
	if(m_Light)
	{
		delete m_Light;
		m_Light = 0;
	}

	// Release the light shader object.
	if(m_LightShader)
	{
		m_LightShader->Shutdown();
		delete m_LightShader;
		m_LightShader = 0;
	}

	// Release the model object.
	if(m_Model)
	{
		m_Model->Shutdown();
		delete m_Model;
		m_Model = 0;
	}

	// Release the camera object.
	if(m_Camera)
	{
		delete m_Camera;
		m_Camera = 0;
	}

	// Release the Direct3D object.
	if(m_D3D)
	{
		m_D3D->Shutdown();
		delete m_D3D;
		m_D3D = 0;
	}

	return;
}


bool GraphicsClass::Frame()
{
	// Set the position of the camera.
	m_Camera->SetPosition(0.0f, 0.0f, -5.0f);

	return true;
}


bool GraphicsClass::Render()
{
	D3DXMATRIX worldMatrix, viewMatrix, orthoMatrix;
	bool result;
第一个pass绘制到纹理。
	// Render the entire scene to the texture first.
	RenderToTexture();
第二个pass进行普通的绘制。
	// Clear the buffers to begin the scene.
	m_D3D->BeginScene(0.0f, 0.0f, 0.0f, 1.0f);

	// Render the scene as normal to the back buffer.
	RenderScene();
绘制完成后将debug window作为2D图像绘制在屏幕50x50的位置。
	// Turn off the Z buffer to begin all 2D rendering.
	m_D3D->TurnZBufferOff();

	// Get the world, view, and ortho matrices from the camera and d3d objects.
	m_D3D->GetWorldMatrix(worldMatrix);
	m_Camera->GetViewMatrix(viewMatrix);
	m_D3D->GetOrthoMatrix(orthoMatrix);

	// Put the debug window vertex and index buffers on the graphics pipeline to prepare them for drawing.
	result = m_DebugWindow->Render(m_D3D->GetDevice(), 50, 50);
	if(!result)
	{
		return false;
	}

	// Render the debug window using the texture shader.
	m_TextureShader->Render(m_D3D->GetDevice(), m_DebugWindow->GetIndexCount(), worldMatrix, viewMatrix, orthoMatrix,
							m_RenderTexture->GetShaderResourceView());

	// Turn the Z buffer back on now that all 2D rendering has completed.
	m_D3D->TurnZBufferOn();

	// Present the rendered scene to the screen.
	m_D3D->EndScene();

	return true;
}
RenderToTexture方法将渲染目标视图作为当前的渲染目标,绘制完毕后使用D3Dclass对象将渲染目标重新设置为后备缓存。
void GraphicsClass::RenderToTexture()
{
	// Set the render target to be the render to texture.
	m_RenderTexture->SetRenderTarget(m_D3D->GetDevice(), m_D3D->GetDepthStencilView());
将渲染纹理的背景清除为蓝色,这样我们就可以把它与常规的场景绘制区分开来。
	// Clear the render to texture.
	m_RenderTexture->ClearRenderTarget(m_D3D->GetDevice(), m_D3D->GetDepthStencilView(), 0.0f, 0.0f, 1.0f, 1.0f);

	// Render the scene now and it will draw to the render to texture instead of the back buffer.
	RenderScene();

	// Reset the render target back to the original back buffer and not the render to texture anymore.
	m_D3D->SetBackBufferRenderTarget();

	return;
}
RenderScene方法绘制整个场景。本教程中我们在RenderToTexture中调用它一次,将场景绘制到一张纹理中。然后再Render方法中再调用一次将场景绘制到常规的后备缓存中。
void GraphicsClass::RenderScene()
{
	D3DXMATRIX worldMatrix, viewMatrix, projectionMatrix;
	static float rotation = 0.0f;


	// Generate the view matrix based on the camera's position.
	m_Camera->Render();

	// Get the world, view, and projection matrices from the camera and d3d objects.
	m_D3D->GetWorldMatrix(worldMatrix);
	m_Camera->GetViewMatrix(viewMatrix);
	m_D3D->GetProjectionMatrix(projectionMatrix);

	// Update the rotation variable each frame.
	rotation += (float)D3DX_PI * 0.005f;
	if(rotation > 360.0f)
	{
		rotation -= 360.0f;
	}

	D3DXMatrixRotationY(&worldMatrix, rotation);

	// Put the model vertex and index buffers on the graphics pipeline to prepare them for drawing.
	m_Model->Render(m_D3D->GetDevice());

	// Render the model using the light shader.
	m_LightShader->Render(m_D3D->GetDevice(), m_Model->GetIndexCount(), worldMatrix, viewMatrix, projectionMatrix,
						  m_Model->GetTexture(), m_Light->GetDirection(), m_Light->GetDiffuseColor());

	return;
}
总结
现在你理解了绘制到纹理的基本方法。
练习
1.编译并运行程序,你会看到一个旋转的立方体,并且在屏幕左上角显示一个蓝色背景的小立方体,这是绘制到纹理的效果。
2.修改debug window,使它的长宽比与屏幕的长宽比相同。
3.修改3D场景,确认也能正确地绘制到纹理。
4.修改相机的观察角度观察效果。
5.使用这个纹理作为你自己的shader的输入并改变输出结果(例如添加噪点、扫描行等效果)。
文件下载(已下载 1158 次)发布时间:2012/8/10 0:28:54 阅读次数:10910