DirectX 10 教程4:Buffers,Shaders和HLSL
原文地址:Tutorial 4: Buffers, Shaders, and HLSL(http://www.rastertek.com/dx10tut04.html)。
源代码下载:dx10tut04.zip。
本教程介绍如何在DirectX 10编写顶点着色器和像素着色器,还会介绍如何使用顶点缓存和索引缓存,这些都是需要理解的最基本的概念。
顶点缓存
第一个要理解的概念是顶点缓存(vertex buffer)。要理解这个概念可以先看一下一个3D的球模型:
3D球模型实际上是由几百个三角形构成的,如下图所示:
每个三角形有三个点,我们称之为顶点。要绘制球模型,我们需要将所有顶点放置到一个称为顶点缓存的特殊数据数组中,之后就可以将顶点缓存发送到GPU绘制模型了。
索引缓存
索引缓存与顶点缓存密切相关,它记录的是顶点在缓存中的位置,GPU就可以使用索引快速地在顶点缓存中找到指定的顶点。索引缓存的概念类似于书中使用的索引,它可以帮助你快速地找到要想的文章。DirectX SDK文档还指出使用索引缓存还可以增加显存中顶点数据缓存的命中率。因此强烈推荐使用索引缓存提高性能。
顶点着色器
顶点着色器是一些小程序,主要用于将顶点缓存中的顶点变换到3D空间。同时它还进行另外的操作,例如计算顶点的法线。顶点着色器由GPU调用处理每个顶点。例如,一个拥有5000个多边形的模型每帧会调用15000次顶点着色器,因此如果程序的帧频为60fps的话,那么你的顶点着色器每秒会调用900,000次,所以编写有效率的顶点着色器是很重要的。
像素着色器
像素着色器是一些小程序,主要用于赋予多边形颜色。像素着色器由GPU调用处理每个可见像素。赋予颜色,光照,纹理和大多数你想施加在多边形表面的效果都是由像素着色器处理的。
HLSL
HLSL是用来编写顶点和像素着色器程序的语言。它的语法与C语言类似。HLSL程序文件是由全局变量,类型定义,顶点着色器,像素着色器和几何着色器组成的。本教程我们只编写一个非常简单的HLSL程序用来入门。
更新的框架
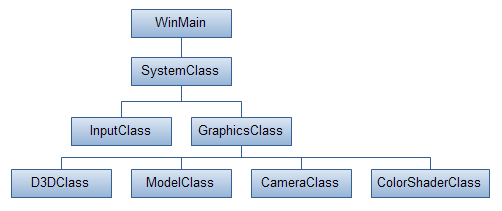
本教程的框架需要更新。GraphicsClass中添加了三个新类:CameraClass,ModelClass和ColorShaderClass。CameraClass生成视矩阵,它处理相机在世界空间的位置并传入shader中。ModelClass处理3D模型的几何数据。本教程中3D模型只是一个简单的三角形。ColorShaderClass负责调用HLSL shader在屏幕上绘制模型。首先让我们看一下HLSL shader编程。
Color.fx
这是我们的第一个shader程序。Shader是进行模型绘制操作的小程序。本例中的shader用HLSL编写,存储在color.fx文件中。这个shader的目的就是绘制一个三角形。
////////////////////////////////////////////////////////////////////////////////
// Filename: color.fx
////////////////////////////////////////////////////////////////////////////////
Shader中的全局变量可以让我们从外部访问并修改。例如我们可以在GraphicsClass中设置这三个矩阵,然后将它们传递到shader,这样就可以被ColorVertexShader使用了。你可以使用很多类型的变量,例如整数int或浮点数float。
/////////////
// GLOBALS //
/////////////
matrix worldMatrix;
matrix viewMatrix;
matrix projectionMatrix;
类似于C,我们也可以创建自己的数据类型。我们可以使用不同类型的变量使shader编程更容易更易读。本例中我们创建了包含x,y,z,w位置信息的矢量和red,green,blue,alpha颜色信息的结构体。POSITION,COLOR和SV_POSITION是语义,告知GPU变量的用途。这里必须创建两个不同的结构,因为虽然结构相同,但顶点着色器和像素着色器的语义是不同的。POSITION用于顶点着色器,而SV_POSITION用于像素着色器,COLOR两个着色器都适用。如果你想使用一个以上相同类型的变量,需要在后面添加一个数字,例如COLOR0,COLOR1。
//////////////
// TYPEDEFS //
//////////////
struct VertexInputType
{
    float4 position : POSITION;
    float4 color : COLOR;
};

struct PixelInputType
{
    float4 position : SV_POSITION;
    float4 color : COLOR;
};
当顶点着色器处理从顶点缓存发送的数据时由GPU调用,对每个顶点缓存中的顶点都会调用一次名为ColorVertexShader的顶点着色器程序。顶点着色器的输入必须与顶点缓存的格式和shader源文件的类型定义(本例中为VertexInputType)匹配。顶点着色器的输出发送到像素着色器。本例中输出类型叫做PixelInputType。顶点着色器首先创建了一个PixelInputType类型的变量。然后将输入的位置数据乘以世界、观察和投影矩阵。之后复制输入的颜色,然后返回输出结构体作为像素着色器的输入。因为我们只读取位置的XYZ分量,所以将输入位置的w分量手动设置为1。
////////////////////////////////////////////////////////////////////////////////
// Vertex Shader
////////////////////////////////////////////////////////////////////////////////
PixelInputType ColorVertexShader(VertexInputType input)
{
    PixelInputType output;


	// Change the position vector to be 4 units for proper matrix calculations.
    input.position.w = 1.0f;

	// Calculate the position of the vertex against the world, view, and projection matrices.
    output.position = mul(input.position, worldMatrix);
    output.position = mul(output.position, viewMatrix);
    output.position = mul(output.position, projectionMatrix);

	// Store the input color for the pixel shader to use.
    output.color = input.color;

	return output;
}
像素着色器绘制多边形上的每个像素。在像素着色器中使用PixelInputType作为输入,输出为float4表示最终的像素颜色。本例中我们告知像素着色器输出的颜色与输入的颜色相同。注意,像素着色器输入来自于顶点着色器的输出。
////////////////////////////////////////////////////////////////////////////////
// Pixel Shader
////////////////////////////////////////////////////////////////////////////////
float4 ColorPixelShader(PixelInputType input) : SV_Target
{
    return input.color;
}
Technique才是实际的“shader”。它用来绘制多边形和调用顶点、像素着色器。你可以将它想象成HLSL shader的main()方法。你可以设置多个pass,调用不同的顶点和像素着色器创建所需的效果。本例中我们只使用一个简单的pass,只调用一次前面定义的顶点和像素着色器。本教程不使用几何着色器。我们通过将SetVertexShader第一个参数设置为vs_4_0使顶点着色器设置为版本4.0,这样我们可以访问对应4.0版本的DirectX 10 HLSL的函数。同理也将像素着色器设置为4.0版本。
////////////////////////////////////////////////////////////////////////////////
// Technique
////////////////////////////////////////////////////////////////////////////////
technique10 ColorTechnique
{
    pass pass0
    {
        SetVertexShader(CompileShader(vs_4_0, ColorVertexShader()));
        SetPixelShader(CompileShader(ps_4_0, ColorPixelShader()));
        SetGeometryShader(NULL);
    }
}
Modelclass.h
ModelClass负责封装3D模型的几何数据。本教程中我们手动创建三角形的顶点数据,我还创建了一个顶点缓存和索引缓存用于绘制三角形。
////////////////////////////////////////////////////////////////////////////////
                    // Filename: modelclass.h
                    ////////////////////////////////////////////////////////////////////////////////
                    #ifndef _MODELCLASS_H_ #define _MODELCLASS_H_ ////////////// // INCLUDES //
                    ////////////// #include &ly;d3d10.h>
                    #include <d3dx10math.h>


                    ////////////////////////////////////////////////////////////////////////////////
                    // Class name: ModelClass
                    ////////////////////////////////////////////////////////////////////////////////
                    class ModelClass { private:
下面是顶点类型定义,注意这个定义需要匹配下面的ColorShaderClass中的定义。
struct VertexType
	{
		D3DXVECTOR3 position;
	    D3DXVECTOR4 color;
	};

public:
	ModelClass();
	ModelClass(const ModelClass&);
	~ModelClass();
下面两个方法处理模型顶点缓存和索引缓存的初始化和清除。Render方法将模型几何数据发送到显卡做好被shader绘制的准备。
	bool Initialize(ID3D10Device*);
	void Shutdown();
	void Render(ID3D10Device*);

	int GetIndexCount();

private:
	bool InitializeBuffers(ID3D10Device*);
	void ShutdownBuffers();
	void RenderBuffers(ID3D10Device*);
ModelClass中的私有变量为顶点缓存和索引缓存,以及两个整数保存缓存的大小。所有DirectX 10缓存通常使用ID3D10Buffer类型,当缓存创建时,通常由一个缓存描述进行定义。
private:
	ID3D10Buffer *m_vertexBuffer, *m_indexBuffer;
	int m_vertexCount, m_indexCount;
};

#endif
Modelclass.cpp
////////////////////////////////////////////////////////////////////////////////
// Filename: modelclass.cpp
////////////////////////////////////////////////////////////////////////////////
#include "modelclass.h"
构造函数将顶点和索引缓存初始化为null。
ModelClass::ModelClass()
{
	m_vertexBuffer = 0;
	m_indexBuffer = 0;
}


ModelClass::ModelClass(const ModelClass& other)
{
}


ModelClass::~ModelClass()
{
}
Initialize方法会调用顶点和索引缓存的初始化方法。
bool ModelClass::Initialize(ID3D10Device* device)
{
	bool result;


	// Initialize the vertex and index buffer that hold the geometry for the triangle.
	result = InitializeBuffers(device);
	if(!result)
	{
		return false;
	}

	return true;
}
Shutdown方法调用顶点和索引缓存的清除方法。
void ModelClass::Shutdown()
{
	// Release the vertex and index buffers.
	ShutdownBuffers();

	return;
}
Render从GraphicsClass::Render方法调用。它调用RenderBuffers将顶点和索引缓存绑定到图形管线,这样shader才能绘制它们。
void ModelClass::Render(ID3D10Device* device)
{
	// Put the vertex and index buffers on the graphics pipeline to prepare them for drawing.
	RenderBuffers(device);

	return;
}
GetIndexCount返回索引的大小,ColorShader类需要这个信息绘制模型。
int ModelClass::GetIndexCount()
{
	return m_indexCount;
}
在InitializeBuffers方法中创建顶点和索引缓存。通常你会读取一个模型从数据中创建缓存。本教程中因为只有一个三角形,所以是手动在顶点和索引缓存中设置了三个顶点。
bool ModelClass::InitializeBuffers(ID3D10Device* device)
{
	VertexType* vertices;
	unsigned long* indices;
	D3D10_BUFFER_DESC vertexBufferDesc, indexBufferDesc;
    D3D10_SUBRESOURCE_DATA vertexData, indexData;
	HRESULT result;
首先创建两个临时数组保存顶点和索引数据。
	// Set the number of vertices in the vertex array.
	m_vertexCount = 3;

	// Set the number of indices in the index array.
	m_indexCount = 3;

	// Create the vertex array.
	vertices = new VertexType[m_vertexCount];
	if(!vertices)
	{
		return false;
	}

	// Create the index array.
	indices = new unsigned long[m_indexCount];
	if(!indices)
	{
		return false;
	}
现在在两个数组中填充三角形的三个顶点和每个顶点的索引。请注意按顺时针方向的顺序创建顶点,如果是逆时针则会认为三角形面向相反方向,在背面剔除时就不会绘制这个三角形了。在顶点定义中还包含颜色信息,我设置为绿色。
	// Load the vertex array with data.
	vertices[0].position = D3DXVECTOR3(-1.0f, -1.0f, 0.0f);  // Bottom left.
	vertices[0].color = D3DXVECTOR4(0.0f, 1.0f, 0.0f, 1.0f);

	vertices[1].position = D3DXVECTOR3(0.0f, 1.0f, 0.0f);  // Top middle.
	vertices[1].color = D3DXVECTOR4(0.0f, 1.0f, 0.0f, 1.0f);

	vertices[2].position = D3DXVECTOR3(1.0f, -1.0f, 0.0f);  // Bottom right.
	vertices[2].color = D3DXVECTOR4(0.0f, 1.0f, 0.0f, 1.0f);

	// Load the index array with data.
	indices[0] = 0;  // Bottom left.
	indices[1] = 1;  // Top middle.
	indices[2] = 2;  // Bottom right.
填充好顶点和索引数组后,就可以在此基础上创建顶点和索引缓存了,创建缓存的方法是类似的。首先填充一个缓存描述,在描述中必须正确指定ByteWidth(缓存大小)和BindFlags(缓存类型)。然后还需要一个subresource pointer指向顶点或索引数组。最后调用D3D设备的CreateBuffer方法返回新缓存的指针。
	// Set up the description of the vertex buffer.
    vertexBufferDesc.Usage = D3D10_USAGE_DEFAULT;
    vertexBufferDesc.ByteWidth = sizeof(VertexType) * m_vertexCount;
    vertexBufferDesc.BindFlags = D3D10_BIND_VERTEX_BUFFER;
    vertexBufferDesc.CPUAccessFlags = 0;
    vertexBufferDesc.MiscFlags = 0;

	// Give the subresource structure a pointer to the vertex data.
    vertexData.pSysMem = vertices;

	// Now finally create the vertex buffer.
    result = device->CreateBuffer(&vertexBufferDesc, &vertexData, &m_vertexBuffer);
	if(FAILED(result))
	{
		return false;
	}

	// Set up the description of the index buffer.
    indexBufferDesc.Usage = D3D10_USAGE_DEFAULT;
    indexBufferDesc.ByteWidth = sizeof(unsigned long) * m_indexCount;
    indexBufferDesc.BindFlags = D3D10_BIND_INDEX_BUFFER;
    indexBufferDesc.CPUAccessFlags = 0;
    indexBufferDesc.MiscFlags = 0;

	// Give the subresource structure a pointer to the index data.
    indexData.pSysMem = indices;

	// Create the index buffer.
	result = device->CreateBuffer(&indexBufferDesc, &indexData, &m_indexBuffer);
	if(FAILED(result))
	{
		return false;
	}
创建了顶点和索引缓存后就可以删除顶点和索引数组了,因为这些数据已经复制到了缓存中,这两个数组就不需要了。
	// Release the arrays now that the vertex and index buffers have been created and loaded.
	delete [] vertices;
	vertices = 0;

	delete [] indices;
	indices = 0;

	return true;
}
ShutdownBuffers方法用于释放顶点缓存和索引缓存。
void ModelClass::ShutdownBuffers()
{
	// Release the index buffer.
	if(m_indexBuffer)
	{
		m_indexBuffer->Release();
		m_indexBuffer = 0;
	}

	// Release the vertex buffer.
	if(m_vertexBuffer)
	{
		m_vertexBuffer->Release();
		m_vertexBuffer = 0;
	}

	return;
}
RenderBuffers从Render方法中调用。这个方法将顶点和索引缓存在GPU输入处理中激活。当GPU中有了一个激活的顶点缓存后,就可以使用HLSL shader绘制这个缓存。这个方法还定义了绘制缓存的方式,方式有三角形列表、线、三角扇形等多种方式。本例中我们使用DirectX的IASetPrimitiveTopology方法告知GPU以三角形列表的形式绘制缓存。
void ModelClass::RenderBuffers(ID3D10Device* device)
{
	unsigned int stride;
	unsigned int offset;


	// Set vertex buffer stride and offset.
    stride = sizeof(VertexType);
	offset = 0;

	// Set the vertex buffer to active in the input assembler so it can be rendered.
	device->IASetVertexBuffers(0, 1, &m_vertexBuffer, &stride, &offset);

    // Set the index buffer to active in the input assembler so it can be rendered.
    device->IASetIndexBuffer(m_indexBuffer, DXGI_FORMAT_R32_UINT, 0);

    // Set the type of primitive that should be rendered from this vertex buffer, in this case triangles.
    device->IASetPrimitiveTopology(D3D10_PRIMITIVE_TOPOLOGY_TRIANGLELIST);

	return;
}
Colorshaderclass.h
ColorShaderClass用来调用HLSL shader绘制3D模型。
//////////////////////////////////////////////////////////////////////////////// // Filename: colorshaderclass.h //////////////////////////////////////////////////////////////////////////////// #ifndef _COLORSHADERCLASS_H_ #define _COLORSHADERCLASS_H_ ////////////// // INCLUDES // ////////////// #include#include #include using namespace std; //////////////////////////////////////////////////////////////////////////////// // Class name: ColorShaderClass //////////////////////////////////////////////////////////////////////////////// class ColorShaderClass { public: ColorShaderClass(); ColorShaderClass(const ColorShaderClass&); ~ColorShaderClass();
下面的方法用于shader的初始化和关闭。Render方法设置shader参数并使用shader绘制模型顶点。
	bool Initialize(ID3D10Device*, HWND);
	void Shutdown();
	void Render(ID3D10Device*, int, D3DXMATRIX, D3DXMATRIX, D3DXMATRIX);

private:
	bool InitializeShader(ID3D10Device*, HWND, WCHAR*);
	void ShutdownShader();
	void OutputShaderErrorMessage(ID3D10Blob*, HWND, WCHAR*);

	void SetShaderParameters(D3DXMATRIX, D3DXMATRIX, D3DXMATRIX);
	void RenderShader(ID3D10Device*, int);

private:
	ID3D10Effect* m_effect;
	ID3D10EffectTechnique* m_technique;
	ID3D10InputLayout* m_layout;

	ID3D10EffectMatrixVariable* m_worldMatrixPtr;
	ID3D10EffectMatrixVariable* m_viewMatrixPtr;
	ID3D10EffectMatrixVariable* m_projectionMatrixPtr;
};

#endif
Colorshaderclass.cpp
////////////////////////////////////////////////////////////////////////////////
// Filename: colorshaderclass.cpp
////////////////////////////////////////////////////////////////////////////////
#include "colorshaderclass.h"
与往常一样,在构造函数中将所有私有指针设置为null。
ColorShaderClass::ColorShaderClass()
{
	m_effect = 0;
	m_technique = 0;
	m_layout = 0;

	m_worldMatrixPtr = 0;
	m_viewMatrixPtr = 0;
	m_projectionMatrixPtr = 0;
}


ColorShaderClass::ColorShaderClass(const ColorShaderClass& other)
{
}


ColorShaderClass::~ColorShaderClass()
{
}
Initialize方法调用InitializeShader方法初始化shader,参数为HLSL shader文件名称,本例中为color.fx。
bool ColorShaderClass::Initialize(ID3D10Device* device, HWND hwnd)
{
	bool result;


	// Initialize the shader that will be used to draw the triangle.
	result = InitializeShader(device, hwnd, L"../Engine/color.fx");
	if(!result)
	{
		return false;
	}

	return true;
}
Shutdown方法调用ShutdownShader方法清除shader。
void ColorShaderClass::Shutdown()
{
	// Shutdown the shader effect.
	ShutdownShader();

	return;
}
Render方法首先使用SetShaderParameters方法设置shader参数。然后调用RenderShader绘制绿色的三角形。
void ColorShaderClass::Render(ID3D10Device* device, int indexCount, D3DXMATRIX worldMatrix, D3DXMATRIX viewMatrix, D3DXMATRIX projectionMatrix)
{
	// Set the shader parameters that it will use for rendering.
	SetShaderParameters(worldMatrix, viewMatrix, projectionMatrix);

	// Now render the prepared buffers with the shader.
	RenderShader(device, indexCount);

	return;
}
首先是InitializeShader方法。这个方法加载了shader文件使之可用于DirectX和GPU。你可以看到如何创建布局,顶点缓存数据如何绑定到GPU上的图形管线。布局需要与定义在modelclass.h中的VertexType和color.fx中的定义匹配。
bool ColorShaderClass::InitializeShader(ID3D10Device* device, HWND hwnd, WCHAR* filename)
{
	HRESULT result;
	ID3D10Blob* errorMessage;
	D3D10_INPUT_ELEMENT_DESC polygonLayout[2];
	unsigned int numElements;
    D3D10_PASS_DESC passDesc;


	// Initialize the error message.
	errorMessage = 0;
下面的代码将shader程序编译到effect。参数为shader文件名称,shader版本(DirectX 10中为4.0),要编译到的effect指针。如果编译失败,则将出错信息保存到errorMessage字符串。如果仍然失败并且没有errorMessage字符串,则说明没有找到shader文件,这时会弹出一个对话框加以说明。
	// Load the shader in from the file.
	result = D3DX10CreateEffectFromFile(filename, NULL, NULL, "fx_4_0", D3D10_SHADER_ENABLE_STRICTNESS, 0,
										device, NULL, NULL, &m_effect, &errorMessage, NULL);
	if(FAILED(result))
	{
		// If the shader failed to compile it should have writen something to the error message.
		if(errorMessage)
		{
			OutputShaderErrorMessage(errorMessage, hwnd, filename);
		}
		// If there was  nothing in the error message then it simply could not find the shader file itself.
		else
		{
			MessageBox(hwnd, filename, L"Missing Shader File", MB_OK);
		}

		return false;
	}
正确地编译了shader之后,我们就可以使用这个effect获取shader中的technique了。我们会使用technique进行绘制。
	// Get a pointer to the technique inside the shader.
	m_technique = m_effect->GetTechniqueByName("ColorTechnique");
	if(!m_technique)
	{
		return false;
	}
下一步是创建顶点数据的设置。这个shader使用了一个位置向量和一个颜色向量,我们需要在设置中定义两者的大小。语义名称第一个被填充,它可以让shader知道元素的用途,本例中第一个元素使用语义POSITION,第二个使用COLOR。第二个是格式,位置矢量使用DXGI_FORMAT_R32G32B32_FLOAT,颜色使用DXGI_FORMAT_R32G32B32A32_FLOAT。最后是AlignedByteOffset,表示数据如如何被放置到缓存中。本例中,位置数据使用12个字节,接下来16个字节用于颜色。AlignedByteOffset表示每个元素的偏移。你可以使用D3D10_APPEND_ALIGNED_ELEMENT代替AlignedByteOffset中的具体值,它会帮你设置平移量。其他设置我保持默认,不再详细说明。
	// Now setup the layout of the data that goes into the shader.
	// This setup needs to match the VertexType stucture in the ModelClass and in the shader.
	polygonLayout[0].SemanticName = "POSITION";
	polygonLayout[0].SemanticIndex = 0;
	polygonLayout[0].Format = DXGI_FORMAT_R32G32B32_FLOAT;
	polygonLayout[0].InputSlot = 0;
	polygonLayout[0].AlignedByteOffset = 0;
	polygonLayout[0].InputSlotClass = D3D10_INPUT_PER_VERTEX_DATA;
	polygonLayout[0].InstanceDataStepRate = 0;

	polygonLayout[1].SemanticName = "COLOR";
	polygonLayout[1].SemanticIndex = 0;
	polygonLayout[1].Format = DXGI_FORMAT_R32G32B32A32_FLOAT;
	polygonLayout[1].InputSlot = 0;
	polygonLayout[1].AlignedByteOffset = D3D10_APPEND_ALIGNED_ELEMENT;
	polygonLayout[1].InputSlotClass = D3D10_INPUT_PER_VERTEX_DATA;
	polygonLayout[1].InstanceDataStepRate = 0;
创建了布局描述后,我们就可以获取它的大小,然后使用D3D设备创建输入布局。
	// Get a count of the elements in the layout.
    numElements = sizeof(polygonLayout) / sizeof(polygonLayout[0]);

	// Get the description of the first pass described in the shader technique.
    m_technique->GetPassByIndex(0)->GetDesc(&passDesc);

	// Create the input layout.
    result = device->CreateInputLayout(polygonLayout, numElements, passDesc.pIAInputSignature, passDesc.IAInputSignatureSize, &m_layout);
	if(FAILED(result))
	{
		return false;
	}
我们还需要获取全局矩阵的指针,这样我们就可以容易地从GraphicsClass类中设置shader中的矩阵。
	// Get pointers to the three matrices inside the shader so we can update them from this class.
    m_worldMatrixPtr = m_effect->GetVariableByName("worldMatrix")->AsMatrix();
	m_viewMatrixPtr = m_effect->GetVariableByName("viewMatrix")->AsMatrix();
    m_projectionMatrixPtr = m_effect->GetVariableByName("projectionMatrix")->AsMatrix();

	return true;
}
ShutdownShader释放所有在InitializeShader方法中创建的接口和指针。
void ColorShaderClass::ShutdownShader()
{
	// Release the pointers to the matrices inside the shader.
	m_worldMatrixPtr = 0;
	m_viewMatrixPtr = 0;
	m_projectionMatrixPtr = 0;

	// Release the pointer to the shader layout.
	if(m_layout)
	{
		m_layout->Release();
		m_layout = 0;
	}

	// Release the pointer to the shader technique.
	m_technique = 0;

	// Release the pointer to the shader.
	if(m_effect)
	{
		m_effect->Release();
		m_effect = 0;
	}

	return;
}
OutputShaderErrorMessage输出在编译顶点或像素着色器时的出错信息。
void ColorShaderClass::OutputShaderErrorMessage(ID3D10Blob* errorMessage, HWND hwnd, WCHAR* shaderFilename)
{
	char* compileErrors;
	unsigned long bufferSize, i;
	ofstream fout;


	// Get a pointer to the error message text buffer.
	compileErrors = (char*)(errorMessage->GetBufferPointer());

	// Get the length of the message.
	bufferSize = errorMessage->GetBufferSize();

	// Open a file to write the error message to.
	fout.open("shader-error.txt");

	// Write out the error message.
	for(i=0; i<bufferSize; i++)
	{
		fout << compileErrors[i];
	}

	// Close the file.
	fout.close();

	// Release the error message.
	errorMessage->Release();
	errorMessage = 0;

	// Pop a message up on the screen to notify the user to check the text file for compile errors.
	MessageBox(hwnd, L"Error compiling shader.  Check shader-error.txt for message.", shaderFilename, MB_OK);

	return;
}
SetShaderVariables方法可以方便地设置全局变量。这个方法中的矩阵在GraphicsClass中创建,然后在Render中通过这个方法将这些矩阵设置到shader中的全局矩阵。
void ColorShaderClass::SetShaderParameters(D3DXMATRIX worldMatrix, D3DXMATRIX viewMatrix, D3DXMATRIX projectionMatrix)
{
	// Set the world matrix variable inside the shader.
    m_worldMatrixPtr->SetMatrix((float*)&worldMatrix);

	// Set the view matrix variable inside the shader.
	m_viewMatrixPtr->SetMatrix((float*)&viewMatrix);

	// Set the projection matrix variable inside the shader.
    m_projectionMatrixPtr->SetMatrix((float*)&projectionMatrix);

	return;
}
RenderShader是被ColorShaderClass::Render调用的第二个方法。SetShaderParameters在之前调用,确保在调用HLSL程序前设置正确的shader参数。RenderShader将通过technique指针调用color.fx HLSL shader程序。这个方法首先在输入处理程序激活输入布局,这样GPU就知道要处理的顶点缓存的格式。第二步是从shader中获取technique,technique用于告知GPU哪个顶点和像素shader程序用来绘制顶点缓存。本例中我们获取的是来自于color.fx的ColorTechnique。然后遍历每个pass,使用D3D设备的DrawIndexed方法绘制三角形。本例中只有一个pass,但我的代码中处理的是多个pass,这是为以后的教程做准备的。
void ColorShaderClass::RenderShader(ID3D10Device* device, int indexCount)
{
    D3D10_TECHNIQUE_DESC techniqueDesc;
	unsigned int i;


	// Set the input layout.
	device->IASetInputLayout(m_layout);

	// Get the description structure of the technique from inside the shader so it can be used for rendering.
    m_technique->GetDesc(&techniqueDesc);

    // Go through each pass in the technique (should be just one currently) and render the triangles.
	for(i=0; i<techniqueDesc.Passes; ++i)
    {
        m_technique->GetPassByIndex(i)->Apply(0);
        device->DrawIndexed(indexCount, 0, 0);
    }

	return;
}
Cameraclass.h
我们已经介绍了如何编写HLSL shader,如何创建顶点和索引缓存,如何使用ColorShaderClass调用HLSL shader绘制这些缓存。现在还缺一件事:就是如何观察绘制的场景。这需要一个相机类让DirectX 10知道我们的观察信息。相机类保存相机的位置和旋转信息,然后根据信息创建视矩阵并将这个矩阵传递到HLSL shader中。
////////////////////////////////////////////////////////////////////////////////
// Filename: cameraclass.h
////////////////////////////////////////////////////////////////////////////////
#ifndef _CAMERACLASS_H_
#define _CAMERACLASS_H_


//////////////
// INCLUDES //
//////////////
#include <d3dx10math.h>


////////////////////////////////////////////////////////////////////////////////
// Class name: CameraClass
////////////////////////////////////////////////////////////////////////////////
class CameraClass
{
public:
	CameraClass();
	CameraClass(const CameraClass&);
	~CameraClass();

	void SetPosition(float, float, float);
	void SetRotation(float, float, float);

	D3DXVECTOR3 GetPosition();
	D3DXVECTOR3 GetRotation();

	void Render();
	void GetViewMatrix(D3DXMATRIX&);

private:
	float m_positionX, m_positionY, m_positionZ;
	float m_rotationX, m_rotationY, m_rotationZ;
	D3DXMATRIX m_viewMatrix;
};

#endif
CameraClass的头很简单,只包含4个方法。SetPosition和SetRotation方法用于设置相机的位置和旋转。Render用于基于相机的位置和旋转创建视矩阵。GetViewMatrix用于获取相机的视矩阵,shader需要这个信息进行绘制。
Cameraclass.cpp
////////////////////////////////////////////////////////////////////////////////
// Filename: cameraclass.cpp
////////////////////////////////////////////////////////////////////////////////
#include "cameraclass.h"
构造函数将相机的位置和旋转初始化为屏幕的原点。
CameraClass::CameraClass()
{
	m_positionX = 0.0f;
	m_positionY = 0.0f;
	m_positionZ = 0.0f;

	m_rotationX = 0.0f;
	m_rotationY = 0.0f;
	m_rotationZ = 0.0f;
}


CameraClass::CameraClass(const CameraClass& other)
{
}


CameraClass::~CameraClass()
{
}
SetPosition和SetRotation方法用于设置相机的位置和旋转。
void CameraClass::SetPosition(float x, float y, float z)
{
	m_positionX = x;
	m_positionY = y;
	m_positionZ = z;
	return;
}


void CameraClass::SetRotation(float x, float y, float z)
{
	m_rotationX = x;
	m_rotationY = y;
	m_rotationZ = z;
	return;
}
GetPosition和GetRotation方法返回相机的位置和旋转。
D3DXVECTOR3 CameraClass::GetPosition()
{
	return D3DXVECTOR3(m_positionX, m_positionY, m_positionZ);
}


D3DXVECTOR3 CameraClass::GetRotation()
{
	return D3DXVECTOR3(m_rotationX, m_rotationY, m_rotationZ);
}
Render方法使用相机的位置和旋转信息生成和更新视矩阵。我首先创建up,position,rotation等变量。然后在场景原点基于旋转的x,y,z值旋转相机。之后平移相机,使用position,lookAt和up的值通过D3DXMatrixLookAtLH方法我们就可以创建视矩阵了。
void CameraClass::Render()
{
	D3DXVECTOR3 up, position, lookAt;
	float yaw, pitch, roll;
	D3DXMATRIX rotationMatrix;


	// Setup the vector that points upwards.
	up.x = 0.0f;
	up.y = 1.0f;
	up.z = 0.0f;

	// Setup the position of the camera in the world.
	position.x = m_positionX;
	position.y = m_positionY;
	position.z = m_positionZ;

	// Setup where the camera is looking by default.
	lookAt.x = 0.0f;
	lookAt.y = 0.0f;
	lookAt.z = 1.0f;

	// Set the yaw (Y axis), pitch (X axis), and roll (Z axis) rotations in radians.
	pitch = m_rotationX * 0.0174532925f;
	yaw   = m_rotationY * 0.0174532925f;
	roll  = m_rotationZ * 0.0174532925f;

	// Create the rotation matrix from the yaw, pitch, and roll values.
	D3DXMatrixRotationYawPitchRoll(&rotationMatrix, yaw, pitch, roll);

	// Transform the lookAt and up vector by the rotation matrix so the view is correctly rotated at the origin.
	D3DXVec3TransformCoord(&lookAt, &lookAt, &rotationMatrix);
	D3DXVec3TransformCoord(&up, &up, &rotationMatrix);

	// Translate the rotated camera position to the location of the viewer.
	lookAt = position + lookAt;

	// Finally create the view matrix from the three updated vectors.
	D3DXMatrixLookAtLH(&m_viewMatrix, &position, &lookAt, &up);

	return;
}
当调用Render方法创建了视矩阵后,我们就可以使用GetViewMatrix方法将更新后的视矩阵返回给调用的函数。视矩阵是HLSL shader中三个主要的矩阵之一。
void CameraClass::GetViewMatrix(D3DXMATRIX& viewMatrix)
{
	viewMatrix = m_viewMatrix;
	return;
}
Graphicsclass.h
GraphicsClass中添加了三个新的类。CameraClass,ModelClass和ColorShaderClass的头文件和私有成员变量在此处添加。记住:GraphicsClass是绘制场景的主类,需要调用所有需要的类对象。
////////////////////////////////////////////////////////////////////////////////
// Filename: graphicsclass.h
////////////////////////////////////////////////////////////////////////////////
#ifndef _GRAPHICSCLASS_H_
#define _GRAPHICSCLASS_H_


///////////////////////
// MY CLASS INCLUDES //
///////////////////////
#include "d3dclass.h"
#include "cameraclass.h"
#include "modelclass.h"
#include "colorshaderclass.h"


/////////////
// GLOBALS //
/////////////
const bool FULL_SCREEN = true;
const bool VSYNC_ENABLED = true;
const float SCREEN_DEPTH = 1000.0f;
const float SCREEN_NEAR = 0.1f;


////////////////////////////////////////////////////////////////////////////////
// Class name: GraphicsClass
////////////////////////////////////////////////////////////////////////////////
class GraphicsClass
{
public:
	GraphicsClass();
	GraphicsClass(const GraphicsClass&);
	~GraphicsClass();

	bool Initialize(int, int, HWND);
	void Shutdown();
	bool Frame();

private:
	bool Render();

private:
	D3DClass* m_D3D;
	CameraClass* m_Camera;
	ModelClass* m_Model;
	ColorShaderClass* m_ColorShader;
};

#endif
Graphicsclass.cpp
////////////////////////////////////////////////////////////////////////////////
// Filename: graphicsclass.cpp
////////////////////////////////////////////////////////////////////////////////
#include "graphicsclass.h"
GraphicsClass的第一个变化是构造函数中将camera,model和color shader对象初始化为null。
GraphicsClass::GraphicsClass()
{
	m_D3D = 0;
	m_Camera = 0;
	m_Model = 0;
	m_ColorShader = 0;
}
Initialize方法中添加了初始化这三个新对象的代码。
bool GraphicsClass::Initialize(int screenWidth, int screenHeight, HWND hwnd)
{
	bool result;


	// Create the Direct3D object.
	m_D3D = new D3DClass;
	if(!m_D3D)
	{
		return false;
	}

	// Initialize the Direct3D object.
	result = m_D3D->Initialize(screenWidth, screenHeight, VSYNC_ENABLED, hwnd, FULL_SCREEN, SCREEN_DEPTH, SCREEN_NEAR);
	if(!result)
	{
		MessageBox(hwnd, L"Could not initialize Direct3D.", L"Error", MB_OK);
		return false;
	}

	// Create the camera object.
	m_Camera = new CameraClass;
	if(!m_Camera)
	{
		return false;
	}

	// Set the initial position of the camera.
	m_Camera->SetPosition(0.0f, 0.0f, -10.0f);

	// Create the model object.
	m_Model = new ModelClass;
	if(!m_Model)
	{
		return false;
	}

	// Initialize the model object.
	result = m_Model->Initialize(m_D3D->GetDevice());
	if(!result)
	{
		MessageBox(hwnd, L"Could not initialize the model object.", L"Error", MB_OK);
		return false;
	}

	// Create the color shader object.
	m_ColorShader = new ColorShaderClass;
	if(!m_ColorShader)
	{
		return false;
	}

	// Initialize the color shader object.
	result = m_ColorShader->Initialize(m_D3D->GetDevice(), hwnd);
	if(!result)
	{
		MessageBox(hwnd, L"Could not initialize the color shader object.", L"Error", MB_OK);
		return false;
	}

	return true;
}
Shutdown中也添加了关闭并释放这三个新对象的代码。
void GraphicsClass::Shutdown()
{
	// Release the color shader object.
	if(m_ColorShader)
	{
		m_ColorShader->Shutdown();
		delete m_ColorShader;
		m_ColorShader = 0;
	}

	// Release the model object.
	if(m_Model)
	{
		m_Model->Shutdown();
		delete m_Model;
		m_Model = 0;
	}

	// Release the camera object.
	if(m_Camera)
	{
		delete m_Camera;
		m_Camera = 0;
	}

	// Release the D3D object.
	if(m_D3D)
	{
		m_D3D->Shutdown();
		delete m_D3D;
		m_D3D = 0;
	}

	return;
}
Frame方法与前一个教程相同。
bool GraphicsClass::Frame()
{
	bool result;


	// Render the graphics scene.
	result = Render();
	if(!result)
	{
		return false;
	}

	return true;
}
Render方法中变化最大。首先还是清除后备缓存。然后调用相机的Render方法基于相机的位置创建一个视矩阵,然后从相机类获取这个视矩阵的副本。我们还从D3Dclass类获取了世界矩阵和投影矩阵的副本。然后调用ModelClass::Render方法将绿色三角形绑定到图形管道。接着调用color shader绘制顶点,这样绿色的三角形就绘制到了后备缓存,当场景完成后,我们调用EndScene将它显示在屏幕上。
bool GraphicsClass::Render()
{
	D3DXMATRIX worldMatrix, viewMatrix, projectionMatrix;


	// Clear the buffers to begin the scene.
	m_D3D->BeginScene(0.0f, 0.0f, 0.0f, 1.0f);

	// Generate the view matrix based on the camera's position.
	m_Camera->Render();

	// Get the world, view, and projection matrices from the camera and d3d objects.
	m_Camera->GetViewMatrix(viewMatrix);
	m_D3D->GetWorldMatrix(worldMatrix);
	m_D3D->GetProjectionMatrix(projectionMatrix);

	// Put the model vertex and index buffers on the graphics pipeline to prepare them for drawing.
	m_Model->Render(m_D3D->GetDevice());

	// Render the model using the color shader.
	m_ColorShader->Render(m_D3D->GetDevice(), m_Model->GetIndexCount(), worldMatrix, viewMatrix, projectionMatrix);

	// Present the rendered scene to the screen.
	m_D3D->EndScene();

	return true;
}
总结
本教程你学习了顶点和索引缓存的工作原理,如何使用HLSL编写顶点和像素着色器的代码,最后你理解了如何将这些新概念整合到框架中绘制一个绿色三角形。对绘制一个三角形来说,这个代码有点长,完全可以将它们写在一个main()方法中。但是,我用的是一个框架,这样接下来的教程只需稍作修改就可以实现更复杂的图像了。
练习
1.编译并允许代码,确认在屏幕上绘制了一个绿色的三角形,按escape退出程序。
2.将三角形颜色修改为红色。
3.将三角形变为矩形。
4.将相机位置后退10个单位。
5.将像素着色器的输出颜色的亮度减半。
文件下载(已下载 1366 次)发布时间:2012/7/15 21:54:34 阅读次数:13769