DirectX 10教程2:创建一个框架和窗口
原文地址:Tutorial 2: Creating a Framework and Window(http://www.rastertek.com/dx10tut02.html)。
源代码下载:dx10tut02.zip
在开始DirectX 10编程之前,我推荐你创建一个简单的框架,这个框架用于处理基本的窗体功能,并可以非常容易地进行扩展。因为本教程的目的是为了演示DirectX 10的各项功能,因此我会将框架的代码尽量精简。
框架
框架包含4个项目。它有一个WinMain方法处理程序的入口点,有一个system类封装了整个应用程序,并可以从WinMain方法中调用,在system类中我们还使用了一个input类处理用户输入,一个graphics类处理DirectX图形代码。框架结构如下图所示:
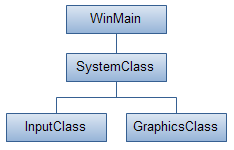
图1 框架结构
下面我们看一下在main.cpp文件中的WinMain方法。
WinMain
////////////////////////////////////////////////////////////////////////////////
// Filename: main.cpp
////////////////////////////////////////////////////////////////////////////////
#include "systemclass.h"

int WINAPI WinMain(HINSTANCE hInstance, HINSTANCE hPrevInstance, PSTR pScmdline, int iCmdshow)
{
    SystemClass* System;
    bool result;

    // 创建system对象。
    System = new SystemClass;
    if(!System)
    {
        return 0;
    }

    //初始化并运行system对象。
    result = System->Initialize();
    if(result)
    {
        System->Run();
    }

    // 关闭并释放system对象。
    System->Shutdown();

    delete System;
    System = 0;
    return 0;
}
WinMain方法相当简单。我们创建了system对象并进行初始化,如果初始化成功则调用system类的Run方法。Run方法运行自己的循环过程并执行所有的程序代码。当Run方法完成后,关闭system对象并进行清除。这样我们就简化了程序结构,将整个程序封装在了system类中。下面看一下system类的头文件。
Systemclass.h
////////////////////////////////////////////////////////////////////////////////
// Filename: systemclass.h
////////////////////////////////////////////////////////////////////////////////
#ifndef _SYSTEMCLASS_H_
#define _SYSTEMCLASS_H_
我们定义了WIN32_LEAN_AND_MEAN,这样就可以通过排除某些不常用的API减小Win32头文件,可以加速程序生成过程。
///////////////////////////////
// PRE-PROCESSING DIRECTIVES //
///////////////////////////////
#define WIN32_LEAN_AND_MEAN
需要包含Windows.h头文件,这样我们就可以调用方法创建/销毁窗口,并可以使用其他有用的win32方法。
//////////////
// INCLUDES //
//////////////
#include <windows.h>
我们还包含了框架中另两个类的头文件,这样我们就可以在system类中使用它们。
///////////////////////
// MY CLASS INCLUDES //
///////////////////////
#include "inputclass.h"
#include "graphicsclass.h"
类的定义很简单。有Initialize,Shutdown和Run方法,它们可以被定义在这个类中的WinMain调用。还有一些私有方法可以在这个方法中被调用。还包含了一个MessageHandler方法用于处理来自于windows系统的消息。最后有一些私有变量m_Input和m_Graphics指向处理输入和图形的两个对象。
////////////////////////////////////////////////////////////////////////////////
// Class name: SystemClass
////////////////////////////////////////////////////////////////////////////////
class SystemClass
{
public:
	SystemClass();
	SystemClass(const SystemClass&);
	~SystemClass();

	bool Initialize();
	void Shutdown();
	void Run();

	LRESULT CALLBACK MessageHandler(HWND, UINT, WPARAM, LPARAM);

private:
	bool Frame();
	void InitializeWindows(int&, int&);
	void ShutdownWindows();

private:
	LPCWSTR m_applicationName;
	HINSTANCE m_hinstance;
	HWND m_hwnd;

	InputClass* m_Input;
	GraphicsClass* m_Graphics;
};


/////////////////////////
// FUNCTION PROTOTYPES //
/////////////////////////
static LRESULT CALLBACK WndProc(HWND, UINT, WPARAM, LPARAM);


/////////////
// GLOBALS //
/////////////
static SystemClass* ApplicationHandle = 0;


#endif
这个类中还包含了WndProc方法和ApplicationHandle指针,这样我们就可以将窗体消息处理重定向到system类中的MessageHandler方法。下面看一下system类的源文件:
Systemclass.cpp
////////////////////////////////////////////////////////////////////////////////
// Filename: systemclass.cpp
////////////////////////////////////////////////////////////////////////////////
#include "systemclass.h"
在类的构造函数中将对象指针初始化为null。这很重要,因为如果这些对象的初始化过程失败,那么以后的Shutdown方法会试图清理这些对象,如果这个对象不为null,程序就会认为它是已经正确创建的对象,需要被清理。将所有指针和变量初始化为null是一个编程的好习惯,如果你不进行这个步骤,某些释放操作可能会失败。
SystemClass::SystemClass()
{
    m_Input = 0;
    m_Graphics = 0;
}
下面的代码我创建了一个空的复制构造函数和一个空的析构函数。在这个类中我们不需要它们,但如果没有定义,一些编译器会自动帮你生成这两个函数,所以我将它们设为空白。你还会注意到在析构函数中没有清理任何对象,这个步骤是在Shutdown方法中进行的。这样做的理由是我无法确定清理操作是否会被调用,某些windows函数(例如ExitThread())不会调用类析构函数,可能导致内存泄露。
SystemClass::SystemClass(const SystemClass& other)
{
}

SystemClass::~SystemClass()
{
}
Initialize方法处理所有设置过程。它首先调用InitializeWindows创建应用程序所需的窗体,还创建并初始化input和graphics对象,这两个对象用于处理用户输入和绘制图形。
bool SystemClass::Initialize()
{
	int screenWidth, screenHeight;
	bool result;


	// Initialize the width and height of the screen to zero before sending the variables into the function.
	screenWidth = 0;
	screenHeight = 0;

	// Initialize the windows api.
	InitializeWindows(screenWidth, screenHeight);

	// Create the input object.  This object will be used to handle reading the keyboard input from the user.
	m_Input = new InputClass;
	if(!m_Input)
	{
		return false;
	}

	// Initialize the input object.
	m_Input->Initialize();

	// Create the graphics object.  This object will handle rendering all the graphics for this application.
	m_Graphics = new GraphicsClass;
	if(!m_Graphics)
	{
		return false;
	}

	// Initialize the graphics object.
	result = m_Graphics->Initialize(screenWidth, screenHeight, m_hwnd);
	if(!result)
	{
		return false;
	}

	return true;
}
Shutdown方法用于清理工作,它关闭并释放与graphics和input对象相联系的所有对象,还关闭了窗口以及与之联系的句柄。
void SystemClass::Shutdown()
{
	// Release the graphics object.
	if(m_Graphics)
	{
		m_Graphics->Shutdown();
		delete m_Graphics;
		m_Graphics = 0;
	}

	// Release the input object.
	if(m_Input)
	{
		delete m_Input;
		m_Input = 0;
	}

	// Shutdown the window.
	ShutdownWindows();

	return;
}
在Run方法中,应用程序在循环处理中执行所有处理过程直至退出。在每个循环中都会调用Frame方法进行处理。这是一个非常重要的概念,程序的其他部分都是以这种方式编写的。伪代码如下:
当没有done时
    检查窗体系统信息
    处理系统信息
    处理应用程序循环
    检查用户是否需要在绘制过程中退出
void SystemClass::Run()
{
	MSG msg;
	bool done, result;


	// Initialize the message structure.
	ZeroMemory(&msg, sizeof(MSG));

	// Loop until there is a quit message from the window or the user.
	done = false;
	while(!done)
	{
		// Handle the windows messages.
		if(PeekMessage(&msg, NULL, 0, 0, PM_REMOVE))
		{
			TranslateMessage(&msg);
			DispatchMessage(&msg);
		}

		// If windows signals to end the application then exit out.
		if(msg.message == WM_QUIT)
		{
			done = true;
		}
		else
		{
			// Otherwise do the frame processing.
			result = Frame();
			if(!result)
			{
				done = true;
			}
		}

	}

	return;
}
Frame方法中包含了所有处理过程。目前来说非常简单,我们检查用户是否按下了Escape键退出,如果不是,则调用graphics对象绘制此帧的图像。以后我们还会在这个方法中添加更多的代码。
bool SystemClass::Frame()
{
	bool result;


	// Check if the user pressed escape and wants to exit the application.
	if(m_Input->IsKeyDown(VK_ESCAPE))
	{
		return false;
	}

	// Do the frame processing for the graphics object.
	result = m_Graphics->Frame();
	if(!result)
	{
		return false;
	}

	return true;
}
MessageHandler方法处理windows系统消息,这样我们就可以监听感兴趣的消息。目前来说,我们只是监听键盘按下或释放的信息,然后将这个信息传递到input对象中。而其他信息则返回到默认的windows消息处理程序中。
LRESULT CALLBACK SystemClass::MessageHandler(HWND hwnd, UINT umsg, WPARAM wparam, LPARAM lparam)
{
	switch(umsg)
	{
		// Check if a key has been pressed on the keyboard.
		case WM_KEYDOWN:
		{
			// If a key is pressed send it to the input object so it can record that state.
			m_Input->KeyDown((unsigned int)wparam);
			return 0;
		}

		// Check if a key has been released on the keyboard.
		case WM_KEYUP:
		{
			// If a key is released then send it to the input object so it can unset the state for that key.
			m_Input->KeyUp((unsigned int)wparam);
			return 0;
		}

		// Any other messages send to the default message handler as our application won't make use of them.
		default:
		{
			return DefWindowProc(hwnd, umsg, wparam, lparam);
		}
	}
}
在InitializeWindows方法中我们构建了窗体,这个方法以screenWidth和screenHeight为参数。我们使用了一些默认设置创建了一个无边框的空窗口。这个方法根据一个叫做FULL_SCREEN的变量创建一个小窗口或全屏窗口,如果这个变量设置为true,则生成一个全屏窗口,如果设置为false,则在屏幕中央生成一个800x600的窗口。我将FULL_SCREEN变量放置在graphicsclass.h文件顶部,后面我会解释为什么将这个变量放置在此而不是Systemclass.h的顶部。
void SystemClass::InitializeWindows(int& screenWidth, int& screenHeight)
{
	WNDCLASSEX wc;
	DEVMODE dmScreenSettings;
	int posX, posY;


	// Get an external pointer to this object.
	ApplicationHandle = this;

	// Get the instance of this application.
	m_hinstance = GetModuleHandle(NULL);

	// Give the application a name.
	m_applicationName = L"Engine";

	// Setup the windows class with default settings.
	wc.style         = CS_HREDRAW | CS_VREDRAW | CS_OWNDC;
	wc.lpfnWndProc   = WndProc;
	wc.cbClsExtra    = 0;
	wc.cbWndExtra    = 0;
	wc.hInstance     = m_hinstance;
	wc.hIcon		 = LoadIcon(NULL, IDI_WINLOGO);
	wc.hIconSm       = wc.hIcon;
	wc.hCursor       = LoadCursor(NULL, IDC_ARROW);
	wc.hbrBackground = (HBRUSH)GetStockObject(BLACK_BRUSH);
	wc.lpszMenuName  = NULL;
	wc.lpszClassName = m_applicationName;
	wc.cbSize        = sizeof(WNDCLASSEX);

	// Register the window class.
	RegisterClassEx(&wc);

	// Determine the resolution of the clients desktop screen.
	screenWidth  = GetSystemMetrics(SM_CXSCREEN);
	screenHeight = GetSystemMetrics(SM_CYSCREEN);

	// Setup the screen settings depending on whether it is running in full screen or in windowed mode.
	if(FULL_SCREEN)
	{
		// If full screen set the screen to maximum size of the users desktop and 32bit.
		memset(&dmScreenSettings, 0, sizeof(dmScreenSettings));
		dmScreenSettings.dmSize       = sizeof(dmScreenSettings);
		dmScreenSettings.dmPelsWidth  = (unsigned long)screenWidth;
		dmScreenSettings.dmPelsHeight = (unsigned long)screenHeight;
		dmScreenSettings.dmBitsPerPel = 32;
		dmScreenSettings.dmFields     = DM_BITSPERPEL | DM_PELSWIDTH | DM_PELSHEIGHT;

		// Change the display settings to full screen.
		ChangeDisplaySettings(&dmScreenSettings, CDS_FULLSCREEN);

		// Set the position of the window to the top left corner.
		posX = posY = 0;
	}
	else
	{
		// If windowed then set it to 800x600 resolution.
		screenWidth  = 800;
		screenHeight = 600;

		// Place the window in the middle of the screen.
		posX = (GetSystemMetrics(SM_CXSCREEN) - screenWidth)  / 2;
		posY = (GetSystemMetrics(SM_CYSCREEN) - screenHeight) / 2;
	}

	// Create the window with the screen settings and get the handle to it.
	m_hwnd = CreateWindowEx(WS_EX_APPWINDOW, m_applicationName, m_applicationName,
						    WS_CLIPSIBLINGS | WS_CLIPCHILDREN | WS_POPUP,
						    posX, posY, screenWidth, screenHeight, NULL, NULL, m_hinstance, NULL);

	// Bring the window up on the screen and set it as main focus.
	ShowWindow(m_hwnd, SW_SHOW);
	SetForegroundWindow(m_hwnd);
	SetFocus(m_hwnd);

	// Hide the mouse cursor.
	ShowCursor(false);

	return;
}
ShutdownWindow释放窗体和对应的句柄。
void SystemClass::ShutdownWindows()
{
	// Show the mouse cursor.
	ShowCursor(true);

	// Fix the display settings if leaving full screen mode.
	if(FULL_SCREEN)
	{
		ChangeDisplaySettings(NULL, 0);
	}

	// Remove the window.
	DestroyWindow(m_hwnd);
	m_hwnd = NULL;

	// Remove the application instance.
	UnregisterClass(m_applicationName, m_hinstance);
	m_hinstance = NULL;

	// Release the pointer to this class.
	ApplicationHandle = NULL;

	return;
}
WndProc方法接收窗体发送的消息。在初始化窗体类时,我们在InitializeWindows方法中使用wc.lpfnWndProc = WndProc告知了WndProc的名称。我在这个类中包含WndProc方法的原因是让它发送所有消息到MessageHandler方法中,这样做可以将消息处理过程直接挂钩到这个类,使代码保持简洁。
LRESULT CALLBACK WndProc(HWND hwnd, UINT umessage, WPARAM wparam, LPARAM lparam)
{
	switch(umessage)
	{
		// Check if the window is being destroyed.
		case WM_DESTROY:
		{
			PostQuitMessage(0);
			return 0;
		}

		// Check if the window is being closed.
		case WM_CLOSE:
		{
			PostQuitMessage(0);
			return 0;
		}

		// All other messages pass to the message handler in the system class.
		default:
		{
			return ApplicationHandle->MessageHandler(hwnd, umessage, wparam, lparam);
		}
	}
}
Inputclass.h
为了让这个教程保持简单,我使用了windows的输入功能(以后会有个教程介绍DirectInput)。Inputclass类处理用户的键盘输入。这个类接收的输入来自于SystemClass::MessageHandler方法。Input对象会在一个keyboard数组中储存每个键的状态,可以告知哪个键被按下。下面是代码:
////////////////////////////////////////////////////////////////////////////////
// Filename: inputclass.h
////////////////////////////////////////////////////////////////////////////////
#ifndef _INPUTCLASS_H_
#define _INPUTCLASS_H_


////////////////////////////////////////////////////////////////////////////////
// Class name: InputClass
////////////////////////////////////////////////////////////////////////////////
class InputClass
{
public:
	InputClass();
	InputClass(const InputClass&);
	~InputClass();

	void Initialize();

	void KeyDown(unsigned int);
	void KeyUp(unsigned int);

	bool IsKeyDown(unsigned int);

private:
	bool m_keys[256];
};

#endif
Inputclass.cpp
////////////////////////////////////////////////////////////////////////////////
// Filename: inputclass.cpp
////////////////////////////////////////////////////////////////////////////////
#include "inputclass.h"


InputClass::InputClass()
{
}


InputClass::InputClass(const InputClass& other)
{
}


InputClass::~InputClass()
{
}


void InputClass::Initialize()
{
	int i;


	// Initialize all the keys to being released and not pressed.
	for(i=0; i<256; i++)
	{
		m_keys[i] = false;
	}

	return;
}


void InputClass::KeyDown(unsigned int input)
{
	// If a key is pressed then save that state in the key array.
	m_keys[input] = true;
	return;
}


void InputClass::KeyUp(unsigned int input)
{
	// If a key is released then clear that state in the key array.
	m_keys[input] = false;
	return;
}


bool InputClass::IsKeyDown(unsigned int key)
{
	// Return what state the key is in (pressed/not pressed).
	return m_keys[key];
}
Graphicsclass.h
Graphics类是system类创建的另一个对象,应用程序中的所有图像功能都封装在这个类中。我还在头文件中包含了与图形相关的全局设置。目前这个类是空的,但在后面的教程中会包括所有图形对象。
//////////////////////////////////////////////////////////////////////////////// // Filename: graphicsclass.h //////////////////////////////////////////////////////////////////////////////// #ifndef _GRAPHICSCLASS_H_ #define _GRAPHICSCLASS_H_ ////////////// // INCLUDES // ////////////// #include///////////// // GLOBALS // ///////////// const bool FULL_SCREEN = false; const bool VSYNC_ENABLED = true; const float SCREEN_DEPTH = 1000.0f; const float SCREEN_NEAR = 0.1f; //////////////////////////////////////////////////////////////////////////////// // Class name: GraphicsClass //////////////////////////////////////////////////////////////////////////////// class GraphicsClass { public: GraphicsClass(); GraphicsClass(const GraphicsClass&); ~GraphicsClass(); bool Initialize(int, int, HWND); void Shutdown(); bool Frame(); private: bool Render(); private: }; #endif
Graphicsclass.cpp
因为本教程只需构建框架,所以目前这个类是空的。
////////////////////////////////////////////////////////////////////////////////
// Filename: graphicsclass.cpp
////////////////////////////////////////////////////////////////////////////////
#include "graphicsclass.h"


GraphicsClass::GraphicsClass()
{
}


GraphicsClass::GraphicsClass(const GraphicsClass& other)
{
}


GraphicsClass::~GraphicsClass()
{
}


bool GraphicsClass::Initialize(int screenWidth, int screenHeight, HWND hwnd)
{

	return true;
}


void GraphicsClass::Shutdown()
{

	return;
}


bool GraphicsClass::Frame()
{

	return true;
}


bool GraphicsClass::Render()
{

	return true;
}
总结
现在我们有了一个程序框架,可以在屏幕上显示一个窗口了。这个框架是接下来所有示例的基础,因此理解这个框架是非常重要的。你可以试着做一下练习编译代码。如果你现在还不能完全理解框架也可以进入下一个教程,在以后的教程中你可以更好地理解框架的原理。
练习
将graphicsclass.h中的参数FULL_SCREEN设置为true,然后重新编译运行代码,按下escape键退出程序。
文件下载(已下载 1027 次)发布时间:2012/7/13 12:44:25 阅读次数:10516