XNA Shader编程教程24 – 发光(Bloom)
原文地址:http://digierr.spaces.live.com/blog/cns!2B7007E9EC2AE37B!860.entry。

本教程将会实现一个发光(bloom)效果。这个shader是一个后期处理shader,可以对任意纹理施加发光效果。这个示例基于http://creators.xna.com/en-US/sample/bloom上的示例。
什么是Blooming?
当一个像素的颜色受到周围像素影响时就发生了blooming,会让这个像素变得更亮或过曝,较亮的像素边缘的较暗像素会受到较亮像素的影响,让较暗的像素损失一点细节。下图显示了使用bloom (左)和不使用bloom (右)的区别。

我们需要一些渲染目标用于实现发光效果。第一个是原始场景纹理,然后需要一张纹理包含发光效果,二张纹理包含发光场景的模糊版本。
第一个模糊纹理将发光纹理模糊一次,第二张模糊纹理再一次模糊第一张模糊纹理,这样效果更好。使用一个模糊shader并不是实现模糊的最好方法,但它已经工作得足够好了。如果你想创建一个更高级的模糊效果,可以使用“高斯模糊Gaussian blur”。
我们要做的第一件事是将正常场景绘制到一张纹理中。然后,我们需要提取原始纹理的明亮区域并将它储存在一个叫做BloomTexture 的纹理中。我们将使用一个shader用来提取明亮的颜色。这个shader的工作就是从原始场景中提取一个像素,基于一个临界值变量(threshold variable),计算这个像素的颜色是否足够明亮。
saturate((Color - Threshold) / (1 - Threshold));
临界值包含一个介于0.0和1.0之间的值,用于从Color中移除低于Threshold的颜色信息。
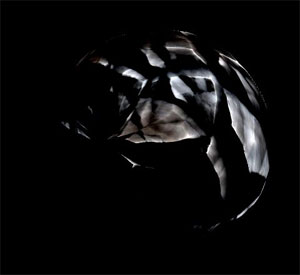
图24.3 – 发光纹理的内容
图24.3包含了发光纹理,它是基于原始纹理的,临界值为0.3f。如你所见,场景移除了暗淡的部分(基于临界值)保留了明亮的部分。
Bloom.fx的代码如下:
// This shader gets the areas that are bright. This will later be blured making bright spots "glow"
sampler TextureSampler : register(s0);

// Get the threshold of what brightness level we want to glow
float Threshold = 0.3;

float4 PixelShader(float2 texCoord : TEXCOORD0) : COLOR0
{
    float4 Color = tex2D(TextureSampler, texCoord);

    // Get the bright areas that is brighter than Threshold and return it.
    return saturate((Color - Threshold) / (1 - Threshold));

}

technique Bloom
{
    pass P0
    {
        // A post process shader only needs a pixel shader.
        PixelShader = compile ps_2_0 PixelShader();
    }
}
然后我们需要模糊场景。我们使用教程23中相同的模糊effect,但这次我们施加了2次模糊让效果更好。图24.4显示了发光纹理经过2次模糊后的效果。

最后我们需要组合原始纹理和模糊过的发光纹理。我们可以先绘制初始纹理,然后将发光纹理混合其中,但这样做效果不好,组合过程也不够灵活。所以我们需要创建一个新shader 组合这两个纹理。
这个shader有四个参数让我们可以控制组合过程,这四个参数是发光纹理和原始纹理的强度和饱和度。
// Controls the Intensity of the bloom texture
float BloomIntensity = 1.3;

// Controls the Intensity of the original scene texture
float OriginalIntensity = 1.0;

// Saturation amount on bloom
float BloomSaturation = 1.0;

// Saturation amount on original scene
float OriginalSaturation = 1.0;
我们首先设置一个默认值,但你也可以从程序中控制这些参数。
然后我们创建一个函数帮助我们处理饱和度(即一个颜色偏离灰度或自身亮度的程度)。这个函数基于一个输入参数saturation调整给定color的饱和度,函数中用到的灰度颜色用于实现一个灰度场景(灰度的实现方法可参见XNA Shader编程教程11-Post process灰度图)。
float4 AdjustSaturation(float4 color, float saturation)
{
    // We define gray as the same color we used in the grayscale shader
    float grey = dot(color, float3(0.3, 0.59, 0.11));
    return lerp(grey, color, saturation);
}
在PixelShader函数中,首先获取模糊过的发光纹理和初始纹理的颜色。
// Get our bloom pixel from bloom texture
float4 bloomColor = tex2D(BloomSampler, texCoord);

// Get our original pixel from ColorMap
float4 originalColor = tex2D(ColorMapSampler, texCoord);
然后使用AdjustSaturation函数基于添加到shader中的参数调整bloomColor和originalColor。
bloomColor = AdjustSaturation(bloomColor, BloomSaturation) * BloomIntensity;
originalColor = AdjustSaturation(originalColor, OriginalSaturation) * OriginalIntensity;
使用这些参数,我们可以让初始纹理变得非常暗,只有发光部分是明亮的。你可以调整这些参数看看效果。然后在bloomColor明亮的地方让初始纹理变暗,以避免这些区域过于明亮。
originalColor *= (1 - saturate(bloomColor));
最后一步是组合这些纹理颜色,只是简单地将它们相加。
return originalColor + bloomColor;
非常简单,不是吗?我们所做的就是组合一些简单的shader创建一个高级的effect。
CombineBloom.fx的代码如下:
// This combines the bloom texture with the original scene texture.
// BloomIntensity, OriginalIntensity, BloomSaturation and OriginalSaturation is used
// to control the blooming effect.
// This shader is based on the example in creators.xna.com, where I learned this technique.
// Our bloom texture
sampler BloomSampler : register(s0);

// Our original SceneTexture
texture ColorMap;

// Create a sampler for the ColorMap texture using lianear filtering and clamping
sampler ColorMapSampler = sampler_state
{
   Texture =
;
   MinFilter = Linear;
   MagFilter = Linear;
   MipFilter = Linear;
   AddressU  = Clamp;
   AddressV  = Clamp;
};

// Controls the Intensity of the bloom texture
float BloomIntensity = 1.3;

// Controls the Intensity of the original scene texture
float OriginalIntensity = 1.0;

// Saturation amount on bloom
float BloomSaturation = 1.0;

// Saturation amount on original scene
float OriginalSaturation = 1.0;

float4 AdjustSaturation(float4 color, float saturation)
{
    // We define gray as the same color we used in the grayscale shader
    float grey = dot(color, float3(0.3, 0.59, 0.11));
    return lerp(grey, color, saturation);
}

float4 PixelShader(float2 texCoord : TEXCOORD0) : COLOR0
{
      // Get our bloom pixel from bloom texture
      float4 bloomColor = tex2D(BloomSampler, texCoord);

      // Get our original pixel from ColorMap
      float4 originalColor = tex2D(ColorMapSampler, texCoord);

    // Adjust color saturation and intensity based on the input variables to the shader
      bloomColor = AdjustSaturation(bloomColor, BloomSaturation) * BloomIntensity;
     originalColor = AdjustSaturation(originalColor, OriginalSaturation) * OriginalIntensity;

    // make the originalColor darker in very bright areas, avoiding these areas look burned-out
    originalColor *= (1 - saturate(bloomColor));

    // Combine the two images.
   return originalColor + bloomColor;

}

technique BloomCombine
{
    pass P0
    {
        // A post process shader only needs a pixel shader.
        PixelShader = compile ps_2_0 PixelShader();
    }
}
文件下载(已下载 2142 次)
发布时间:2010/6/28 15:02:19 阅读次数:12194