Instanced Model示例
这个示例展示如何有效率地绘制相同模型的许多副本,使用GPU instancing技术减少重复绘制调用的开销。
原文地址:http://creators.xna.com/en-US/sample/meshinstancing。
示例概览
游戏经常需要绘制相同模型的多个副本,例如在场景中放置树木,在房间中放置箱子。 绘制一个模型的调用相对来说比较耗费资源,几百个模型的绘制更加耗费资源。这个示例展示了一些技术,通过使用这些技术你可以减少绘制相同模型副本的开销。
注意:没有一个最好的instancing技术。在Windows平台上实现的方法与Xbox 360并不相同。在Windows平台上,理想的技术需要shader 3.0,但也可以有一个变通的方法可以用在shader 2.0上。
这个示例实现了几种不同的instancing技术,所以可以在不同平台和不同shader版本上工作。这些instancing技术可以动态的减少CPU的工作量。它们有点不同,在某些情况下甚至会稍微加重GPU的负担。无论模型如何复杂,绘制一个模型时CPU的开销是不变的。但是,根据三角形数量和shader的复杂程度,GPU的负担会随之变化。基于这个理由,绘制具有简单shader的低精度模型的性能主要决定于CPU,使用简单shader的复杂模型的瓶颈主要在GPU上。如果GPU是瓶颈,使用instancing技术就不会带来性能提升。另外,如果模型又大又复杂,那么内存就会不够用,可能无法使用instance。所以使用相对较小和简单的模型(1000三角形或更少)时,Instancing可以带来最大的性能提升。
Instancing需要以一个特别的方式组织顶点和索引数据。XNA框架自带的Model类还不够灵活,所以这个示例实现了一个InstancedModel类。一个自定义内容管道处理器用来将模型数据从.X和.FBX格式转换为InstancedModel类。
最低Shader版本
Vertex Shader Model 2.0
Pixel Shader Model 1.1
示例控制
本示例使用以下键盘控制和手柄控制。
| 动作 | 键盘控制 | 手柄控制 |
| 改变techniques | A | A |
| 增加instances | X | X |
| 减少instances | Y | Y |
| 退出 | ESC或ALT+F4 | BACK |
工作原理
本示例实现了5个不同的技术。
- No instancing或state batching: 这与在一个循环中调用许多次ModelMesh.Draw的工作方式是相同的。
- No instancing: 不使用任何特定的GPU技巧,但在重复设置设备状态方面表现地更聪明。
- 硬件instancing:Windows shader 3.0技术。
- Shader instancing: Windows shader 2.0技术。
- VFetch instancing: Xbox 360技术。
No Instancing或State Batching
这个绘制技术完全不使用instancing,这不是一个好方法!写在这个示例中的目的在于与其他技术作比较。
这个技术只是遍历所有可用的instances,设置所有渲染状态,开始effect,然后对每个模型副本调用DrawIndexedPrimitives方法。这个操作顺序和你在一个循环中调用多次ModelMesh.Draw方法是一样的。这个technique的性能类似于使用Model类绘制多个许多instances的情况。
伪代码如下:
foreach (Matrix instance in instances)
{
    SetVertexBuffer();
    SetIndexBuffer();
    SetVertexDeclaration();

    SetWorldTransform(instance);

    effect.Begin();

    foreach (EffectPass pass in effect.CurrentTechnique.Passes)
    {
        pass.Begin();

        DrawIndexedPrimitives();

        pass.End();
    }

    effect.End();
}
你可以看到这个方法每次重复设置了相同的状态,调用了相同的effect方法。
No Instancing
严格地说这也不是一个正确的instancing技术。它只是重新安排了C#绘制代码,将重复操作提取到内部循环之外。InstancedModel.DrawInstances方法获取一个instance转换矩阵数组,而不是遍历所有instances重复相同的绘制代码,所以可以一次绘制许多相同模型的副本。这个技术的核心是在InstancedModelPart.Draw方法中实现的,这个方法创建图形设备开始effect。然后调用InstancedModelPart.DrawNoInstancing辅助方法遍历每个instance,使每个副本的重复操作降到最低。
伪代码如下:
SetVertexBuffer();
SetIndexBuffer();
SetVertexDeclaration();

effect.Begin();

foreach (EffectPass pass in effect.CurrentTechnique.Passes)
{
    pass.Begin();

    foreach (Matrix instance in instances)
    {
        SetWorldTransform(instance);
        effect.CommitChanges();

        DrawIndexedPrimitives();
    }

    pass.End();
}

effect.End();
这个技术有趣的地方在于shader完全不需要改变,因此在其他平台或使用其他shader时,其工作方式完全一样。通过更聪明地设置操作的顺序,这个方法带来了显著的性能提升。所以有这么一个经验:如果可以有特定的方法可以优化你的特定情况,就不要害怕改变XNA自带的绘制代码。
硬件Instancing
这个技术完全在GPU上处理instancing。无论绘制多少instance,CPU的负担都非常低。它只能工作在Windows平台,并且需要一块shader 3.0的显卡。
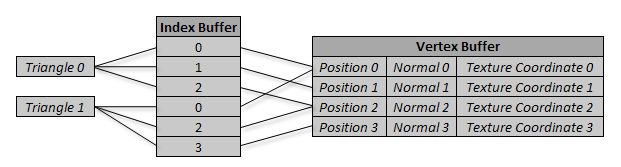
在使用索引的情况中,每3个索引构成一个三角形。这些索引用来查询顶点缓冲,而顶点缓冲提供诸如位置、法线和纹理坐标等数据。下图表示一个简单的矩形使用的数据结构(2个三角形。由6个索引,4个顶点定义)。
硬件instancing在数据结构上无需改变,但它需要添加一个新的信息。这个信息是保存每个instance的变换矩阵的第二个顶点缓冲。第二个顶点缓冲的大小要与绘制的instances最大数量相同,而无需和第一个顶点缓冲大小相同。每一帧你要调用SetData将每个instances最新的变换矩阵更新到第二个顶点缓冲中。
要将两个顶点缓冲传递到shader,你必须在VertexDeclaration包含这个额外的转换矩阵数据。不幸的是,矩阵数据没有VertexElementFormat,所以我们需要将矩阵拆成4个Vector4加以替代。这个步骤是在示例中的InstancedModelPart.InitializeHardwareInstancing方法中进行的。
现在我们必须将两个顶点缓冲设置到(第一个顶点缓冲保存实际几何数据,第二个顶点缓冲保存instance的变换矩阵),然后告知需要绘制多少个instances。代码如下:
VertexStreamCollection vertices = graphicsDevice.Vertices;

vertices[0].SetSource(geometryVertexBuffer, 0, geometryVertexStride);
vertices[0].SetFrequencyOfIndexData(numberOfInstances);

vertices[1].SetSource(instanceTransformVertexBuffer, 0, SizeOfMatrix);
vertices[1].SetFrequencyOfInstanceData(1);
最后,我们必须将每个instance的变换矩阵作为顶点着色器的一个输入参数。可在InstancedModel.fx 文件的HardwareInstancingVertexShader方法中看到具体代码。
一旦完成了上述步骤,GPU就会处理所有东西。我们只需调用DrawIndexedPrimitives方法即可,GPU会绘制模型数据的指定数量的副本。它会重用每个副本的索引缓冲,使用这个索引缓冲查询相同的几何顶点缓冲。它还保存了当前绘制的是哪个instance,自动从第二个顶点缓冲的正确位置查询变换矩阵并将它们和位置数据、法线数据等一起传递到顶点着色器中。
使用上图相同的两个三角形,下图表示使用硬件instances绘制模型的两个副本时的数据流:
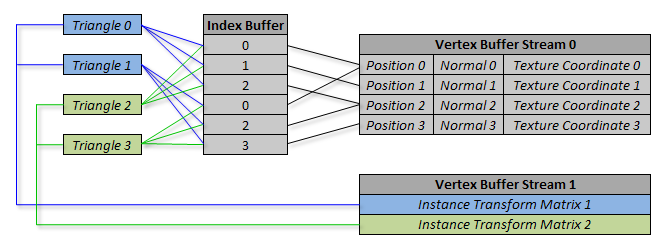
第一个instance使用的数据用蓝色表示,第二个instance为绿色。灰色代表被两个instances共享的数据。注意观察三角形0和2、1和3是如何共享相同的索引的, 它们从顶点缓冲流0中引用相同的数据,还有注意每个instances是如何从顶点缓冲流1中获取不同的变换坐标。
Shader Instancing
但如果你有一块支持shader 3.0的显卡,使用硬件instancing效果很好。但在shader 2.0的硬件上如何实现? shader instancing技术提供了与硬件instancing近似的性能,但可以工作在shader 2.0硬件上。唯一的缺点是需要更多的内存,因为它需要复制顶点和索引数据的副本。
InstancedModel构造函数使用IsTechniqueSupported方法自动检测是否运行在shader 3.0显卡上。默认使用硬件instancing,如有必要则使用shader instancing。 shader instancing的基本思路是只制作几何数据的一些副本,然后将它们一次存储到顶点和索引缓冲中。
译者注:下面不翻译了,我不想研究要淘汰的技术。
This makes it possible to draw many copies of the model in a single call, simply by specifying a larger number of triangles when you call DrawIndexedPrimitives. The hard part is this: how can the shader tell which instance it is currently drawing? To determine this, you must add an additional channel of data to your vertex buffer, which specifies the instance index. This is set to 0 for all the vertices of the first copy of the model, 1 for the second copy, and so on. The shader can use this index to choose which instance transform matrix should apply to each vertex. It looks up the instance transforms from a matrix array that is uploaded to the shader constant registers using an effect parameter.
Here is a diagram of shader instancing in action:
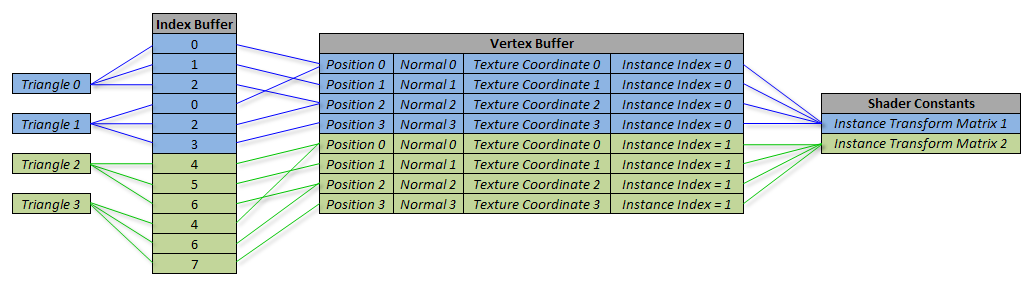
Data used for the first instance is shown in blue, and the second instance is green. Note how the triangle assembly, index buffer, and vertex buffer lookups are functioning exactly as they would while drawing a single non instanced model. The vertex buffer just happens to contain two copies of the same position, normal, and texture coordinate data, which are differentiated only by the instance index value. This is used to select the appropriate instance transform matrix for each copy of the model.
The repeated copies of the geometry data are created on demand by the ReplicateVertexData and ReplicateIndexData methods of the InstancedModelPart class. InitializeShaderInstancing also modifies the vertex declaration to include the additional instance index data channel. As an alternate, it would have been possible to pregenerate this data inside the content processor. However, doing it that way would bloat our XNB files with repeated copies of the same data. Also, using the preferred method means we won't generate the repeated information if we are running on a shader 3.0 card that can use hardware instancing.
There is a limit on how many shader instances can be drawn in a single batch. This comes partly from the limited number of shader constant registers available to hold the instance transform matrices (see the comment and MAX_SHADER_MATRICES constant at the top of InstanceModel.fx) and partly from the limited range of 16-bit index values. If we repeated the model data too many times, our 16-bit indices would overflow. We do not want to use 32-bit indices because they are not universally supported on all graphics cards. The InstancedModelPart class stores the result of combining these two batch size limits in the maxInstances field. If asked to draw more copies than this limit, the DrawShaderInstancing method splits up the request, drawing as many instances as possible in each call to DrawIndexPrimitives.
VFetch Instancing
Xbox 360不支持硬件instancing。虽然在技术上可以使用shader instancing,但是无需如此,因为Xbox 360提供了更好的选择。
译者注:下面不翻译了,我对XBOX360没兴趣。
Index dereferencing is normally handled automatically inside the GPU. Your vertex shader never gets direct access to the index value. Instead, it is passed the result of the GPU dereferencing whatever is stored at that index in the vertex buffer. Xbox 360 provides an alternative to this behavior. Using the INDEX HLSL semantic, you can request that the raw index value be passed directly into your vertex shader:
VertexShaderOutput MyVertexShader(int index : INDEX)
{ ....
You can then use the vfetch shader instruction to manually look up whatever data lives at that index in the vertex buffer, for example:
float4 position;
float4 normal;
float4 textureCoordinate;
asm
{
    vfetch position, index, position0
    vfetch normal, index, normal0
    vfetch textureCoordinate, index, texcoord0
};
But here's the trick: there is no requirement that the index you pass into the vfetch instruction be the same value that was passed in to your vertex shader! You can use arbitrary math instructions to compute whatever vertex buffer index you like. You could even do one vfetch instruction to look up a value from one part of the vertex buffer, and then use that value as an index to look up in a different part of the buffer.
To render instanced data, we extend our index buffer with repeated copies of the model data, in the same way as when using the shader instancing technique on Windows. But thanks to the vfetch instruction, there is no need to also replicate multiple copies of the vertex data, or to add the extra vertex channel for holding instance indices. Instead, we perform modulus and division computations at the top of our vertex shader:
VertexShaderOutput MyVertexShader(int index : INDEX)
{
    int vertexIndex = (index + 0.5) % VertexCount;
    int instanceIndex = (index + 0.5) / VertexCount;
This diagram shows the resulting data flow:
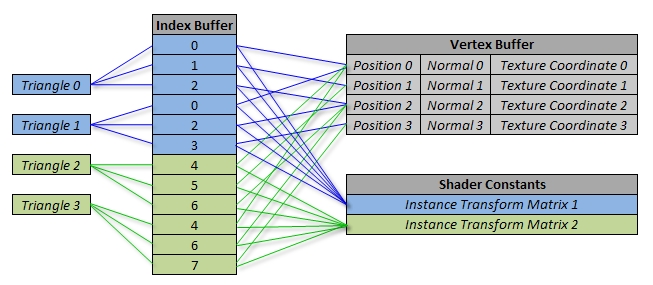
Thanks to the modulus operation, both the original index value of 0 and the replicated index value of 4 end up referencing the first entry in our vertex buffer. Both copies of the model can use the same vertex buffer data. But thanks to the division operation, we are also able to determine that an index value of 0 refers to the first instance, while 4 refers to the second, so each instance can choose the appropriate transform matrix from the shader constant registers.
Although VFetch instancing does require extra copies of the index data, the memory overhead is much smaller than for shader instancing on Windows, because it does not also require extra copies of the (much bigger) vertex data.
Instancing技术对比
| 技术 | 平台 | CPU负担 | 内存消耗 | 每次绘制调用最大instances数量 | 如何指定instance 的位置 | 是否复制索引数据 | 是否复制顶点数据 |
| No instancing 或state batching | 任意 | 差 | 非常好 | 1 | Effect参数 | No | No |
| No instancing | 任意 | 较好 | 非常好 | 1 | Effect参数 | No | No |
| Hardware instancing | Windows, shader 3.0 | 非常好 | 非常好 | 无限 | 第二个顶点数据流 | No | No |
| Shader instancing | Windows, shader 2.0 | 非常好 | 差 | ~60 (取决于shader) | Effect参数数组 | Yes | Yes |
| VFetch instancing | Xbox 360 | 非常好 | 轻微 | overhead ~60 (取决于shader) | Effect参数数组 | Yes | No |
示例扩展
除了instancing部分,本例中的shader其实非常简单。它只是实现了一个简单的漫反射光照模型,你也可以添加诸如镜面高光、多光源、逐像素光照、法线映射等功能。
这个示例对每个instances只定义了一个4×4矩阵,所以虽然每个instance位置可以不同,但看起来是完全一样的。你可以添加一个额外的针对每个instance的参数,当使用VFetch 或shader instancing时将这个参数作为shader常量数组,使用 hardware instancing时将这个参数作为第二个顶点数据流的额外数据通道。你可以使用这个额外参数给每个instance添加不同的颜色,或替换某些颜色等操作让它们的外观有所不同。
本示例需要shader 2.0,但是如果你减少位于InstancedModel.fx 文件顶部和InstancedModelPart.cs文件中的MAX_SHADER_MATRICES 和MaxShaderMatrices常量,shader instancing技术实际上在shader 1.1中也能工作。因为shader 1.1只支持96个常量寄存器,而shader 2.0可以支持256个,所以shader 1.1版本的技术无法绘制很多instances。
文件下载(已下载 1700 次)发布时间:2010/6/9 13:29:44 阅读次数:9254