4.创建文本标签、图像和按钮控件
在前一个教程创建了控件基类UISceneNode.cs后,接下来就要从基类创建常用的Label、Image、Button控件了。
文本标签控件UILabel
最简单的是文本标签UILabel类,它只是简单地将文本绘制到屏幕上,显然应该使用SpriteBatch.DrawString()方法,成员变量需要在基类的基础上再添加文本text、字体font、文字大小size和文字颜色fontColor。
namespace StunEngine.UI
{
/// <summary>
/// 基本的2D文本
/// </summary>
public class UILabel : UISceneNode
{
成员变量和构造函数
![]()
属性
![]()
/// <summary>
/// 绘制控件
/// </summary>
/// <param name="gameTime"></param>
public override void Draw(GameTime gameTime)
{
if (isVisible == true)
{
// 设置淡入淡出的透明度
Color alphaTextColor = new Color(fontColor.R, fontColor.G, fontColor.B, scene.TransitionAlpha);
// 绘制文字
StunXnaGE.SpriteBatch.DrawString(font, text, new Vector2(position.X, position.Y), alphaTextColor, rotation, origin, 1.0f, spriteEffect, layerDepth);
}
}
![]()
/// <summary>
/// 如果鼠标在文字内部则返回true
/// </summary>
/// <param name="x"></param>
/// <param name="y"></param>
/// <returns></returns>
public override bool IsPointInside(int x, int y)
{
if (x >= (int)(Position.X * engine.ScreenScalingFactor.X) && x <= (int)((Position.X + Size.X) * engine.ScreenScalingFactor.X ))
{
if (y >= (int)(Position.Y * engine.ScreenScalingFactor.Y) && y <= (int)((Position.Y + Size.Y) * engine.ScreenScalingFactor.Y))
return true;
}
return false;
}
}
}
从代码可见,对外公开的构造函数是参数最少的一个,而拥有复杂参数的构造函数为Internal,即不能被外部程序调用,在实际游戏中先通过简单的构造函数先创建一个默认的Label,然后再通过设置属性的方法改变你想要改变的变量,这样做的好处是可以简化创建的代码,参考一下WinForm程序,它也是这样处理的,接下去的Image和Button思路是类似的。
别忘了将TabStop设置为false,因为文本标签不接受焦点。
在Draw()方法中还需要获取所属Scene的透明值,以实现控件的淡入淡出效果。
IsPointInside()方法用于判断鼠标是否在控件内部,帮助在后面的UIManager类中实现鼠标移入和移出行为。
图像控件UIImage
图像控件就相当与WinForm程序中的pictureBox控件,只不过pictureBox的默认大小是100×50,UIImage控件的默认大小是屏幕大小。代码如下:
namespace StunEngine.UI
{
/// <summary>
/// 在指定屏幕位置绘制一张2D图像
/// </summary>
public class UIImage : UISceneNode
{
/// <summary>
/// 图像的2D屏幕大小
/// </summary>
protected Vector2 size;
![]()
/// <summary>
/// 纹理的普通状态的源矩形
/// </summary>
protected Rectangle rectSourceOrigin;
![]()
/// <summary>
/// Sprite的调制颜色
/// </summary>
protected Color color;
![]()
/// <summary>
/// 根据给定纹理名称创建一个覆盖整个屏幕的UIImage
/// </summary>
/// <param name="engine">引擎</param>
/// <param name="textureName">纹理名称</param>
/// <param name="setEngine">引擎</param>
/// <param name="setScene">所属Scene</param>
/// <param name="setTextureName">纹理名称</param>
public UIImage(StunXnaGE setEngine, Scene setScene, string setTextureName)
: this(setEngine, setScene, setTextureName, null, Vector2.Zero, new Vector2(setEngine.Graphics.PreferredBackBufferWidth, setEngine.Graphics.PreferredBackBufferHeight), Color.White)
{
![]()
}
![]()
/// <summary>
/// 根据给定纹理名称,位置,大小创建一个位于指定位置和大小的UIImage
/// </summary>
/// <param name="engine">引擎</param>
/// <param name="position">2D屏幕位置</param>
/// <param name="size">大小</param>
/// <param name="textureName">纹理名称</param>
/// <param name="setEngine">引擎</param>
/// <param name="setScene">所属Scene</param>
/// <param name="setTextureName">纹理名称</param>
/// <param name="setRectSourceOrigin">图像源矩形</param>
/// <param name="setPosition">图像的2D屏幕位置</param>
/// <param name="setSize">图像大小</param>
/// <param name="setColor">spriteBatch调制颜色</param>
internal UIImage(StunXnaGE setEngine, Scene setScene, string setTextureName, Rectangle? setRectSourceOrigin, Vector2 setPosition, Vector2 setSize, Color setColor)
: base(setEngine, setScene, setTextureName, setPosition)
{
//如果图像源矩形设为null,则创建默认为原始图像大小的图像
if(setRectSourceOrigin==null )
this.rectSourceOrigin =new Rectangle (0,0,ColorTexture.Width ,ColorTexture.Height );
else
this.rectSourceOrigin = (Rectangle)setRectSourceOrigin;
![]()
this.color = setColor;
this.size = setSize ;
this.TabStop = false;
}
![]()
/// <summary>
/// 获取或设置控件的大小
/// </summary>
public Vector2 Size { get { return size; } set { size = value; } }
![]()
/// <summary>
/// 获取或设置纹理的普通状态的源矩形
/// </summary>
public Rectangle RectSourceOrigin
{
get { return rectSourceOrigin; }
set { rectSourceOrigin = value; }
}
![]()
/// <summary>
/// 获取或设置Sprite的调制颜色
/// </summary>
public Color Color
{
get { return color; }
set { color = value; }
}
![]()
public override void Draw(GameTime gameTime)
{
//如果此控件可见
if (this.IsVisible == true)
{
//设置淡入淡出透明度
Color alphaTextureColor = new Color(color.R, color.G, color.B, scene.TransitionAlpha);
//绘制文字
StunXnaGE.SpriteBatch.Draw(ColorTexture, new Rectangle((int)position.X, (int)position.Y, (int)size.X, (int)size.Y), rectSourceOrigin, alphaTextureColor, rotation, origin, spriteEffect, layerDepth);
}
}
![]()
/// <summary>
/// 如果给定的坐标位于控件内则返回true
/// </summary>
/// <param name="x">给定的X坐标</param>
/// <param name="y">给定的Y坐标</param>
/// <returns></returns>
public override bool IsPointInside(int x, int y)
{
if (x >= (int)(Position.X * engine.ScreenScalingFactor.X) && x <= (int)((Position.X + Size.X) * engine.ScreenScalingFactor.X))
{
if (y >= (int)(Position.Y * engine.ScreenScalingFactor.Y) && y <= (int)((Position.Y + Size.Y) * engine.ScreenScalingFactor.Y))
return true;
}
return false;
}
}
}
按钮控件UIButton
按钮控件可以看成是UILabel和UIImage的组合,对应按钮上的文字和按钮的背景图片,但是C#不支持多重继承,不过也不是很麻烦,那就从UIImage类继承吧。
首先添加了两个枚举表示文字的对齐方式,Winform中的Button控件文字的对齐方式有9种之多,我只定义了最常用的两种。
根据鼠标移入、移除和点击变换背景图像,我使用的图像来自于http://www.tomshane.cz/neoforce/Features/tabid/55/Default.aspx上的Neoforce Controls,这个软件是开源的,我只使用了其中的按钮图片:
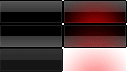
其中第一行第一列对应普通状态、第一行第二列对应鼠标移至控件上的图像、第二行第二列对应点击时的图像。第二个构造函数还可以指定自己的图像作为按钮图像,你也可以将text设为null创建一个只有背景图像的按钮,这样可以实现图像按钮,字体往往更美观。
你可以将背景图像设置为null创建一个只有文字的按钮,这实际上就是XNA官方网站上的场景管理,http://creators.xna.com/en-US/samples/gamestatemanagement中的菜单项MenuEntry类(还记得我一开始就说过这个引擎的场景管理主要就是参考这个例子吗?),只不过我没有实现那个例子中菜单项的变大变小的“呼吸”效果和飞入飞出的效果。
namespace StunEngine.UI
{
/// <summary>
/// 文字对齐方式枚举
/// </summary>
public enum TextAlign
{
MiddleLeft,
MiddleCenter
}
![]()
/// <summary>
/// 按钮控件
/// </summary>
public class UIButton:UIImage
{
成员变量和构造函数
![]()
属性
![]()
public override void Draw(GameTime gameTime)
{
//如果此控件可见
if (isVisible == true)
{
//如果按钮背景图片不为null,则绘制背景
if (ColorTextureName != null)
{
//设置淡入淡出透明度
Color alphaTextureColor = new Color(color.R, color.G, color.B, scene.TransitionAlpha);
![]()
//根据鼠标移入还是按下设置图像源矩阵
Rectangle rect = isMouseInside || (uiManager.ActiveControl == this) ? ((Input.MouseLeftButtonPressed&&isMouseInside)?rectSourceClicked: rectSourceHighlight): rectSourceOrigin;
//绘制按钮背景图像
StunXnaGE.SpriteBatch.Draw(ColorTexture, new Rectangle((int)position.X, (int)position.Y, (int)size.X, (int)size.Y), rect, alphaTextureColor, rotation, origin, spriteEffect, layerDepth);
}
![]()
//如果按钮文字不为null,则绘制文字
if (text != null)
{
Color textColor = isMouseInside || (uiManager.ActiveControl == this) ? textColorHighlight : textColorOrigin;
// 设置淡入淡出的透明度
Color alphaTextColor = new Color(textColor.R, textColor.G, textColor.B, scene.TransitionAlpha);
![]()
//如果文字的对齐方式为MiddleCenter
if (textAlign == TextAlign.MiddleCenter)
StunXnaGE.SpriteBatch.DrawString(font, text, new Vector2(position.X + size.X / 2 - font.MeasureString(text).X / 2, position.Y + size.Y / 2 - font.MeasureString(text).Y / 2), alphaTextColor, rotation, origin, 1.0f, spriteEffect, layerDepth);
//如果文字的对齐方式为MiddleLeft
else if (textAlign == TextAlign.MiddleLeft)
StunXnaGE.SpriteBatch.DrawString(font, text, new Vector2(position.X, position.Y + size.Y / 2 - font.MeasureString(text).Y / 2), alphaTextColor, rotation, origin, 1.0f, spriteEffect, layerDepth);
}
}
}
![]()
/// <summary>
/// 如果鼠标在按钮内部则返回true
/// </summary>
/// <param name="x">鼠标x坐标</param>
/// <param name="y">鼠标y坐标</param>
/// <returns>是否在按钮内部</returns>
public override bool IsPointInside(int x, int y)
{
return base.IsPointInside(x,y);
}
}
}
好了,这个引擎只制作了常用的三个控件,其他诸如ComboBox、OptionBox使用同样的方法也可以自己制作,只不过这些控件使用鼠标更加方便,在Xbox360上并不实用,推荐还是使用Neoforce Controls中的图片,最好先创建一个BaseButton类,而Button、ComboBox、OptionBox从它继承。 还有一个XNA控件程序xwinforms可供参考:http://sourceforge.net/projects/xwinforms/。
发布时间:2009/11/24 上午9:12:44 阅读次数:7394