2.12 创建一个Post-Processing Framework

问题

你想在最终的图像上添加一个2D post-processing effect,诸如模糊,扭曲,摇晃,变焦,边缘检测等。

解决方案

首先将2D或3D场景绘制到屏幕,在Draw过程的最后,在后备缓冲的内容还没有发送到屏幕前,你需要将这个后备缓冲的内容存储在一张2D图像中,解释请见教程3-8。

然后,将这张2D图像绘制到屏幕上,但通过一个自定义的pixel shader实现,这也是本教程中有趣的部分。在pixel shader中,

你可以单独处理图像中的每个像素。你可以通过使用一个简单的SpriteBatch实现以上操作(见教程3-1),但是SpriteBatch不支持多个pass的alpha混合(如下一个教程介绍的effect)。要解决这个问题并创建一个支持所有post-processing effect的框架,你需要手动定义覆盖整个屏幕的三角形,在这个三角形上施加最终的图像。通过这种方式,你可以使用任意的pixel shader处理最终图像的像素。

如果你想组合多个post-processing effect,你可以在每个effect之后将结果图像绘制到一个RenderTarget2D变量中而不是绘制到后备缓冲中。这样最后一个effect的最终结果才会被绘制到后备缓冲中。

工作原理

首先需要在程序中添加一些变量,这些变量包括ResolveTexture2D,它用来获取后备缓冲的内容(可见教程3-8),RenderTarget2D,它用来对多个effects进行排列。你还需要一个effect文件保存post-processing technique(s)。

VertexPositionTexture[] ppVertices; 
RenderTarget2D targetRenderedTo; 
ResolveTexture2D resolveTexture; 
Effect postProcessingEffect; 
float time = 0; 

因为你要定义两个三角形覆盖整个屏幕,所以需要定义顶点:

private void InitPostProcessingVertices()
{
    ppVertices = new VertexPositionTexture[4]; int i = 0;
    ppVertices[i++] = new VertexPositionTexture(new Vector3(-1, 1, 0f), new Vector2(0, 0));
    ppVertices[i++] = new VertexPositionTexture(new Vector3(1, 1, 0f), new Vector2(1, 0));
    ppVertices[i++] = new VertexPositionTexture(new Vector3(-1, -1, 0f), new Vector2(0, 1)); 
    ppVertices[i++] = new VertexPositionTexture(new Vector3(1, -1, 0f), new Vector2(1, 1));
}

这个方法定义了矩形的四个顶点,用来绘制TriangleStrip (可参见教程5-1)形式的两个三角形。请记住屏幕坐标的范围是[-1,1],而纹理坐标的范围是[0,1]。

你可以看到刚才定义的位置就是屏幕坐标,点(-1,-1)对应窗口的左上角,点(1,1)对应右下角。你也可以指定纹理坐标的左上角(0,0)位于窗口的左上角(-1,-1),纹理坐标的右下角(1,1)位于窗口右下角。如果将这个矩形绘制到这个屏幕中,图像就会覆盖整个窗口。

注意:因为窗口是2D的,在顶点的位置中可以无需第三个坐标。但是,对屏幕的每个像素,XNA会将距离相机的位置保存到深度缓冲中,这实际上就是第三个坐标。通过将这个距离指定为0,表示将图像绘制到尽可能离相机近的地方(更确切的说,将图像绘制在近裁平面上)。

别忘了在Initialize方法中调用这个方法:

InitPostProcessingVertices(); 

最后三个变量应在LoadContent方法中进行初始化:

PresentationParameters pp = GraphicsDevice.PresentationParameters;
targetRenderedTo = new RenderTarget2D(device, pp.BackBufferWidth, pp.BackBufferHeight, 1, device.DisplayMode.Format); 
resolveTexture = new ResolveTexture2D(device, pp.BackBufferWidth, pp.BackBufferHeight, 1, device.DisplayMode.Format); 
postProcessingEffect = content.Load<Effect>("content/postprocessing"); 

可参见教程3-8学习更多有关渲染目标的知识。这种情况中重要的是新的渲染目标和窗口的属性一样,它需要有相同的宽度,高度,颜色格式,这些都可以从图形设备的PresentationParameters结构中获取。通过这种方式,你可以很简单地获取纹理,然后对它进行post-process,将结果发送到屏幕,而无需做任何缩放和颜色映射的操作。因为你使用的是完全尺寸的纹理,无需任何mipmaps (可参见教程3-7的注释)。这意味着你只需一个mipmap level,就是纹理的原始大小。你还要加载包含post-processing technique(s)的effect文件。

加载了变量后,就可以开始下面的工作了。在与以往一样绘制了场景后,你想调用一个方法可以获取后备缓冲中的内容,然后对它进行处理,将结果发送到后备缓冲。这就是PostProcess方法要进行的操作:

private void PostProcess()
{
    device.ResolveBackBuffer(resolveTexture, 0);
    Texture2D textureRenderedTo = resolveTexture;
}

第一行代码将后备缓冲中的当前内容转换到一个ResolveTexture2D,即本例中的resolveTexture变量。这个变量包含了要绘制到屏幕中的场景。你将这个变量存储为一个普通的Texture2D,叫做textureRenderedTo。

然后,使用post-processing effect将这个textureRenderedTo绘制到覆盖整个窗口的矩形中。在这个简单教程中,你将定义一个叫做Invent的effect,它可以将图像中的每个像素的颜色反相。

postProcessingEffect.CurrentTechnique = postProcessingEffect.Techniques["Invert"]; 
postProcessingEffect.Begin();
postProcessingEffect.Parameters["textureToSampleFrom"]. SetValue(textureRenderedTo);
foreach (EffectPass pass in postProcessingEffect.CurrentTechnique.Passes)
{
     pass.Begin();
     device.VertexDeclaration = new VertexDeclaration(device, VertexPositionTexture.VertexElements); 
     device.DrawUserPrimitives<VertexPositionTexture> (PrimitiveType.TriangleStrip, ppVertices, 0, 2);
     pass.End();
}
postProcessingEffect.End();

你首先选择了用来将最终图像绘制到屏幕的post-processing technique,开始这个effect。

然后,将textureRenderedTo传递到显卡上,这样effect可以从中进行采样。最后,对post-processing technique的每个pass,你让显卡绘制覆盖整个屏幕的两个三角形。你需要编写effect的代码让两个三角形显示这个图像,以你选择的方式进行处理。

注意:当在3D世界中绘制物体时,你总要设置World, View和Projection矩阵。这些矩阵让显卡中的vertex shader将3D坐标映射到屏幕的对应像素上。但在这个例子中,你已经在屏幕空间中定义了两个三角形的位置,所以无需设置这些矩阵,因为现在vertex shader不会改变顶点的位置,只是简单地将它们传递到pixel shader中。

别忘了在调用Draw方法中调用这个方法:

PostProcess(); 

HLSL

只剩最后一步了:在HLSL中定义post-processing technique。不要担心,因为这里使用的HLSL非常简单。所以,打开一个新文件,命名为postprocessing. fx。

texture textureToSampleFrom;
sampler textureSampler = sampler_state
{
    texture = <textureToSampleFrom>;
    magfilter = POINT; 
    minfilter = POINT;
    mipfilter = POINT; 
};

struct PPVertexToPixel
{
    float4 Position : POSITION; 
    float2 TexCoord    : TEXCOORD0; 
};

struct PPPixelToFrame
{
    float4 Color    : COLOR0;
};

PPVertexToPixel PassThroughVertexShader(float4 inPos: POSITION0,float2 inTexCoord: TEXCOORD0)
{
    PPVertexToPixel Output = (PPVertexToPixel)0;
    Output.Position = inPos;
    Output.TexCoord = inTexCoord;
    return Output;
}

//    PP Technique: Invert     
PPPixelToFrame InvertPS(PPVertexToPixel PSIn) : COLOR0 
{
    PPPixelToFrame Output = (PPPixelToFrame)0;

    float4 colorFromTexture = tex2D(textureSampler, PSIn.TexCoord); 
    Output.Color = 1-colorFromTexture;

    return Output; 
}

technique Invert
{
    pass Pass0
    {
        VertexShader = compile vs_1_1 PassThroughVertexShader(); 
        PixelShader = compile ps_1_1 InvertPS();
    }
}

这个代码还可以再短一点,但我想和前面教程中的HLSL代码的结构保持一致。在technique 定义的底部,表示的是technique的名称和使用的vertex shader和pixel shader。在它之上是vertex shader和pixel shader,在代码顶部是可以从XNA程序中设置的变量。对这个简单例子,你只需设置从后备缓冲获取的2D图像。

然后,在显卡中创建一个纹理采样器,这也是后面的pixel shader从中进行颜色采样的变量。你将这个采样器连接到刚才定义的纹理,然后声明如果代码要求的一个坐标的颜色不是100%对应一个像素时应该进行的操作,这里你指定采样器提取最近像素的颜色。

注意:纹理坐标是一个float2,X和Y值在0和1之间。因为这些数字是floats,对它们的任何运算几乎都会导致一个四舍五入的误差。这意味着当你使用这样一个坐标从纹理采样时,大多数纹理坐标不会精确地对应纹理上的一个像素,但会非常接近。这就是为什么你需要指定纹理采样器应该怎样做的原因。

然后,你定义了两个结构:一个保存从vertex shader发送到pixel shader的信息。这个信息只包含屏幕坐标和纹理到哪采样获取像素的颜色。第二个结构保存pixel shader输出。对每个像素,pixel shader只需要计算颜色。

vertex shader让你处理发送到显卡的每个顶点的数据。3D程序中vertex shader最重要的任务之一就是将3D坐标转换为2D屏幕坐标。在post-processing effects的情况中,vertex shader并不真正有用,因为你已经定义了两个三角形的顶点的屏幕坐标!所以,你只需让vertex shader将输入的位置传递到输出就可以了。

然后,在pixel shader中才是post-processing effect的处理。对绘制到屏幕的每个像素,调用这个方法,让你可以改变像素的颜色。在pixel shader中,首先创建一个空的叫做Outputde 输出结构, 然后,这个颜色从textureSampler进行采样。如果pixel shader只是简单地输出这个颜色,那么输出的图像与原始图像是一样的,因为窗口每个像素都是从原始图像的原始位置采样它的颜色的。所以你想改变采样的坐标或从原始图像获取的颜色,这会在下一段中进行这个操作。

colorFromTexture变量包含四个介于0和1之间的值(红,绿,蓝和alpha)。本例中,通过从1减去这些值将它们反相。将这个反相过的颜色保存到Output结构中并返回。

当运行代码时,场景会被保存到textureRenderedTo纹理中,每个像素的颜色会在绘制到屏幕前被反相。

多个Post-Processing Effects队列

再加一些代码让你可以处理多个post-processing effects队列。在Draw方法中,你将创建一个集合包含要施加的post-processing techniques,然后将这个集合传递到PostProcess方法中:

List<string> ppEffectsList = new List<string>(); 
ppEffectsList.Add("Invert"); 
PostProcess(ppEffectsList); 

现在你只定义了一个Invert technique,所以这个简单例子中你使用了这个technique 两次。通过反相一个反相过的图像,结果是再次获得了原始图像,这有什么令人激动的?

你要调整PostProcess方法让它接受effect集合作为参数。如你所见,这个方法的开始部分被扩展为可以处理多个 Post-Processing Effects:

public void PostProcess(List<string> ppEffectsList)
{
    for (int currentTechnique = 0; currentTechnique < ppEffectsList.Count; currentTechnique++) 
    {
        device.SetRenderTarget(0, null);
        Texture2D textureRenderedTo;

        if (currentTechnique == 0)
        {
            device.ResolveBackBuffer(resolveTexture, 0);
            textureRenderedTo = resolveTexture;
        } 
       else
       {
           textureRenderedTo = targetRenderedTo.GetTexture();
       }

       if (currentTechnique == ppEffectsList.Count - 1) 
           device.SetRenderTarget(0, null);
       else
           device.SetRenderTarget(0, targetRenderedTo);

        postProcessingEffect.CurrentTechnique= postProcessingEffect.Techniques[ppEffectsList[currentTechnique]]; 

        postProcessingEffect.Begin();
        postProcessingEffect.Parameters["textureToSampleFrom"]. SetValue(textureRenderedTo);

        foreach (EffectPass pass in postProcessingEffect.CurrentTechnique.Passes) 
        {
            pass.Begin();
            device.VertexDeclaration = new VertexDeclaration(device, VertexPositionTexture.VertexElements); 
            device.DrawUserPrimitives<VertexPositionTexture> (PrimitiveType.TriangleStrip, ppVertices, 0, 2);
            pass.End();
            postProcessingEffect.End();
        }
    }
}

这个方法的思路如图2-14所示。对集合中的每个effect,你将渲染目标中的内容保存到一张纹理中,然后使用当前的effect再次将它绘制到渲染目标中。这个规则有两个例外。

首先,对第一个effect,获取后备缓冲中的内容,而不是RenderTarget的内容。最后,对最后一个effect,将结果绘制到后备缓冲,这样它会被绘制到屏幕。这个过程如图2-14所示。

图2-14

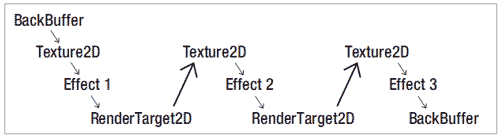
图2-14 多个post-processing effects队列

前面的代码显示了工作流程。如果是第一个technique,则将后备缓冲中的内容存储到textureRenderedTo,否则,将渲染目标的内容存储到textureRenderedTo。无论哪种方式, textureRenderTo都会包含最终要绘制的内容。如教程3-8的解释,在调用RenderTarget 的GetTexture前,你必须激活另一个渲染目标,这是由这个方法的第一行代码实现的。

然后检查当前technique是否是集合中的最后一个,如果是,通过在device. SetRenderTarget方法中传递null(你也可以不使用这行代码,因为在方法顶部已经做了这个操作)将后备缓冲设置为当前渲染目标。否则,将自定义的渲染目标作为当前渲染目标。

代码的其他部分保持不变。

作为post-processing technique的第二个简单例子,你可以根据时间改变颜色值。将这个代码添加到. fx文件的顶部:

float xTime; 

这个变量可以在XNA程序中设置,在HLSL代码中读取。将这行代码添加到. fx文件的最后:

//    PP Technique: TimeChange     
PPPixelToFrame TimeChangePS(PPVertexToPixel PSIn) : COLOR0 
{
    PPPixelToFrame Output = (PPPixelToFrame)0;

    Output.Color = tex2D(textureSampler, PSIn.TexCoord); 
    Output.Color.b *= sin(xTime);
    Output.Color.rg *= cos(xTime);
    Output.Color += 0.2f;

    return Output; 
}

technique TimeChange
{
    pass Pass0
    {
        VertexShader = compile vs_1_1 PassThroughVertexShader(); 
        PixelShader = compile ps_2_0 TimeChangePS();
    }
}

对图像的每个像素,蓝色通道会乘以由xTime变量决定的正弦值,红色和绿色乘以余弦值。记住,正弦和余弦产生一个介于–1和+1之间的波形,颜色通道的负值会被截取到0。

使用这个technique绘制最终图像:

List<string> ppEffectsList = new List<string>(); 
ppEffectsList.Add("Invert"); 
ppEffectsList.Add("TimeChange"); 
postProcessingEffect.Parameters["xTime"].SetValue(time); 
PostProcess(ppEffectsList); 

注意你将xTime变量设置为time,需要在XNA代码中指定这个time变量:

float time; 

在Update方法中更新变量:

time += gameTime.ElapsedGameTime.Milliseconds / 1000.0f; 

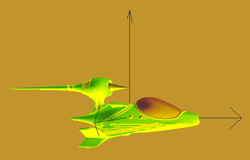
当运行代码时,你会看到图像的颜色会随时间发生变化。还不是很漂亮,但是你可以只基于它们的原始颜色改变像素的颜色。在下一个教程中,还要考虑像素周围的颜色决定最终颜色。

代码

下面的代码定义顶点,这些顶点构成矩形用来显示最终图像:

private void InitPostProcessingVertices()
{
    ppVertices = new VertexPositionTexture[4];
    int i = 0;
    ppVertices[i++] = new VertexPositionTexture(new Vector3(-1, 1, 0f), new Vector2(0, 0));
    ppVertices[i++] = new VertexPositionTexture(new Vector3(1, 1, 0f), new Vector2(1, 0));
    ppVertices[i++] = new VertexPositionTexture(new Vector3(-1, -1, 0f), new Vector2(0, 1));
    ppVertices[i++] = new VertexPositionTexture(new Vector3(1, -1, 0f), new Vector2(1, 1));
}

在Draw方法中,你想往常一样绘制场景。在绘制之后,定义使用哪个post-processing effects,并将集合传递到PostProcess方法中:

protected override void Draw(GameTime gameTime)
{
    device.Clear(ClearOptions.Target|ClearOptions.DepthBuffer, Color.CornflowerBlue, 1, 0);

    //draw model
    Matrix worldMatrix = Matrix.CreateScale(0.01f, 0.01f, 0.01f) * Matrix.CreateTranslation(0, 0, 0); myModel.CopyAbsoluteBoneTransformsTo(modelTransforms);
    foreach (ModelMesh mesh in myModel.Meshes)
    {
        foreach (BasicEffect effect in mesh.Effects)
        {
            effect.EnableDefaultLighting();
            effect.World = modelTransforms[mesh.ParentBone.Index] * worldMatrix; 
            effect.View = fpsCam.ViewMatrix;
            effect.Projection = fpsCam.ProjectionMatrix;
        }
        mesh.Draw();
    }

    //draw coordcross
    cCross.Draw(fpsCam.ViewMatrix, fpsCam.ProjectionMatrix);

    List<string> ppEffectsList = new List<string>(); 
    ppEffectsList.Add("Invert");
    ppEffectsList.Add("TimeChange"); 
    postProcessingEffect.Parameters["xTime"].SetValue(time); 
    PostProcess(ppEffectsList);

    base.Draw(gameTime);
}

在Draw方法的最后,调用PostProcess方法,这个方法获取后备缓冲, 使用一个或多个post-processing effects 将图像绘制到屏幕中:

public void PostProcess(List<string> ppEffectsList)
{
    for (int currentTechnique = 0; currentTechnique < ppEffectsList.Count; currentTechnique++)
    {
        device.SetRenderTarget(0, null); 
        Texture2D textureRenderedTo;

        if (currentTechnique == 0)
        {    
            device.ResolveBackBuffer(resolveTexture, 0);
            textureRenderedTo = resolveTexture;
         }
         else
         {
             textureRenderedTo = targetRenderedTo.GetTexture();
          }

          if (currentTechnique == ppEffectsList.Count - 1) 
              device.SetRenderTarget(0, null);
          else
              device.SetRenderTarget(0, targetRenderedTo);

          postProcessingEffect.CurrentTechnique = postProcessingEffect.Techniques[ppEffectsList[currentTechnique]]; 
          postProcessingEffect.Begin();
          postProcessingEffect.Parameters["textureToSampleFrom"]. SetValue(textureRenderedTo);

          foreach (EffectPass pass in postProcessingEffect.CurrentTechnique.Passes)
          {
pass.Begin();
device.VertexDeclaration = new VertexDeclaration(device, VertexPositionTexture.VertexElements);
device.DrawUserPrimitives<VertexPositionTexture> (PrimitiveType.TriangleStrip, ppVertices, 0, 2);
pass.End();
}
postProcessingEffect.End();
}
}

在HLSL文件中,确保将纹理采样器连接到textureToSampleFrom变量上:

float xTime;

texture textureToSampleFrom;
sampler textureSampler = sampler_state
{
    texture = <textureToSampleFrom>;
    magfilter = POINT; 
    minfilter = POINT; 
    mipfilter = POINT;
}

struct PPVertexToPixel
{
    float4 Position : POSITION;
    float2 TexCoord    : TEXCOORD0;
};

struct PPPixelToFrame
{
     float4 Color    : COLOR0;
};

PPVertexToPixel PassThroughVertexShader(float4 inPos: POSITION0, float2 inTexCoord: TEXCOORD0)
{
     PPVertexToPixel Output = (PPVertexToPixel)0;
    Output.Position = inPos;
    Output.TexCoord = inTexCoord;
    return Output;
}

//    PP Technique: Invert     
PPPixelToFrame InvertPS(PPVertexToPixel PSIn) : COLOR0 
{
    PPPixelToFrame Output = (PPPixelToFrame)0;

    float4 colorFromTexture = tex2D(textureSampler, PSIn.TexCoord); 
    Output.Color = 1-colorFromTexture;

    return Output; 
}

technique Invert
{
    pass Pass0
    {
        VertexShader = compile vs_1_1 PassThroughVertexShader(); 
        PixelShader = compile ps_1_1 InvertPS();
    } 
}

//    PP Technique: TimeChange
PPPixelToFrame TimeChangePS(PPVertexToPixel PSIn) : COLOR0 
{
    PPPixelToFrame Output = (PPPixelToFrame)0;

    Output.Color = tex2D(textureSampler, PSIn.TexCoord); 
    Output.Color.b *= sin(xTime);
    Output.Color.rg *= cos(xTime);
    Output.Color += 0.2f;

    return Output;
}

technique TimeChange
{
    pass Pass0
    {
        VertexShader = compile vs_1_1 PassThroughVertexShader(); 
        PixelShader = compile ps_2_0 TimeChangePS();
    }
}

程序截图


发布时间:2009/10/26 8:06:24  阅读次数:5472

2006 - 2024,推荐分辨率1024*768以上,推荐浏览器Chrome、Edge等现代浏览器,截止2021年12月5日的访问次数:1872万9823 站长邮箱

沪ICP备18037240号-1

沪公网安备 31011002002865号