6.2 在顶点间共享法线
问题
在前面的教程中,你学习了如何根据法线数据使三角形获取正确的光照。
但是,盲目地将这个方法施加到所有三角形中往往得不到最好的效果。
如果三角形的每个顶点具有相同的法线方向,那么光照是一样的,所有像素会获得同样的光照。如果两个相邻三角形(不在同一平面)也是如此施加光照,那么一个三角形的所有像素获得同样的光照,另一个三角形的所有像素获得另一个光照。这会导致很容易地可见看见两者的边界,因为两个三角形有不同的颜色。
如果三角形中的颜色是平滑过渡的,你想获取一个更好的效果。要做到这点,从一个三角形到另一个三角形的明暗应该平滑过渡。
解决方案
显卡是根据三角形的三个顶点计算明暗的。三角形中的所有像素的明暗会进行插值。如果三个顶点的法线是相同的,所有像素会获得相同的明暗。如果不同,像素的明暗在角中会平滑过渡。
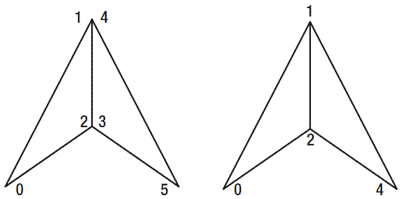
看一下两个三角形,共享一条边,由六个顶点组成。这种情况如图6-3的左图所示。要保证从一个三角形到另一个三角形的颜色能够平滑过渡, 你需要确保两个边界的颜色是一样的。这可以通过让共享的顶点具有相同的法线实现。在图6-3的左图,顶点1和4,顶点2和3有相同的法线。

图6-3 两个共享一条边的三角形
工作原理
本教程中,你将使用两个方法定义两个三角形。首先,定义两个所有顶点都有相同法线的三角形,这会导致三角形中的所有像素都有相同的光照。然后,你要确保共享顶点中的法线是相同的,这会在三角形边界上获得光滑的明暗效果。
每个三角形拥有各自的法线
这个方法获取垂直于三角形的方向并将这个方向存储在顶点中。
下面的代码定义了如图6-3左图中所示的六个顶点。每个三角形的三个顶点具有相同的法线方向,垂直于三角形。左边的三角形垂直放置,所以它的法线向左。第二个三角形水平放置,法线向上。
private void InitVertices()
{
    vertices = new VertexPositionNormalTexture[6];
    vertices[0] = new VertexPositionNormalTexture(new Vector3(0, -1, 0), new Vector3(-1, 0, 0), new Vector2(0,1));
    vertices[1] = new VertexPositionNormalTexture(new Vector3(0, 0, - 1), new Vector3(-1, 0, 0), new Vector2(0.5f, 0));
    vertices[2] = new VertexPositionNormalTexture(new Vector3(0, 0, 0), new Vector3(-1, 0, 0), new Vector2(0.5f, 1));
    vertices[3] = new VertexPositionNormalTexture(new Vector3(0, 0), new Vector3(0, 1, 0), new Vector2(0.5f,1));
    vertices[4] = new VertexPositionNormalTexture(new Vector3(0,- 1), new Vector3(0, 1, 0), new Vector2(0.5f,1));
    vertices[5] = new VertexPositionNormalTexture(new Vector3(1, 0), new Vector3(0, 1, 0), new Vector2(1,1));

    myVertexDeclaration = new VertexDeclaration(device, VertexPositionNormalTexture.VertexElements);
}
然后定义一个稍微偏右下方向的光线。确保归一化这个光线的方向:
Vector3 lightDirection = new Vector3(10, -2, 0);
lightDirection.Normalize();
basicEffect.DirectionalLight0.Direction = lightDirection;
然后绘制两个三角形:
basicEffect.Begin();
foreach (EffectPass pass in basicEffect.CurrentTechnique.Passes)
{
    pass.Begin();
    device.VertexDeclaration = myVertexDeclaration;
    device.DrawUserPrimitives<VertexPositionNormalTexture>(PrimitiveType.TriangleList, vertices, 0, 2);
    pass.End();
}
basicEffect.End();
可参见教程6-1中的“归一化法线”一节理解为何需要归一化光线方向。
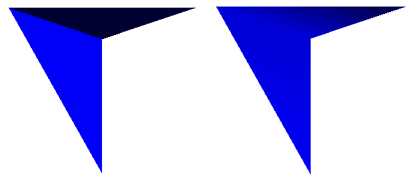
这时应该看到两个三角形,都有一个不透明颜色,如图6-4左图所示。你可以轻易地看到两者间的边界,在绘制大物体时这并不是你想要的结果。

图6-4 三角形着色(左图),共享的顶点着色(右图)
共享法线
这次,你将在顶点1和4、顶点2和3上施加同样的法线方向。带来的一个问题是你应该选择哪个方向。
要获取最光滑的效果,你只需简单地求法线的平均值,如下面的代码所示:
private void InitVertices() vertices = new VertexPositionNormalTexture[6];
Vector3 normal1 = new Vector3(-1, 0, 0);
Vector3 normal2 = new Vector3(0, 1, 0);
Vector3 sharedNormal = normal1 + normal2;
sharedNormal.Normalize();

vertices[0] = new VertexPositionNormalTexture(new Vector3(0, -1, 0), normal1, new Vector2(0,1));
vertices[1] = new VertexPositionNormalTexture(new Vector3(0, 0, - 1), sharedNormal, new Vector2(0.5f, 0));
vertices[2] = new VertexPositionNormalTexture(new Vector3(0, 0, 0), sharedNormal, new Vector2(0.5f, 1));
vertices[3] = new VertexPositionNormalTexture(new Vector3(0, 0), sharedNormal, new Vector2(0.5f,1));
vertices[4] = new VertexPositionNormalTexture(new Vector3(0,- 1), sharedNormal, new Vector2(0.5f,1));
vertices[5] = new VertexPositionNormalTexture(new Vector3(1, 0), normal2, new Vector2(1,1));

myVertexDeclaration=new VertexDeclaration(device, VertexPositionNormalTexture.VertexElements);
首先求出两个三角形的法线之和,然后归一化结果(见教程6-1中的“归一化法线”一节)。计算的结果会指向左和上之间。
然后定义六个顶点。两侧的两个顶点不共享法线,所以仍保持原来的法线值。其他四个共享法线的顶点使用相同的法线。
现在,当绘制两个三角形时,明暗会光滑地从一个两侧的顶点过渡到共享的边,如图6-4右图所示。让你很难看到两个三角形的共同边,这样用户不会发现物体是由多个三角形组成的。
技巧:教程5-7介绍了如何给一个大物体自动计算共享法线。
当使用索引时也可以使用这个方法(参见教程5-3)。
代码
在教程的前面可以找到定义三角形的代码,下面的代码用来绘制三角形:
basicEffect.World = Matrix.Identity;
basicEffect.View = fpsCam.ViewMatrix;
basicEffect.Projection = fpsCam.ProjectionMatrix;
basicEffect.Texture = blueTexture;
basicEffect.TextureEnabled = true;
basicEffect.LightingEnabled = true;
Vector3 lightDirection = new Vector3(10, -2, 0);
lightDirection.Normalize();
basicEffect.DirectionalLight0.Direction = lightDirection;
basicEffect.DirectionalLight0.DiffuseColor = Color.White.ToVector3();
basicEffect.DirectionalLight0.Enabled = true;

basicEffect.Begin();
foreach (EffectPass pass in basicEffect.CurrentTechnique.Passes)
{
    pass.Begin();
    device.VertexDeclaration = myVertexDeclaration;
    device.DrawUserPrimitives<VertexPositionNormalTexture>(PrimitiveType.TriangleList, vertices, 0, 2);
    pass.End();
}
basicEffect.End();
注意:这个教程使用的纹理只有一个不透明的颜色(蓝色), 你可以确认最后的颜色渐变效果。
发布时间:2009/9/27 上午9:57:38 阅读次数:5643
