6.3 给光线添加更高的细节:逐像素光照
问题
在前两个教程中,是在每个顶点中计算明暗程度,对三角形的每个像素需要对这个值进行插值。所以这叫做逐顶点光照(per-vertex lighting,又叫做高洛德着色,高洛德浓淡Gouraud shading)。
在某些情况中,逐顶点光照没不能产生最好的结果。特别是使用大三角形或有锐利的边缘或两者都有时,往往得不到想要的结果。
举例说明,如图左边是一个有三个面的立方体。图的右边表示共享的法线应该如何定义。本例中,光线方向用四根箭头表示。
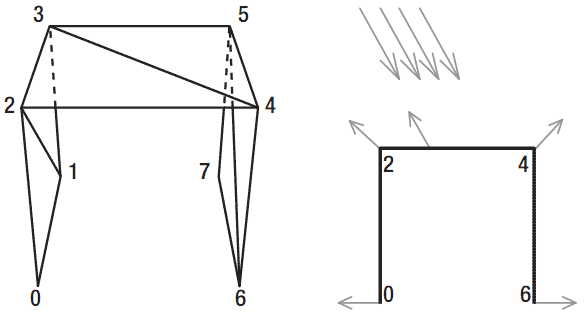
图6-5 Vertex shader对per-pixel lighting
关注立方体的顶部,对应右图中顶点2和4之间的线段。使用逐顶点光照,会计算顶点2和4的明暗。在顶点4光照不多,因为顶点4的法线几乎是垂直于光线方向的,这里我们认为是20%的光照。顶点2光照得多,因为它的法线方向几乎和光线方向一致,我们设为80%光照。在逐顶点光照中,三角形中的像素的明暗要进行插值,所有介于这两个顶点之间的像素接受的光照是20%至80%之间的插值。这样,没有一个像素可以获得100%的光照。
但是,顶点2和4之间的某一个像素的顶点方向与光线方向完全一致!这个法线显示在图6-5的右图中。很明显,这个像素应该获得100%的光照,但是使用逐顶点光照,这个像素只能获得介于20%和80%之间的某个光照值。
解决方案
逐顶点光照只计算顶点的精确明暗,而在顶点间的像素的明暗是通过插值获取的。
使用逐像素光照,你对所有像素的法线进行插值,让你可以计算每个像素的精确明暗。
工作原理
使用BasicEffect,很容易使用逐像素光照。在设置BasicEffect参数时,只需添加以下代码行:
basicEffect.PreferPerPixelLighting = true;
注意:要使逐像素shader可以工作,你必须要拥有支持Shader 2.0以上的显卡。你可以使用以下代码检查显卡的支持:
GraphicsDevice. GraphicsDeviceCapabilities.MaxPixelShaderProfile>=ShaderProfile.PS_2_0
代码
下面的代码创建如图6-5左图所示的顶点。因为某些法线可能不再是单位长度,所有确保在最后要对它们进行归一化:
private void InitVertices()
{
    vertices = new VertexPositionNormalTexture[8];
    vertices[0] = new VertexPositionNormalTexture(new Vector3(0, -1, 0), new Vector3(-1, 0, 0), new Vector2(0, 1));
    vertices[1] = new VertexPositionNormalTexture(new Vector3(0, -1,- 1), new Vector3(-1, 0, 0), new Vector2(0, 0));
    vertices[2] = new VertexPositionNormalTexture(new Vector3(0, 0, 0), new Vector3(-1, 1, 0), new Vector2(0.33f, 1));
    vertices[3] = new VertexPositionNormalTexture(new Vector3(0, 0,- 1), new Vector3(-1, 1, 0), new Vector2(0.33f, 0));
    vertices[4] = new VertexPositionNormalTexture(new Vector3(1, 0, 0), new Vector3(1, 1, 0), new Vector2(0.66f, 1));
    vertices[5] = new VertexPositionNormalTexture(new Vector3(1, 0,- 1), new Vector3(1, 1, 0), new Vector2(0.66f, 0));
    vertices[6] = new VertexPositionNormalTexture(new Vector3(1, -1, 0), new Vector3(1, 0, 0), new Vector2(1, 1));
    vertices[7] = new VertexPositionNormalTexture(new Vector3(1, -1,- 1), new Vector3(1, 0, 0), new Vector2(1, 0));

    for (int i = 0; i < vertices.Length; i++)
        vertices[i].Normal.Normalize();

    myVertexDeclaration = new VertexDeclaration(device, VertexPositionNormalTexture.VertexElements);
}
阅读教程6-1中的“归一化法线”理解为何需要最后的for循环。
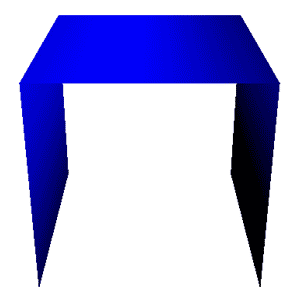
注意:因为XNA没有提供一个包含3D位置、颜色、法线的顶点结构,这个教程使用一个蓝色的纹理让每个像素的颜色都是一样的。通过这种方式,你看到的颜色中的所有变化都会被光照影响。
然后就可以使用逐像素光照绘制三角形了:
basicEffect.World = Matrix.Identity;
basicEffect.View = fpsCam.ViewMatrix;
basicEffect.Projection = fpsCam.ProjectionMatrix;
basicEffect.Texture = blueTexture;
basicEffect.TextureEnabled = true;
basicEffect.LightingEnabled = true;
Vector3 lightDirection = new Vector3(3, -10, 0);
lightDirection.Normalize();
basicEffect.DirectionalLight0.Direction = lightDirection;
basicEffect.DirectionalLight0.DiffuseColor = Color.White.ToVector3();
basicEffect.DirectionalLight0.Enabled = true;
basicEffect.PreferPerPixelLighting = true;

basicEffect.Begin();
foreach (EffectPass pass in basicEffect.CurrentTechnique.Passes)
{
    pass.Begin();
    device.VertexDeclaration = myVertexDeclaration;
    device.DrawUserPrimitives<VertexPositionNormalTexture>(PrimitiveType.TriangleStrip, vertices, 0, 6);
    pass.End();
}
basicEffect.End();
发布时间:2009/9/24 13:35:01 阅读次数:6509