5.1 绘制三角形,线和点
问题
你想定义一个3D几何结构并绘制到屏幕上,这个结构可以是由三角形,线或点组成。
解决方案
当绘制3D几何对象时,你首先需要使用primitives(图元)定义它的形状。Primitives (图元)是可以被XNA绘制的最基本的对象,最常被使用的图元是三角形。任何形状,包括圆,如果圆的数量足够多的话,都能用来表示三角形。XNA Framework可以将点,线、三角形作为图元绘制。
XNA允许你定义这些图元的所有3D坐标。当你调用DrawUserPrimitives方法时,只要你提供正确的观察矩阵和投影矩阵,XNA会自动将这些3D坐标转换为对应的屏幕坐标。
工作原理
要将3D坐标转换为屏幕上的像素位置,XNA需要知道相机的位置(存储在观察矩阵中)和关于相机镜头的某些细节(存储在投影矩阵中)。如果你的程序还没有提供这些矩阵或你未理解这些概念,可以看一下教程2-1和2-3,只需把QuakeCamera . cs文件复制并导入到项目中,通过添加如下变量在项目中添加相机系统:
private QuakeCamera fpsCam;
并在Initialize方法中进行初始化:
fpsCam = new QuakeCamera(GraphicsDevice.Viewport);
现在你的项目中已经有了一个相机系统!fpsCam对象提供了所需的观察矩阵和投影矩阵。如果你还想移动相机,可以在Update方法中传递用户的输入:
protected override void Update(GameTime gameTime)
{
    GamePadState gamePadState = GamePad.GetState(PlayerIndex.One);
    if (gamePadState.Buttons.Back == ButtonState.Pressed)
        this.Exit();
    MouseState mouseState = Mouse.GetState();
    KeyboardState keyState = Keyboard.GetState();
    fpsCam.Update(mouseState, keyState, gamePadState);
    base.Update(gameTime);
}
因为三角形使用得最多,所以我从绘制三角形开始。
定义并绘制三角形
使用XNA绘制图元是很简单的,绘制三角形的步骤如下:
- 定义三角形三个顶点的坐标和颜色,将它们存储在一个数组中。
- 设置绘制三角形要用到的effect。
- 声明要传递的数据类型。
- 在屏幕上绘制数组中的内容。
定义顶点
对应三角形的每个顶点,你不仅存储了3D位置还存储了顶点的颜色。XNA提供了一个叫做VertexPositionColor的结构,这个结构可以存储位置和颜色。所以你需要添加VertexPositionColor结构的数组,告诉显卡每个顶点所包含信息的类型。
VertexPositionColor[] vertices;
VertexDeclaration myVertexDeclaration;
定义了变量后,你将创建InitVertices 方法,此方法首先创建VertexDeclaration,然后将三个顶点添加到顶点数组中:
private void InitVertices()
{
    myVertexDeclaration = new VertexDeclaration(device, VertexPositionColor.VertexElements);
    vertices = new VertexPositionColor[3];
    vertices[0] = new VertexPositionColor(new Vector3(-5, 1, 1), Color.Red);
    vertices[1] = new VertexPositionColor(new Vector3(-5, 5, 1), Color.Green);
    vertices[2] = new VertexPositionColor(new Vector3(-3, 1, 1), Color.Blue);
}
在显卡绘制三角形前要用到VertexDeclaration,它告知显卡在顶点中包含何种类型的信息,这个信息通过顶点格式VertexElements显示,本例中是位置和颜色。
注意大多数情况下只在Draw方法中使用myVertexDeclaration变量,所以在调用Draw方法时会创建myVertexDeclaration变量,但这样做会导致每帧都会重新创建myVertexDeclaration!会让程序拖慢一点。更重要的是,因为Xbox 360使用的是.NET Framework的精简版本,这会导致在Xbox 360平台上程序会不定时地发生冲突,而且很难找到原因。所以请确保你只初始化myVertexDeclaration一次。
接下来你指定顶点的位置和颜色,本例中所有顶点的Z坐标都相同,你的三角形是平行于XY平面的。确保在LoadContent方法中调用这个方法。加载BasicEffect 在绘制三角形之前,需要告知显卡如何处理它接收到的信息。本例中,你想让指定的颜色作为三角形顶点的颜色,在更复杂的场景中你可能还要将这些信息用于其他目的。这一步要求调用一个effect。幸运的是,XNA内置了一个effect可以让显卡处理大多数逻辑和基本操作,这个effect叫做BasicEffect,你需要首先创建一个用来绘制三角形。在项目中添加这个变量:
private BasicEffect basicEffect;
并在LoadContent方法中进行初始化:
protected override void LoadContent()
{
    device = graphics.GraphicsDevice;
    basicEffect = new BasicEffect(device, null);
    InitVertices();
}
将三角形绘制到屏幕
注意因为是演示,所以这里我使用了DrawUserPrimitive方法,虽然这个方法不是最快的。教程5-4会讨论一个更加快且复杂的方法。
定义了顶点和加载了BasicEffect后,你就做好了绘制三角形的准备。显然,绘制三角形应在Draw方法中完成,而Draw方法在XNA Framework中已经提供了,它每帧都会被调用。在清除场景后添加以下代码:
device.RenderState.CullMode = CullMode.None;
basicEffect.World = Matrix.Identity;
basicEffect.View = fpsCam.ViewMatrix;
basicEffect.Projection = fpsCam.ProjectionMatrix;
basicEffect.VertexColorEnabled = true;
basicEffect.Begin();
foreach (EffectPass pass in basicEffect.CurrentTechnique.Passes)
{
    pass.Begin();
    device.VertexDeclaration =myVertexDeclaration; device.DrawUserPrimitives<VertexPositionColor>
    (PrimitiveType.TriangleList, vertices, 0, 1);
    pass.End();
}
basicEffect.End();
在绘制三角形前,你需要设置BasicEffect的一些参量。这些参量可能是通过设置世界矩阵(见教程4-2)移动,旋转或缩放三角形。本例中你只是简单地将三角形绘制到指定位置,所以世界矩阵设为单位矩阵。
BasicEffect还需要知道观察矩阵和投影矩阵让显卡可以根据相机的位置将顶点从3D坐标转换为2D屏幕坐标。最后你还需指定BasicEffect effect使用你指定的颜色信息。
注意:如果你没有指定BasicEffect从哪采样颜色,那么它会使用最近指定的那个。
接下来,开始effect。高级ffects可以有多个pass,虽然BasicEffect只有一个pass,但遍历所有可能的pass还是一个好习惯。
一旦开始pass,你首先需要传递VertexDeclaration是显卡知道顶点中包含何种数据。最后调用device.DrawUserPrimitives方法绘制三角形。DrawUserPrimitives方法需要四个参数。第一个参数指定是绘制三角形、线还是点,以及在数组中的存储方式。第二个参数是用来存储顶点的数组。第三个参数指定数组中开始绘制的顶点索引,因为你想从第一个顶点开始绘制,所以这里设置为0。第四个参数表示需要绘制多少个图元,因为在数组中你只存储了三个顶点,所以只需绘制1个三角形。
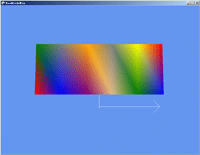
运行代码后就可以绘制一个三角形了!如你所见,三角形的每个顶点的颜色都是你指定的,顶点之间的颜色是通过线性插值求出的。
注意:代码device.RenderState.CullMode = CullMode.None会关闭剔除(见教程5-6)。剔除会使三角形不会被绘制,所以当开始3D编程前,你应关闭它。
使用TriangleList(三角带)绘制多个三角形TriangleList
会绘制一个三角形,那么绘制多个也不难。首先定义顶点:
private void InitVertices()
{
    myVertexDeclaration = new VertexDeclaration(device, VertexPositionColor.VertexElements);
    vertices = new VertexPositionColor[12];
    vertices[0] = new VertexPositionColor(new Vector3(-5, 1, 1), Color.Red);
    vertices[1] = new VertexPositionColor(new Vector3(-5, 5, 1), Color.Green);
    vertices[2] = new VertexPositionColor(new Vector3(-3, 1, 1), Color.Blue);
    vertices[3] = new VertexPositionColor(new Vector3(-3, 5, 1), Color.Gray);
    vertices[4] = new VertexPositionColor(new Vector3(-1, 1, 1), Color.Purple);
    vertices[5] = new VertexPositionColor(new Vector3(-1, 5, 1), Color.Orange);
    vertices[6] = new VertexPositionColor(new Vector3(1, 1, 1), Color.BurlyWood);
    vertices[7] = new VertexPositionColor(new Vector3(1, 5, 1), Color.Gray);
    vertices[8] = new VertexPositionColor(new Vector3(3, 1, 1), Color.Green);
    vertices[9] = new VertexPositionColor(new Vector3(3, 5, 1), Color.Yellow);
    vertices[10] = new VertexPositionColor(new Vector3(5, 1, 1), Color.Blue);
    vertices[11] = new VertexPositionColor(new Vector3(5, 5, 1), Color.Red);
}
技巧:你也可以使用一个递增的整数节省时间,而不是手动设置所有索引。
定义完12个顶点后就可以绘制4个三角形了:
device.DrawUserPrimitives<VertexPositionColor> (PrimitiveType.TriangleList, vertices, 0, 4);
如果你只想绘制最后两个三角形,你可以从第7个顶点开始,因为数组的第一个索引是0,所以这个顶点的索引是6:
device.DrawUserPrimitives<VertexPositionColor> (PrimitiveType.TriangleList, vertices, 6, 2);
因为发送到显存的数据变少,这样做可以节省带宽。
使用TriangleStrip绘制多个三角形
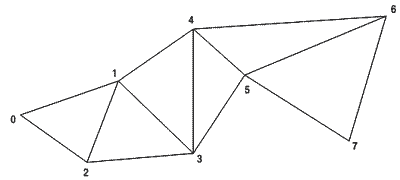
如果你要绘制的三角形是相连的,就可以使用TriangleStrip 代替Triangle List,这样可以节省内存和带宽。看一下如图5-1所示的六个三角形。如果使用TriangleList需要6*3 = 18个顶点,当其中只有8个顶点是唯一的,其余10个顶点是重复存储并发送到显卡中的,这样做会浪费内存、带宽和GPU的处理能力!

图5-1 绘制一个TriangleStrip
将要绘制的三角形指定为一个TriangleStrip,XNA会基于前三个顶点绘制第一个三角形,然后为下一个顶点创建一个新三角形,而这个三角形使用了新的顶点和前两个顶点。这样,第一个三角形是由顶点0,1,2定义的;而第二个是由顶点1,2,3定义的;第三个是由顶点1,3,4定义的,以此类推。
要绘制x个三角形,你需要定义x+2个顶点。如果你在数组中存储了12个顶点,可以使用以下代码以TriangleStrip的形式绘制10个三角形:
device.DrawUserPrimitives<VertexPositionColor> (PrimitiveType.TriangleStrip, vertices, 0, 10);
注意:当使用TriangleStrip以逆时针方向定义三角形时,不可能遵循剔除规则。(见教程5-6)。要解决这个问题,对于TriangleStrip 来说剔除有些特别,第一个三角形必须以顺时针的顺序定义,而其他三角形的顺序相反。
使用PointList绘制多个点
绘制点和线段的码类似;只是指定的图元类型不同。在数组中只需为每个点存储一个顶点。如果你存储了12个顶点,下面的代码就可以在屏幕上绘制12个点:
device.DrawUserPrimitives<VertexPositionColor> (PrimitiveType.PointList, vertices, 0, 12);
注意:无论相机离开点的远近,每个点对应一个像素,你需要一双好眼睛才能看到这些像素。
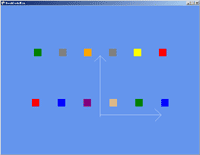
译者注:要想绘制大于一个像素的点,需要使用PointSprite(点精灵),需要在绘制前添加如下代码:
graphics.GraphicsDevice.RenderState.DepthBufferEnable = false;
graphics.GraphicsDevice.RenderState.PointSpriteEnable = true;
graphics.GraphicsDevice.RenderState.PointSize = 30.0f;
程序截图如下:

使用LineList绘制多条线段
你需要两个点定义一条线段。12个顶点可以绘制12/2 = 6条线段,代码如下:
device.DrawUserPrimitives<VertexPositionColor>(PrimitiveType.LineList, vertices, 0, 6);
使用LineStrip绘制多条线段如果一组线是相连的,你也可以绘制一个线带,如图5-2所示。

图5-2 使用LineStrip绘制多条线段
绘制x条线段需要x-1个顶点,所以如果你在数组中存储了12个顶点,那么可以使用如下方法画出11条线段:
device.DrawUserPrimitives<VertexPositionColor> (PrimitiveType.LineStrip, vertices, 0, 11);
使用TriangleFan绘制多个三角形
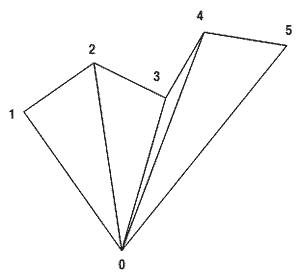
如果三角形共享一个顶点,你也可以使用TriangleFan绘制三角形。图5-3显示了这种三角形。注意对应共享的中心点,每个三角形必须与邻近三角形共享一条边。

图5-3 使用TriangleFan绘制多个三角形
使用x–2个顶点绘制x个三角形。这意味着需要12个顶点绘制10个三角形。共享的点必须是数组中的第一个顶点。
注意:TriangleStrip在提供相同性能的前提下更加灵活:
device.DrawUserPrimitives<VertexPositionColor>(PrimitiveType.TriangleFan, vertices, 0, 10);
代码
因为这个本章的第一个教程,所以下面是使用TriangleStrip绘制三角形的全部代码:
using System; using System.Collections.Generic;
using Microsoft.Xna.Framework;
using Microsoft.Xna.Framework.Audio;
using Microsoft.Xna.Framework.Content;
using Microsoft.Xna.Framework.GamerServices;
using Microsoft.Xna.Framework.Graphics;
using Microsoft.Xna.Framework.Input;
using Microsoft.Xna.Framework.Net;
using Microsoft.Xna.Framework.Storage;
namespace BookCode
{
    public class Game1 : Microsoft.Xna.Framework.Game
    {
        GraphicsDeviceManager graphics;
        GraphicsDevice device;
        BasicEffect basicEffect;
        QuakeCamera fpsCam;
        CoordCross cCross;
        VertexPositionColor[] vertices;
        VertexDeclaration myVertexDeclaration;

        public Game1()
        {
            graphics = new GraphicsDeviceManager(this);
            Content.RootDirectory = "Content";
        }

        protected override void Initialize()
        {
            fpsCam = new QuakeCamera(GraphicsDevice.Viewport);
            base.Initialize();
        }

        protected override void LoadContent()
        {
            device = graphics.GraphicsDevice;
            basicEffect = new BasicEffect(device, null);
            InitVertices();
            cCross = new CoordCross(device);
        }

        private void InitVertices()
        {
            myVertexDeclaration = new VertexDeclaration(device, VertexPositionColor.VertexElements);
            vertices = new VertexPositionColor[12];
            vertices[0] = new VertexPositionColor(new Vector3(-5, 1, 1), Color.Red);
            vertices[1] = new VertexPositionColor(new Vector3(-5, 5, 1), Color.Green);
            vertices[2] = new VertexPositionColor(new Vector3(-3, 1, 1), Color.Blue);
            vertices[3] = new VertexPositionColor(new Vector3(-3, 5, 1), Color.Gray);
            vertices[4] = new VertexPositionColor(new Vector3(-1, 1, 1), Color.Purple);
            vertices[5] = new VertexPositionColor(new Vector3(-1, 5, 1), Color.Orange);
            vertices[6] = new VertexPositionColor(new Vector3(1, 1, 1), Color.BurlyWood);
            vertices[7] = new VertexPositionColor(new Vector3(1, 5, 1), Color.Gray);
            vertices[8] = new VertexPositionColor(new Vector3(3, 1, 1), Color.Green);
            vertices[9] = new VertexPositionColor(new Vector3(3, 5, 1), Color.Yellow);
            vertices[10] = new VertexPositionColor(new Vector3(5, 1, 1),Color.Blue);
            vertices[11] = new VertexPositionColor(new Vector3(5, 5, 1), Color.Red);
        }

        protected override void UnLoadContent()
        {
        }

        protected override void Update(GameTime gameTime)
        {
            GamePadState gamePadState = GamePad.GetState(PlayerIndex.One);
                if (gamePadState.Buttons.Back == ButtonState.Pressed)
                    this.Exit();
            MouseState mouseState = Mouse.GetState();
            KeyboardState keyState = Keyboard.GetState();
            fpsCam.Update(mouseState, keyState, gamePadState);
            base.Update(gameTime);
        }

        protected override void Draw(GameTime gameTime)
        {
            device.Clear(ClearOptions.Target | ClearOptions.DepthBuffer, Color.CornflowerBlue, 1, 0);
            cCross.Draw(fpsCam.ViewMatrix, fpsCam.ProjectionMatrix);

            //draw triangles
            device.RenderState.CullMode = CullMode.None;
            basicEffect.World = Matrix.Identity;
            basicEffect.View = fpsCam.ViewMatrix;
            basicEffect.Projection = fpsCam.ProjectionMatrix;
            basicEffect.VertexColorEnabled = true;
            basicEffect.Begin();
            foreach (EffectPass pass in basicEffect.CurrentTechnique.Passes)
            {
                pass.Begin();
                device.VertexDeclaration = myVertexDeclaration;
                device.DrawUserPrimitives<VertexPositionColor>(PrimitiveType.TriangleStrip, vertices, 0, 10);
                pass.End();
            }
            basicEffect.End();
            base.Draw(gameTime);
        }
    }
}

发布时间:2009/5/25 下午2:05:08 阅读次数:9233
