2.8 天空盒
问题
你想在游戏中中添加一个场景,而不是单一颜色的背景。
解决方案
你用不着将物体充满场景的每个部分,只需简单地绘制一个很大的立方体,在立方体内部的六个面上贴上风景或房子内部的纹理,然后把相机放在立方体内部。
工作原理
有几种方法可以将一个天空盒放置在场景中,最简单的方法是导入一个模型文件,这个文件拥有自己的纹理和effect。如果你想获得完全控制权,你也可以自己定义一个立方体。我还展示了一个HLSL示例,介绍如何使用单张TextureCube纹理实现天空盒的方法,而这个纹理使用了HLSL的texCUBE内置函数。
以上两个技术相同点是:
- 立方体必须总是绘制在相机周围,而相机应该总处于立方体中心。只有这样才能让玩家在移动相机时,保持相机和立方体之间的距离不变,使场景给人一种在无穷远处的印象。
- 当绘制天空盒时你应该让Z缓冲不可写,这样就无需缩放天空盒以适应场景。但注意不要忘记在绘制完天空盒后重新使Z缓冲可写。
从文件载入天空盒
一个方法是从一个模型文件载入天空盒。你可以使用来自于DirectX SDK的例子,这个例子包含了.x文件和对应的六张纹理。将它们复制到你的项目中,最后在项目中添加skyboxModel和skyboxTransforms变量:
Model skyboxModel;
Matrix[] skyboxTransforms;
在LoadContents方法中加载模型:
skyboxModel = content.Load<Model>("skybox");
skyboxTransforms = new Matrix[skyboxModel.Bones.Count];
然后就像对待普通模型一样绘制天空盒:
skyboxModel.CopyAbsoluteBoneTransformsTo(skyboxTransforms);
foreach (ModelMesh mesh in skyboxModel.Meshes)
{
    foreach (BasicEffect effect in mesh.Effects)
    {
        effect.World = skyboxTransforms[mesh.ParentBone.Index];
        effect.View = fpsCam.ViewMatrix;
        effect.Projection = fpsCam.ProjectionMatrix;
    }
    mesh.Draw();
}
这样只是简单地将天空盒作为一个盒子绘制,但是,当你移动相机时,你会更加靠近天空盒,纹理会拉近,会使你感到远处的天空是假的。要避免这种情况发生,天空盒必须看起来距离相机无穷远,这样当相机移动时,天空盒的纹理不会变大。
要做到这一点需要保证相机总在天空盒的中心、换句话说,你要通过将天空盒移动到相机位置而使相机总保持处在天空盒中心,你需要这样设置世界矩阵:
effect.World = skyboxTransforms[mesh.ParentBone.Index] *Matrix.CreateTranslation(fpsCam.Position);
现在,当你运行代码,无论你如何移动相机天空盒看起来总停在同样的位置,给人在无穷远处的感觉。
下一个可能会遇到的问题是你可以清晰地看到立方体的边缘,这是因为XNA对靠近边缘的纹理的采样方式,将纹理寻址方式改成Clamp(见教程5-2),可以让立方体边缘的颜色截取至纹理边界的颜色
device.SamplerStates[0].AddressU = TextureAddressMode.Clamp;
device.SamplerStates[0].AddressV = TextureAddressMode.Clamp;
运行后可以发现立方体边缘变得平滑得多了。
在场景中绘制物体
如果立方体中没有物体,你的场景看起来不会很漂亮。当你将物体放置在场景中时,你还要考虑另外一些问题:天空盒的大小。如何让你的天空盒大到能包容场景中的所有物体又不会因为过大而被投影矩阵裁剪掉?
其实大小并不重要,你可以用任意大小绘制天空盒,在在绘制其他物体之前必须保证XNA不能写入深度缓冲。通过这种方式,任何在天空盒之后绘制的物体就想没有天空盒一样被绘制到场景中。
下面是工作原理:无论你是绘制一个最低点是(-1,-1,-1)最高点是(1,1,1)的盒子还是最低点是(-100,-100,-100) 最高点是(100,100,100)的盒子,如果你将相机放置在盒子中心,它们看起来是一样的。所以,你可以放心地以模型原始大小绘制天空盒。但如果盒子太小,会把场景中的物体隐藏到它的后面,这就是为什么你需要在绘制天空盒时关闭写入深度缓冲的原因。通过这种方式,当天空盒作为第一个物体绘制后,深度缓冲仍是空的!所有在此之后绘制的物体并不知道天空盒已近被绘制了,对应物体的像素会使用物体的颜色。关于Z缓冲更多知识请见教程2-1。
所以,你需要在绘制天空盒前加入以下代码:
device.RenderState.DepthBufferWriteEnable = false;
确保在绘制完天空盒后打开Z缓冲,否则你的模型会混在一起:
device.RenderState.DepthBufferWriteEnable = true;
手动定义天空盒
从一个文件载入天空盒不够灵活。例如,前面一个例子中的天空盒使用了六张纹理使模型要分成六个不同的面,而这六个面都要调用DrawPrimitives 方法只是为了绘制两个三角形。少量的三角形对DrawPrimitives 的大量调用会拖慢XNA程序的速度(见教程3-4和3-11)。
虽然六次调用影响不大,但接下来我们还是想自己建立天空盒的顶点,整个天空盒使用一张纹理只需调用DrawPrimitives一次。我们使用TextureCube代替Texture2D存储天空盒纹理。TextureCube也是一张2D图片,由天空盒的六个面的图像组成,见图2-9。
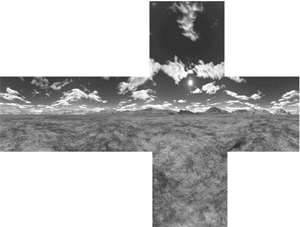
图2-9 天空盒的六个面组成一张图像
在项目中添加TextureCube,Effect和VertexBuffer变量:
VertexBuffer skyboxVertexBuffer;
TextureCube skyboxTexture;
Effect skyboxEffect;
然后在LoadContent 方法中载入effect和纹理:
effect = content.Load<Effect>("skyboxsample");
skyboxTexture = content.Load<TextureCube>("skyboxtexture");
你将在后面创建skyboxsample effect 文件。
提示:你可以使用DirectX SDK 中的DirectX Texture tool创建自己的TextureCube图像。安装完SDK后,你会在开始菜单中找到这个工具的快捷方式。只需选择File→New并选择Cubemap Texture,然后从View→Cube Map Face菜单中选择要应用的面。你也可以实时定义面的内容,具体信息可见教程3-7。
通过手动定义每个顶点,绘制天空盒只需调用DrawPrimitives一次。当然,顶点需要包含位置信息,而且因为要在三角形上添加纹理,还需要在顶点中添加纹理坐标信息。但是,因为你使用HLSL内置的texCUBE函数从TextureCube中采样颜色数据,所以不需要纹理坐标数据,你会在下面学习更多texCUBE的细节知识。
但XNA Framework无法处理只包含位置信息的顶点,你当然可以使用一个复杂结构,比如VertexPositionColor而将颜色数据保持为空值,但这样做仍会将颜色数据发送到显卡,会浪费带宽。要使程序保持清晰,你可以创建最简单的顶点格式,只包含位置数据。可见教程5-14学习如何自定义顶点格式:
public struct VertexPosition
{
    public Vector3 Position;
    public VertexPosition(Vector3 position)
    {
        this.Position = position;
    }

    public static readonly VertexElement[] VertexElements = {
        new VertexElement( 0, 0, VertexElementFormat.Vector3, VertexElementMethod.Default,
VertexElementUsage.Position, 0 )
    };

    public static readonly int SizeInBytes = sizeof(float) * 3;
}
这个结构定义了一个自定义的顶点格式,只包含一个Vector3存储位置信息。当定义天空盒顶点时,必须要考虑三角形顶点的环绕顺序,否则某些面就会被剔除。要学习更多剔除(culling)的知识可见教程5-6。当相机在天空盒中时,每个面都不能被剔除,所以所有三角形都应该以顺时针的顺序排列,这样才能被相机看到。为了让事情变得简单点,我给立方体的八个角都起了一个相对于相机而言的名称:
Vector3 forwardBottomLeft = new Vector3(-1, -1, -1);
Vector3 forwardBottomRight = new Vector3(1, -1, -1);
Vector3 forwardUpperLeft = new Vector3(-1, 1, -1);
Vector3 forwardUpperRight = new Vector3(1, 1, -1);
Vector3 backBottomLeft = new Vector3(-1, -1, 1);
Vector3 backBottomRight = new Vector3(1, -1, 1);
Vector3 backUpperLeft = new Vector3(-1, 1, 1);
Vector3 backUpperRight = new Vector3(1, 1, 1);
接着开始使用前面定义的Vector3定义三角形。立方体有六个面,每个面由两个三角形组成,所以你需要定义36个顶点。定义完所有顶点后,要将它们放在VertexBuffer(可见教程5-4)中发送到显存中:
VertexPosition[] vertices = new VertexPosition[36];
int i = 0;

//face in front of the camera
vertices[i++] = new VertexPosition(forwardBottomLeft);
vertices[i++] = new VertexPosition(forwardUpperLeft);
vertices[i++] = new VertexPosition(forwardUpperRight);
vertices[i++] = new VertexPosition(forwardBottomLeft);
vertices[i++] = new VertexPosition(forwardUpperRight);
vertices[i++] = new VertexPosition(forwardBottomRight);

//face to the right of the camera
vertices[i++] = new VertexPosition(forwardBottomRight);
vertices[i++] = new VertexPosition(forwardUpperRight);
vertices[i++] = new VertexPosition(backUpperRight);
vertices[i++] = new VertexPosition(forwardBottomRight);
vertices[i++] = new VertexPosition(backUpperRight);
vertices[i++] = new VertexPosition(backBottomRight);

//face behind the camera vertices[i++] = new VertexPosition(backBottomLeft);
vertices[i++] = new VertexPosition(backUpperRight);
vertices[i++] = new VertexPosition(backUpperLeft);
vertices[i++] = new VertexPosition(backBottomLeft);
vertices[i++] = new VertexPosition(backBottomRight);
vertices[i++] = new VertexPosition(backUpperRight);

//face to the left of the camera
vertices[i++] = new VertexPosition(backBottomLeft);
vertices[i++] = new VertexPosition(backUpperLeft);
vertices[i++] = new VertexPosition(forwardUpperLeft);
vertices[i++] = new VertexPosition(backBottomLeft);
vertices[i++] = new VertexPosition(forwardUpperLeft);
vertices[i++] = new VertexPosition(forwardBottomLeft);

//face above the camera
vertices[i++] = new VertexPosition(forwardUpperLeft);
vertices[i++] = new VertexPosition(backUpperLeft);
vertices[i++] = new VertexPosition(backUpperRight);
vertices[i++] = new VertexPosition(forwardUpperLeft);
vertices[i++] = new VertexPosition(backUpperRight);
vertices[i++] = new VertexPosition(forwardUpperRight);

//face under the camera
vertices[i++] = new VertexPosition(forwardBottomLeft);
vertices[i++] = new VertexPosition(backBottomRight);
vertices[i++] = new VertexPosition(backBottomLeft);
vertices[i++] = new VertexPosition(forwardBottomLeft);
vertices[i++] = new VertexPosition(forwardBottomRight);
vertices[i++] = new VertexPosition(backBottomRight);

skyboxVertexBuffer = new VertexBuffer(device, vertices.Length * VertexPosition.SizeInBytes,
BufferUsage.WriteOnly);
skyboxVertexBuffer.SetData<ertexPosition>(vertices);
HLSL
定义了顶点后,就可以处理HLSL了。TextureCube只是一张2D图像,所以你可以使用普通的texture和sampler定义:
Texture xCubeTexture;
sampler CubeTextureSampler = sampler_state
{
    texture = <xCubeTexture>;
    magfilter = LINEAR;
    minfilter = LINEAR;
    mipfilter=LINEAR;
    AddressU = clamp;
    AddressV = clamp;
};
这个纹理将在pixel shader中由texCUBE进行采样,texCUBE接受两个参数。第一个参数是纹理对应的采样器,第二个参数指定从哪里对纹理进行采样。texCUBE沿着从立方体中心指向3D位置的方向获取颜色,而不是通过2D纹理坐标获取颜色,接着texCUBE计算对应的纹理坐标。
这样做有几个优点。因为相机总在立方体中心,这个方向就是像素的3D位置的所需颜色!而且,因为你处理的是一个方向,所以无需进行缩放,例如方向(1,3,-2)和方向(10,30,-20)是相同的。
这样,对于每个立方体的顶点,vertex shader需要将3D位置传送到pixel shader(接着转换为2D屏幕坐标):
//Technique: Skybox struct SkyBoxVertexToPixel
{
    float4 Position : POSITION;
    float3 Pos3D : TEXCOORD0;
};

SkyBoxVertexToPixel SkyBoxVS( float4 inPos : POSITION)
{
    SkyBoxVertexToPixel Output = (SkyBoxVertexToPixel)0;
    float4x4 preViewProjection = mul (xView, xProjection);
    float4x4 preWorldViewProjection = mul (xWorld, preViewProjection);
    Output.Position = mul(inPos, preWorldViewProjection);
    Output.Pos3D = inPos;
    return Output;
}
你可以看到vertex shader只需每个顶点的位置,这个位置是由你定义在XNA代码中的顶点提供的。将这个位置乘以世界矩阵、观察矩阵和投影矩阵的组合就可以获得2D屏幕坐标。顶点的原始位置在Output.Pos3D中被传递到pixel shader,在texCUBE中需要这个原始位置。
注意:在大多数情况中你需要原始3D位置,但这次3D位置没有乘以世界矩阵,因为你需要获取从立方体中心指向顶点的方向,这个方向等于“顶点位置减去中心位置”。根据你定义立方体顶点的方式,在原始空间(又叫做模型空间)中中心位置是(0,0,0),所以这个方向就是顶点的位置。
在pixel shader中只获取了这个方向,并找到对应的颜色,最终传递到帧缓冲:
struct SkyBoxPixelToFrame
{
    float4 Color : COLOR0;
};

SkyBoxPixelToFrame SkyBoxPS(SkyBoxVertexToPixel PSIn)
{
    SkyBoxPixelToFrame Output = (SkyBoxPixelToFrame)0;
    Output.Color = texCUBE(CubeTextureSampler, PSIn.Pos3D);

    return Output;
}
既然你已经计算了像素和立方体中心之间的方向,接着可以将它直接传递到texCUBE作为第二个参数,而texCUBE从纹理中采样对应的颜色,最后这个颜色被传递到帧缓冲。
XNA代码
将这个结构放在命名空间顶部:
public struct VertexPosition
{
    public Vector3 Position;
    public VertexPosition(Vector3 position)
    {
        this.Position = position;
    }

    public static readonly VertexElement[] VertexElements = {
        new VertexElement( 0, 0, VertexElementFormat.Vector3, VertexElementMethod.Default,
VertexElementUsage.Position, 0 )
    };

    public static readonly int SizeInBytes = sizeof(float) * 3;
}
这个方法定义了36个顶点:
private void CreateSkyboxVertexBuffer()
{
Vector3 forwardBottomLeft = new Vector3(-1, -1, -1);
Vector3 forwardBottomRight = new Vector3(1, -1, -1);
Vector3 forwardUpperLeft = new Vector3(-1, 1, -1);
Vector3 forwardUpperRight = new Vector3(1, 1, -1);
Vector3 backBottomLeft = new Vector3(-1, -1, 1);
Vector3 backBottomRight = new Vector3(1, -1, 1);
Vector3 backUpperLeft = new Vector3(-1, 1, 1);
Vector3 backUpperRight = new Vector3(1, 1, 1);

VertexPosition[] vertices = new VertexPosition[36];
int i = 0;

//face in front of the camera
vertices[i++] = new VertexPosition(forwardBottomLeft);
vertices[i++] = new VertexPosition(forwardUpperLeft);
vertices[i++] = new VertexPosition(forwardUpperRight);
vertices[i++] = new VertexPosition(forwardBottomLeft);
vertices[i++] = new VertexPosition(forwardUpperRight);
vertices[i++] = new VertexPosition(forwardBottomRight);

//face to the right of the camera
vertices[i++] = new VertexPosition(forwardBottomRight);
vertices[i++] = new VertexPosition(forwardUpperRight);
vertices[i++] = new VertexPosition(backUpperRight);
vertices[i++] = new VertexPosition(forwardBottomRight);
vertices[i++] = new VertexPosition(backUpperRight);
vertices[i++] = new VertexPosition(backBottomRight);

//face behind the camera vertices[i++] = new VertexPosition(backBottomLeft);
vertices[i++] = new VertexPosition(backUpperRight);
vertices[i++] = new VertexPosition(backUpperLeft);
vertices[i++] = new VertexPosition(backBottomLeft);
vertices[i++] = new VertexPosition(backBottomRight);
vertices[i++] = new VertexPosition(backUpperRight);

//face to the left of the camera
vertices[i++] = new VertexPosition(backBottomLeft);
vertices[i++] = new VertexPosition(backUpperLeft);
vertices[i++] = new VertexPosition(forwardUpperLeft);
vertices[i++] = new VertexPosition(backBottomLeft);
vertices[i++] = new VertexPosition(forwardUpperLeft);
vertices[i++] = new VertexPosition(forwardBottomLeft);

//face above the camera
vertices[i++] = new VertexPosition(forwardUpperLeft);
vertices[i++] = new VertexPosition(backUpperLeft);
vertices[i++] = new VertexPosition(backUpperRight);
vertices[i++] = new VertexPosition(forwardUpperLeft);
vertices[i++] = new VertexPosition(backUpperRight);
vertices[i++] = new VertexPosition(forwardUpperRight);

//face under the camera
vertices[i++] = new VertexPosition(forwardBottomLeft);
vertices[i++] = new VertexPosition(backBottomRight);
vertices[i++] = new VertexPosition(backBottomLeft);
vertices[i++] = new VertexPosition(forwardBottomLeft);
vertices[i++] = new VertexPosition(forwardBottomRight);
vertices[i++] = new VertexPosition(backBottomRight);

skyboxVertexBuffer = new VertexBuffer(device, vertices.Length * VertexPosition.SizeInBytes,
BufferUsage.WriteOnly);
skyboxVertexBuffer.SetData<ertexPosition>(vertices);
在Draw 方法中添加以下代码,使用自定义effect 绘制三角形:
graphics.GraphicsDevice.Clear(ClearOptions.Target | ClearOptions.DepthBuffer,
Color.Black, 1, 0);
device.RenderState.DepthBufferWriteEnable = false;
skyboxEffect.CurrentTechnique = skyboxEffect.Techniques["SkyBox"];
skyboxEffect.Parameters["xWorld"].SetValue(Matrix.CreateTranslation(fpsCam.Position));
skyboxEffect.Parameters["xView"].SetValue(fpsCam.ViewMatrix);
skyboxEffect.Parameters["xProjection"].SetValue(fpsCam.ProjectionMatrix);
skyboxEffect.Parameters["xCubeTexture"].SetValue(skyboxTexture);

skyboxEffect.Begin();
foreach (EffectPass pass in skyboxEffect.CurrentTechnique.Passes)
{
    pass.Begin();
    device.VertexDeclaration = new VertexDeclaration(device, VertexPosition.VertexElements);
    device.Vertices[0].SetSource(skyboxVertexBuffer, 0, VertexPosition.SizeInBytes);
    device.DrawPrimitives(PrimitiveType.TriangleList, 0, 12);
    pass.End();
}
skyboxEffect.End();
device.RenderState.DepthBufferWriteEnable = true;
HLSL代码
下面是HLSL代码:
float4x4 xWorld;
float4x4 xView;
float4x4 xProjection;

Texture xCubeTexture;
sampler CubeTextureSampler = sampler_state
{
    texture = <xCubeTexture>;
    magfilter = LINEAR;
    minfilter = LINEAR;
    mipfilter=LINEAR;
    AddressU = clamp;
    AddressV = clamp;
};

//Technique: Skybox
struct SkyBoxVertexToPixel
{
    float4 Position : POSITION;
    float3 Pos3D : TEXCOORD0;
};

SkyBoxVertexToPixel SkyBoxVS( float4 inPos : POSITION)
{
    SkyBoxVertexToPixel Output = (SkyBoxVertexToPixel)0;
    float4x4 preViewProjection = mul (xView, xProjection);
    float4x4 preWorldViewProjection = mul (xWorld, preViewProjection);
    Output.Position = mul(inPos, preWorldViewProjection);
    Output.Pos3D = inPos;
    return Output;
}

struct SkyBoxPixelToFrame
{
    float4 Color : COLOR0;
};

SkyBoxPixelToFrame SkyBoxPS(SkyBoxVertexToPixel PSIn)
{
    SkyBoxPixelToFrame Output = (SkyBoxPixelToFrame)0;
    Output.Color = texCUBE(CubeTextureSampler, PSIn.Pos3D);
    return Output;
}

technique SkyBox
{
    pass Pass0
    {
        VertexShader = compile vs_1_1 SkyBoxVS();
        PixelShader = compile ps_1_1 SkyBoxPS();
    }
}
发布时间:2009/5/5 15:11:26 阅读次数:12768