10.3 地形Effect
要绘制地形,你还要创建一个使用多重纹理和法线映射的自定义effect。多重纹理可以将多个不同的纹理组合在地形上,而法线映射可以添加地形细节。接下来,我们将讨论多纹理和法线映射技术的使用,你将创建地形effect。
多重纹理
使用多重纹理你可以将不同的纹理层放置在地形上,例如沙地、草地、岩石、雪地等。然后,组合这些纹理作为地形的纹理。例如,地形的某些部分有草地,其他部分有岩石,另一部分有草地和沙地或雪地和岩石等。图10-8展示了纹理如何组合成一个新的纹理。
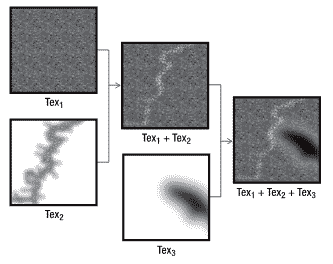
图10-8多重纹理:将三张纹理组合成一张
在将要创建的地形effect中,你将在一个叫做alpha map的纹理的基础上组合多个纹理,这个alpha map纹理决定了每个纹理的权重。这里alpha map是一个RGBA纹理,每个通道8位,你使用每个纹理通道存储不同纹理层的权重。
法线映射
使用法线映射让你可以在不增加网格复杂度的前提下添加地形网格的小细节。你也可以使用更先进更复杂的技术添加网格细节,诸如relief mapping, parallax occlusion mapping和cone step mapping。
在法线映射中,你根据叫做法线贴图(normal map)的法线设置表面法线。接着你使用设置后的法线计算光照,模拟表面上的小细节,如图10-9所示:
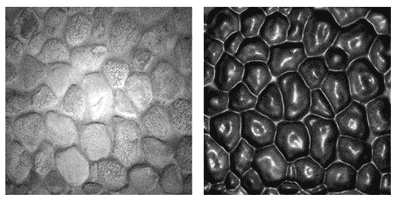
图10-9.左图只有纹理,右图是加上法线映射的纹理
法线贴图是一张RGB纹理,纹理的每个通道代表法线的X,Y和Z向量。注意X,Y和Z坐标不在世界空间中,而是在切线空间中。这样,法线贴图可以独立于表面而可以用在各种类型的对象上。所以,你必须计算每个顶点的切线、法线和副法线向量。 法线映射的缺点是当表面是从掠射角(也称入射余角,即表面法线和观察向量夹角接近90度)方向观察时看起来是平的。
地形Effect-Vertex Processing
你创建的effect支持两个光源,四张纹理和法线映射。总的来说,effect使用六张纹理:四张漫反射,一张alpha 贴图,一张法线贴图。alpha 贴图决定了四张漫反射纹理是如何组合成最后的颜色的。让我们通过vertex shader构建effect。vertex shader输入是一个包含顶点位置、纹理坐标和切线空间(切线、法线和副法线向量)的结构:
struct a2v
{
    float4 position : POSITION;
    float2 uv0 : TEXCOORD0;
    float3 tangent : TANGENT;
    float3 binormal : BINORMAL;
    float3 normal : NORMAL;
};
vertex shader的输出包含顶点转换后的位置,六张纹理的坐标,观察向量和两个光线向量(所有向量都在切线空间):
struct v2f
{
    float4 hposition : POSITION;
    float4 uv1_2 : TEXCOORD0;
    float4 uv3_4 : TEXCOORD1;
    float4 uv5_6 : TEXCOORD2;
    float3 eyeVec : TEXCOORD4;
    float3 lightVec1 : TEXCOORD5;
    float3 lightVec2 : TEXCOORD6;
};
在vertex处理过程中,首先是计算顶点的最终位置:
OUT.hposition = mul(IN.position, matWVP);// Vertex position in homogeneous space
然后计算切线空间,并将它与世界矩阵组合,在计算它的反矩阵(这里反矩阵等于转置矩阵),你使用tangentSpace矩阵将顶点从世界空间转换到切线空间:
float3x3 tangentSpace = float3x3(IN.tangent, IN.binormal, IN.normal);
tangentSpace = mul(tangentSpace, matW);
tangentSpace = transpose(tangentSpace);
现在你应该计算观察向量和两个光线向量,把它们也转换到切线空间(使用angentSpace矩阵):
float3 worldPosition = mul(IN.position, matW).xyz;
OUT.eyeVec = mul(matVI[3].xyz - worldPosition, tangentSpace);
OUT.lightVec1 = mul(light1Position - worldPosition, tangentSpace);
OUT.lightVec2 = mul(light2Position - worldPosition, tangentSpace);
最后使用默认纹理坐标和一些tile因子计算所有的纹理坐标:
OUT.uv1_2 = float4(IN.uv0 * uv1Tile, IN.uv0 * uv2Tile);
OUT.uv3_4 =	float4(IN.uv0 * uv3Tile, IN.uv0 * uv4Tile);
OUT.uv5_6 = float4(IN.uv0 * uvBumpTile, IN.uv0);
完整的vertex代码如下:
v2f TerrainVS(a2v IN)
{
    v2f OUT;
    OUT.hposition = mul(IN.position, matWVP);  // Vertex position in homogeneous space

    // Calculate the tangent basis
    float3x3 tangentSpace = float3x3(IN.tangent, IN.binormal, IN.normal);
    tangentSpace = mul(tangentSpace, matW);
    tangentSpace = transpose(tangentSpace);

    // Calculate eye and light vector in tangent space
    float3 worldPosition = mul(IN.position, matW).xyz;
    OUT.eyeVec = mul(matVI[3].xyz - worldPosition, tangentSpace);
    OUT.lightVec1 = mul(light1Position - worldPosition, tangentSpace);
    OUT.lightVec2 = mul(light2Position - worldPosition, tangentSpace);

    // Multitexturing
    OUT.uv1_2 = float4(IN.uv0 * uv1Tile, IN.uv0 * uv2Tile);
    OUT.uv3_4 = float4(IN.uv0 *	uv3Tile, IN.uv0 * uv4Tile);
    OUT.uv5_6 = float4(IN.uv0 * uvBumpTile, IN.uv0);
    return OUT;
}
地形Effect-Pixel Processing
pixel shader接受的数据都是从vertex shader输出插值得到的。你首先需要归一化所有向量,记住所有向量必须归一化才能得到正确的光照。
float3 eyeVec = normalize(IN.eyeVec);
float3 lightVec1 = normalize(IN.lightVec1);
float3 lightVec2 = normalize(IN.lightVec2);
float3 halfwayVec1 = normalize(lightVec1 + eyeVec);
float3 halfwayVec2 = normalize(lightVec2 + eyeVec);
下一步读取法线贴图并将它的值归一化至-1到1的范围内。这一步是必须的,因为纹理中存储的值的范围是0至1,而它们要用来表示正负值:
float3 normal = tex2D(normalSampler, IN.uv5_6.xy);
normal.xy = normal.xy * 2.0 - 1.0;
normal.z = sqrt(1.0 - dot(normal.xy, normal.xy));
你现在有了所有光照计算所需的向量,然后使用Phong方程计算光照,Pjhong方程通常在图形API中实现,实现Phong方程的phongShader函数返回漫反射和镜面反射的值。
float3 diffuseColor1, diffuseColor2, specularColor1, specularColor2;
phongShading(normal, lightVec1, halfwayVec1, light1Color, diffuseColor1, specularColor1);
phongShading(normal, lightVec2, halfwayVec2, light2Color, diffuseColor2, specularColor2);
除了光照你还要计算每个像素的纹理颜色,你可以通过采用并根据alpha map组合四个漫反射纹理计算颜色。alpha map的每个通道存储纹理颜色的线性插值:
float3 color1 = tex2D(diffuseSampler1, IN.uv1_2.xy);
float3 color2 = tex2D(diffuseSampler2, IN.uv1_2.zw);
float3 color3 = tex2D(diffuseSampler3, IN.uv3_4.xy);
float3 color4 = tex2D(diffuseSampler4, IN.uv3_4.zw);
float4 alpha = tex2D(alphaSampler, IN.uv5_6.zw);

// Combine using the alpha map
float3 combinedColor = lerp(color1, color2, alpha.x);
combinedColor = lerp(combinedColor , color3, alpha.y);
combinedColor = lerp(combinedColor , color4, alpha.z);
最后计算每个像素的最终颜色,根据材质组合纹理、漫反射和镜面反射:
float4 finalColor; finalColor.a = 1.0f;
finalColor.rgb = combinedColor * ( (diffuseColor1 + diffuseColor2) * materialDiffuseColor + ambientLightColor) +
(specularColor1 + specularColor2) * materialSpecularColor;
下面是pixel shader和Phong方法的代码,由Tomas Akenine-Möller 和Eric Haines写的Real-Time Rendering, 2nd (AK Peters, Ltd., 2002)是深入理解Phong算法和法线映射的一本很好的参考书。
void phongShading(in float3 normal, in float3 lightVec, in float3
halfwayVec,in float3 lightColor, out float3 diffuseColor, out float3 specularColor)
{
     float diffuseInt = saturate(dot(normal, lightVec));
     diffuseColor = diffuseInt * lightColor; float specularInt = saturate(dot(normal, halfwayVec));
     specularInt = pow(specularInt, specularPower);
     specularColor = specularInt * lightColor;
}
float4 TerrainPS(v2f IN) : COLOR0
{
    float3 eyeVec = normalize(IN.eyeVec);
    float3 lightVec1 = normalize(IN.lightVec1);
    float3 lightVec2 = normalize(IN.lightVec2);
    float3 halfwayVec1 = normalize(lightVec1 + eyeVec);
    float3 halfwayVec2 = normalize(lightVec2 + eyeVec);

    // Normal mapping
    float3 normal = tex2D(normalSampler, IN.uv5_6.xy);
    normal.xy = normal.xy * 2.0 - 1.0;
    normal.z = sqrt(1.0 - dot(normal.xy, normal.xy));

    // Calculate diffuse and specular color for each light
    float3 diffuseColor1, diffuseColor2, specularColor1, specularColor2;
    phongShading(normal, lightVec1, halfwayVec1, light1Color,diffuseColor1, specularColor1);
    phongShading(normal, lightVec2, halfwayVec2, light2Color, diffuseColor2, specularColor2);

    // Combine the diffuse textures using the alpha map
    float3 color1 = tex2D(diffuseSampler1, IN.uv1_2.xy);
    float3 color2 = tex2D(diffuseSampler2, IN.uv1_2.zw);
    float3 color3 = tex2D(diffuseSampler3, IN.uv3_4.xy);
    float3 color4 = tex2D(diffuseSampler4, IN.uv3_4.zw);
    float4 alpha = tex2D(alphaSampler, IN.uv5_6.zw);
    float3 combinedColor = lerp(color1, color2, alpha.x);
    combinedColor = lerp(combinedColor , color3, alpha.y);
    combinedColor = lerp(combinedColor , color4, alpha.z);

    // Calculate the final color
    float4 finalColor;
    finalColor.a = 	1.0f; finalColor.rgb = combinedColor * ( (diffuseColor1 + diffuseColor2) *
    materialDiffuseColor + ambientLightColor) + (specularColor1 + specularColor2) *
    materialSpecularColor; return finalColor;
}
设置Effect Material
要管理地形effect,你需要创建TerrainEffect类。这个辅助类帮助你设置和管理effect参数,在第8章中已经讨论过。你还要创建TerrainMaterial类,帮助你设置地形effect。TerrainEffect类的代码简化了一部分,在这个类中你要查询和存储所有effect参数。 TerrainMaterial类通过一个类型为LightMaterial、几个类型为TextureMaterial的属性存储了表面的材质,下面是TerrainMaterial的代码:
public class TerrainMaterial
{
    // Surface material
    LightMaterial lightMaterial;

    // Diffuse Textures
    TextureMaterial diffuseTexture1;
    TextureMaterial diffuseTexture2;
    TextureMaterial diffuseTexture3;
    TextureMaterial diffuseTexture4;

    // Alpha map
    TextureMaterial alphaMapTexture;

    // Normal map
    TextureMaterial normalMapTexture;

    // Properties
    public LightMaterial LightMaterial
    {
        get { return lightMaterial; }
        set { lightMaterial = value; }
    }

    public TextureMaterial DiffuseTexture1
    {
        get { return diffuseTexture1; }
        set { diffuseTexture1 = value; }
    }

    public TextureMaterial DiffuseTexture2
    {
        get { return diffuseTexture2; }
        set { diffuseTexture2 = value; }
    }

    public TextureMaterial DiffuseTexture3
    {
         get { return diffuseTexture3; }
         set { diffuseTexture3 = value; }
    }

    public TextureMaterial DiffuseTexture4
    {
        get { return diffuseTexture4; }
        set { diffuseTexture4 = value;
    }

    public TextureMaterial AlphaMapTexture
    {
        get { return alphaMapTexture; }
        set { alphaMapTexture = value; }
    }

    public TextureMaterial NormalMapTexture
    {
         get { return normalMapTexture; }
         set { normalMapTexture = value; }
    }

    public TerrainMaterial()
    {
    }
}
要设置地形effect,应在Terrain类创建SetEffectMaterial方法。你使用这个方法在地形渲染前通过TerrainEffect辅助类设置参数。在场景中使用CameraManager和LightManager类管理相机和光线(在第9章中创建)。将这些类添加到Game类的service container中,这样任何由Game类引用的类都能实时查询这些资源。使用service container你能获取light manager管理场景中的光线,这些光线可用于effeect计算。
// Get the light manager
LightManager lightManager = Game.Services.GetService( typeof(LightManager)) as LightManager;

// Get the first two lights from the light manager
PointLight light0 = lightManager[0] as PointLight;
PointLight light1 = lightManager[1] as PointLight;
// Lights
effect.AmbientLightColor = lightManager.AmbientLightColor;
effect.Light1Position = light0.Position;
effect.Light1Color = light0.Color;
effect.Light2Position = light1.Position;
effect.Light2Color = light1.Color;
使用service container你也可以获取camera manager管理相机,从类型为Transformation的transformation属性获取地形变换:
	// Get the camera manager
cameraManager = Game.Services.GetService( typeof(CameraManager)) as CameraManager;
// Set the camera view and projection
effect.View = cameraManager.ActiveCamera.View;
effect.Projection = cameraManager.ActiveCamera.Projection;

// Set the terrain transformation
effect.World = transformation.Matrix;
最后通过TerrainMaterial类的LightMaterial和TextureMaterial属性设置地形材质和纹理,下面是SetEffectMaterial的代码:
private void SetEffectMaterial()
{
    // Get the light manager LightManager
    lightManager = Game.Services.GetService( typeof(LightManager)) as LightManager;
    // Get the first two lights from the light manager
    PointLight light0 =lightManager[0] as PointLight;
    PointLight light1 = lightManager[1] as PointLight;

    // Lights
    effect.AmbientLightColor = lightManager.AmbientLightColor;
    effect.Light1Position = light0.Position;
    effect.Light1Color = light0.Color;
    effect.Light2Position = light1.Position;
    effect.Light2Color = light1.Color;

    // Get the camera manager
    cameraManager = Game.Services.GetService( typeof(CameraManager)) as CameraManager;

    // Set the camera view and projection
    effect.View = cameraManager.ActiveCamera.View;
    effect.Projection = cameraManager.ActiveCamera.Projection;

    // Set the terrain transformation
    effect.World = transformation.Matrix;
    // Material
    effect.DiffuseColor = terrainMaterial.LightMaterial.DiffuseColor;
    effect.SpecularColor =terrainMaterial.LightMaterial.SpecularColor;
    effect.SpecularPower = terrainMaterial.LightMaterial.SpecularPower;

    // Textures effect.
    DiffuseTexture1  = terrainMaterial.DiffuseTexture1.Texture;
    effect.DiffuseTexture2 = terrainMaterial.DiffuseTexture2.Texture;
    effect.DiffuseTexture3 = terrainMaterial.DiffuseTexture3.Texture;
    effect.DiffuseTexture4 = terrainMaterial.DiffuseTexture4.Texture;
    effect.NormalMapTexture = terrainMaterial.NormalMapTexture.Texture;
    effect.AlphaMapTexture = terrainMaterial.AlphaMapTexture.Texture;

    // Textures UVs
    effect.TextureUV1Tile = terrainMaterial.DiffuseTexture1.UVTile;
    effect.TextureUV2Tile = terrainMaterial.DiffuseTexture2.UVTile;
    effect.TextureUV3Tile = terrainMaterial.DiffuseTexture3.UVTile;
    effect.TextureUV4Tile = terrainMaterial.DiffuseTexture4.UVTile;
    effect.TextureUVNormalTile = material.NormalMapTexture.UVTile;
}
发布时间:2009/4/22 12:16:10 阅读次数:8873