XNA Shader编程教程3.2-逐顶点和逐像素光照
逐顶点光照
所谓逐顶点光照,简单地说就是在vetext shader中计算光照颜色,该过程将为每个顶点计算一次光照颜色,然后在通过顶点在多边形所覆盖的区域对像素颜色进行线形插值。现实中,光照值取决于光线角度,表面法线,和观察点(对于镜面高光来说)。具体实现时的shader代码如下:
//相关全局变量
shared float4x4 matWorldViewProj;
shared float4x4 matWorld;
shared float3 lightPosition;
shared float4 ambientLightColor;
shared float4 diffuseLightColor;
shared float4 specularLightColor;
shared float3 cameraPosition;

//VertexShader输出结构
struct VertexShaderOutput
{
    float4 Position : POSITION;
    float4 Color : COLOR0;
};

//PixelShader输入结构,只接受从VertexShader传来的颜色
struct PixelShaderInput
{
    float4 Color: COLOR0;
};

VertexShaderOutput VertexDiffuseAndPhong(float3 position : POSITION,float3 normal : NORMAL )
{
    VertexShaderOutput output;

    //transform the input position to the output
    output.Position = mul(float4(position, 1.0), matWorldViewProj);
    float3 worldNormal = mul(normal, matWorld);
    float4 worldPosition = mul(float4(position, 1.0), matWorld);
    worldPosition = worldPosition / worldPosition.w;
    float3 directionToLight = normalize(lightPosition - worldPosition.xyz);
    float diffuseIntensity = saturate( dot(directionToLight, worldNormal));
    float4 diffuse= diffuseLightColor * diffuseIntensity;
    float3 reflectionVector = normalize(reflect(-directionToLight, worldNormal));
    float3 directionToCamera = normalize(cameraPosition - worldPosition.xyz);
    float4 specular = specularLightColor * pow(saturate(dot(reflectionVector,
    directionToCamera)), 20);
    output.Color = specular + diffuse + ambientLightColor;
    output.Color.a = 1.0;
     //return the output structure
     return output;
}

float4 	SimplePixelShader(PixelShaderInput input) : COLOR
{
    return input.Color;
}

technique PerVertexDiffuseAndPhong
{
    pass P0
    {
        //set the VertexShader state to the vertex shader function
        VertexShader = compile vs_2_0 VertexDiffuseAndPhong();
        //set the PixelShader state to the pixel shader function
        PixelShader = compile ps_2_0 SimplePixelShader();
    }
}
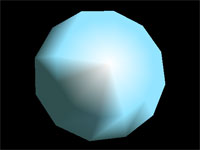
由以上代码可见,各像素的颜色计算都是在VertexShader中实现的。程序截图如下:

当考虑光照时,大部分人都认为逐顶点光照已经足够好了。对于镶嵌度较高的模型来说是这样,但对某些多边形较少的模型来说却不一定。比如这个示例,球的多边形较少,可以明显看出棱角分明,高光效果也不理想。直接对顶点颜色进行插值所得的结果通常不够精确,特别是对面积较大的多边形来说。当处理高精度多边形模型时,由于每个多边形所覆盖的区域很小,因此插值之后每个像素的误差也很小,所以逐顶点光照可以工作的很好。而当处理低模时,这种误差就变的很大了。
逐像素光照
逐像素光照是对所有光照元素进行单独插值,简单地说就是在pixelshader中计算颜色。具体实现时的shader代码如下:
//全局变量
shared float4x4 matWorldViewProj;
shared float4x4 matWorld;
shared float3 cameraPosition;
shared float3 lightPosition;
shared float4 ambientLightColor;
shared float4 diffuseLightColor;
shared float4 specularLightColor;

struct VertexShaderOutputPerPixelDiffuse
{
    float4 Position : POSITION;
    float3 WorldNormal : TEXCOORD0;
    float3 WorldPosition : TEXCOORD1;
};

struct PixelShaderInputPerPixelDiffuse
{
    float3 WorldNormal : TEXCOORD0;
    float3 WorldPosition : TEXCOORD1;
};

VertexShaderOutputPerPixelDiffuse PerPixelDiffuseVS( float3 position : POSITION, float3 normal : NORMAL )
{
    VertexShaderOutputPerPixelDiffuse output;
    //transform the input position to the output
    output.Position = mul(float4(position, 1.0), matWorldViewProj);
    output.WorldNormal = mul(normal, matWorld);
    float4 worldPosition = 	mul(float4(position, 1.0), matWorld);
    output.WorldPosition = worldPosition / worldPosition.w;

    //return the output structure
    return output;
}

float4 DiffuseAndPhongPS(PixelShaderInputPerPixelDiffuse input) : COLOR
{
    //calculate per-pixel diffuse
    float3 directionToLight = normalize(lightPosition - input.WorldPosition);
    float diffuseIntensity = saturate( dot(directionToLight, input.WorldNormal));
    float4 diffuse = diffuseLightColor * diffuseIntensity;

    //calculate Phong components per-pixel
    float3 reflectionVector = normalize(reflect(-directionToLight, input.WorldNormal));
    float3 directionToCamera = normalize(cameraPosition - input.WorldPosition);
    //calculate specular component float4 specular = specularLightColor *
    pow(saturate(dot(reflectionVector, directionToCamera)), 20);

    //all color components are summed in the pixel shader
    float4 color = specular + diffuse + ambientLightColor;
    color.a = 1.0;
    return color;
}

technique PerPixelDiffuseAndPhong
{
    pass P0
    {
        VertexShader = compile vs_2_0 PerPixelDiffuseVS();
        PixelShader = compile ps_2_0 DiffuseAndPhongPS();
    }
}
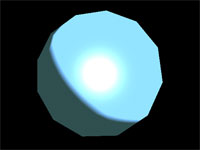
由上面两段代码对比可知,算法实际上是一样的,只不过颜色的计算过程一个放在VertexShader中,而另一个放在PixelShader中。程序截图如下,源代码中可以通过按空格键切换两种效果,逐像素光照效果好:

使用逐像素光照的另一个好处是可以在渲染时添加并不存在的表面细节。通过bump map或normal map,可以在像素级别让原本平坦的表面表现出近似的凹凸效果。
当然,由于逐像素的计算量要比逐顶点要大,所以请根据具体情况灵活选择,如果你使用BasicEffect,那么默认是使用逐顶点光照,你必须添加basicEffect.PreferPerPixelLighting=true才能开启逐像素光照。
最后以上大部分文字来自于clayman博客中的The Complete Effect and HLSL Guide的第十二章,在此感谢。
发布时间:2009/4/10 上午11:09:03 阅读次数:11772
