XNA Game Engine教程系列3- Utilities,Camera和Actor
本教程将涵盖一些额外的工具并展示一个基本组件的创建过程。然后,我们将展示如何创建一个相机和演员(actor)。我们将在Engine类中添加两个工具类。第一个是数学辅助类,主要用于为绘制、相机、模型渲染等生成矩阵,第二个是一个图形辅助类,帮助创建渲染目标和resolve纹理。你不明白也没有关系,下面我们暂时还不会用到。首先是MathUtil类的代码:
using Microsoft.Xna.Framework;
namespace Innovation
{
public static class MathUtil
{
// Generates a projection matrix for a draw call
public static Matrix CreateProjectionMatrix()
{
return Matrix.CreatePerspectiveFieldOfView(MathHelper.PiOver4, (float)Engine.GraphicsDevice.Viewport.Width / (float)Engine.GraphicsDevice.Viewport.Height, .01f, 1000000);
}
// Creates a world matrix
public static Matrix CreateWorldMatrix(Vector3 Translation)
{
return CreateWorldMatrix(Translation, Vector3.Zero);
}
// Creates a world matrix
public static Matrix CreateWorldMatrix(Vector3 Translation, Vector3 Rotation)
{
return CreateWorldMatrix(Translation, Rotation, Vector3.One);
}
// Creates a world matrix
public static Matrix CreateWorldMatrix(Vector3 Translation, Vector3 Rotation, Vector3 Scale)
{
return Matrix.CreateScale(Scale) * Matrix.CreateFromYawPitchRoll(Rotation.Y, Rotation.X, Rotation.Z) * Matrix.CreateTranslation(Translation);
}
// Converts a rotation vector into a rotation matrix
public static Matrix Vector3ToMatrix(Vector3 Rotation)
{
return Matrix.CreateFromYawPitchRoll(Rotation.Y, Rotation.X, Rotation.Z);
}
// Converts a rotation matrix into a rotation vector
public static Vector3 MatrixToVector3(Matrix Rotation)
{
Quaternion q = Quaternion.CreateFromRotationMatrix(Rotation);
return new Vector3(q.X, q.Y, q.Z);
}
}
}
其次是GraphicsUtil类的代码:
using Microsoft.Xna.Framework.Graphics;
namespace Innovation
{
public static class GraphicsUtil
{
// Creates a RenderTarget2D with the specified parameters
public static RenderTarget2D CreateRenderTarget()
{
return CreateRenderTarget(Engine.GraphicsDevice.Viewport.Width, Engine.GraphicsDevice.Viewport.Height);
}
// Creates a RenderTarget2D with the specified parameters
public static RenderTarget2D CreateRenderTarget(int Width, int Height)
{
return CreateRenderTarget(Width, Height, Engine.GraphicsDevice.DisplayMode.Format);
}
// Creates a RenderTarget2D with the specified parameters
public static RenderTarget2D CreateRenderTarget(int Width, int Height, SurfaceFormat Format)
{
return CreateRenderTarget(Width, Height, Format, Engine.GraphicsDevice.PresentationParameters.MultiSampleQuality, Engine.GraphicsDevice.PresentationParameters.MultiSampleType);
}
// Creates a RenderTarget2D with the specified parameters
public static RenderTarget2D CreateRenderTarget(int Width, int Height, SurfaceFormat Format, int MultiSampleQuality, MultiSampleType SampleType)
{ return new RenderTarget2D(Engine.GraphicsDevice, Width, Height, 1, Format, SampleType, MultiSampleQuality, RenderTargetUsage.DiscardContents);
}
// Creates a ResolveTexture2D
public static ResolveTexture2D CreateResolveTexture()
{
return new ResolveTexture2D(Engine.GraphicsDevice, Engine.GraphicsDevice.Viewport.Width, Engine.GraphicsDevice.Viewport.Height, 1, Engine.GraphicsDevice.DisplayMode.Format);
}
}
}
现在我们可以开始使用一些基本的组件了。实例只执行了清除backbuffer的操作。在我们开始之前,我们需要在demo项目中清理Game类(在我们的例子中是 “TestEnvironment”项目)。我们要删除大量无用的注释、方法和对象(在Game1.cs)中:
using Microsoft.Xna.Framework;
using Microsoft.Xna.Framework.Graphics;
using Microsoft.Xna.Framework.Input;
using Innovation;
namespace TestEnvironment
{
Game1()
// Setup graphics
graphics = new GraphicsDeviceManager(this);
}
protected override void LoadContent()
{
}
protected override void Update(GameTime gameTime)
{
base.Update(gameTime);
}
protected override void Draw(GameTime gameTime)
{
base.Draw(gameTime);
}
}
}
现在我们要添加代码以初始化引擎。新增以下代码用以LoadContent(),Update()和Draw(),新增的代码要在base类前调用。
// Setup engine. We do this in the load method
// so that we know graphics will be ready for use
Engine.SetupEngine(graphics);
// Update the engine and game
Engine.Update(gameTime);
// Draw the engine and game
Engine.Draw(gameTime, ComponentType.All);
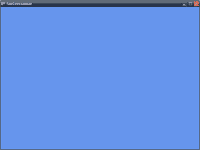
现在,当您按下F5键,您应该可以看到以下内容:
现在,我们可以创建组件。添加一个新的类并输入以下代码:
using Innovation;
using Microsoft.Xna.Framework.Graphics;
namespace TestEnvironment
{
class ClearScreen : Component
{
// Override the component's draw method
public override void Draw()
{
// Simply clear the backbuffer to red
Engine.GraphicsDevice.Clear(Color.Red);
}
}
}
现在,回到Game1类,在LoadContent()方法最后添加添加一个实例,代码如下:
// Create a new ClearScreen. It will automatically
// be set the engine's DefaultScreen, currently
// Engine.BackGroundScreen
ClearScreen clear = new ClearScreen();
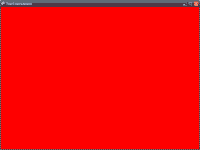
您现在应该可以看到以下画面:
下面我们开始实现更复杂的组件。首先是相机类。这仅仅是一个基类,其他相机将从它继承。这个相机没有任何运动函数,但它正是我们需要的,现在它仅仅指向一个目标位置并并生成我们需要绘制的矩阵,以下是代码,将这个类添加到游戏引擎的项目中:
using Microsoft.Xna.Framework;
using System;
namespace Innovation
{
// Basic Camera class
public class Camera : Component, I3DComponent
{
// Internal values
Vector3 position = Vector3.Zero;
Matrix rotationMatrix = Matrix.Identity;
Vector3 target = new Vector3(0, 0, -1);
Vector3 up = Vector3.Up;
Matrix view;
Matrix projection;
// The point the camera is looking at
public virtual Vector3 Target { get { return target; } set { target = value; } }
// The View and Projection matrices commonly used for rendering
public virtual Matrix View { get { return view; } set { view = value; } }
public virtual Matrix Projection { get { return projection; } set { projection = value; } }
public virtual Vector3 Up { get { return up; } set { up = value; } }
// Public I3DComponent values
public virtual Vector3 Position { get { return position; } set { position = value; } }
public virtual Vector3 Scale { get { return Vector3.One; } set { } }
public Vector3 EulerRotation { get { return MathUtil.MatrixToVector3(Rotation); } set { Rotation = MathUtil.Vector3ToMatrix(value); } }
// The rotation matrix used by the camera and the current up vector
public virtual Matrix Rotation { get { return rotationMatrix; } set { rotationMatrix = value; } }
public virtual BoundingBox BoundingBox { get { return new BoundingBox(Position - Vector3.One, Position + Vector3.One); } }
// Constructors
public Camera(GameScreen Parent) : base(Parent)
// Set the rotation matrix's forward to this vector
Matrix rotationMatrixCopy = this.Rotation;
rotationMatrixCopy.Forward = newForward;
// Save a copy of "Up" (0, 1, 0)
Vector3 referenceVector = Vector3.Up;
// On the slim chance that the camera is pointed perfectly parallel with
// the Y Axis, we cannot use cross product with a parallel axis, so we
// change the reference vector to the forward axis (Z).
if (rotationMatrixCopy.Forward.Y == referenceVector.Y || rotationMatrixCopy.Forward.Y == -referenceVector.Y)
referenceVector = Vector3.Backward;
// Calculate the other parts of the rotation matrix
rotationMatrixCopy.Right = Vector3.Cross(this.Rotation.Forward, referenceVector);
rotationMatrixCopy.Up = Vector3.Cross(this.Rotation.Right, this.Rotation.Forward);
this.Rotation = rotationMatrixCopy;
// Use the rotation matrix to find the new up
Up = Rotation.Up;
// Recalculate View and Projection using the new Position, Target, and Up
View = Matrix.CreateLookAt(Position, Target, Up);
Projection = MathUtil.CreateProjectionMatrix();
}
}
}
下一个组件叫actor。这个类只是保存模型的位置,旋转和缩放等,并根据这些属性绘制此模型。你会看到它通过引擎service container的相机绘制。如果不能找到相机,它将会停止执行并抛出一个异常。以下是代码:
using System;
using Microsoft.Xna.Framework.Graphics;
using Microsoft.Xna.Framework;
namespace Innovation
{
public class Actor : Component, I3DComponent
{
// The model to draw Model model;
// I3DComponent values
public virtual Vector3 Position { get; set; }
public Vector3 EulerRotation { get { return MathUtil.MatrixToVector3(Rotation); } set { Rotation = MathUtil.Vector3ToMatrix(value); } }
public virtual Matrix Rotation { get; set; }
public virtual Vector3 Scale { get; set; }
public virtual BoundingBox BoundingBox { get { return new BoundingBox( Position - (Scale / 2), Position + (Scale / 2) ); } }
// Constructors take a model to draw and a position
public Actor(Model Model, Vector3 Position) : base()
{
Setup(Model, Position);
}
public Actor(Model Model, Vector3 Position, GameScreen Parent) : base(Parent)
{
Setup(Model, Position);
}
// Provide a method to setup the actor so we don't need to
// write it in each constructor void Setup(Model Model, Vector3 Position)
{
this.model = Model;
this.Position = Position;
Scale = Vector3.One;
EulerRotation = Vector3.Zero;
}
public override void Draw() {
// Look for a camera in the service container
Camera camera = Engine.Services.GetService<Camera>();
// Throw an exception if one isn't present
if (camera == null)
{
throw new Exception("Camera not found in engine's" + "service container, cannot draw");
}
// Generate the world matrix (describes the objects movement in 3D)
Matrix world = MathUtil.CreateWorldMatrix(Position, Rotation, Scale);
Matrix[] transforms = new Matrix[model.Bones.Count];
model.CopyAbsoluteBoneTransformsTo(transforms);
// Set some renderstates so the model will draw properly
Engine.GraphicsDevice.RenderState.AlphaBlendEnable = true;
Engine.GraphicsDevice.RenderState.SourceBlend = Blend.SourceAlpha;
Engine.GraphicsDevice.RenderState.DestinationBlend = Blend.InverseSourceAlpha;
Engine.GraphicsDevice.RenderState.DepthBufferEnable = true;
// Loop through meshes and effects and set them up to draw
foreach (ModelMesh mesh in model.Meshes)
{
foreach (BasicEffect effect in mesh.Effects)
{
// Set effect parameters
effect.Parameters["World"].SetValue(transforms[mesh.ParentBone.Index] * world);
effect.Parameters["View"].SetValue(camera.View);
effect.Parameters["Projection"].SetValue(camera.Projection);
// Enable lighting
effect.EnableDefaultLighting();
}
// Draw the mesh
mesh.Draw();
}
}
}
}
最后,我们要添加一个相机和actor。您需要将content文件添加到content项目中,在Game1类的LoadContent()方法最后添加下列代码:
// Create a new Camera
Camera camera = new Camera();
// Setup its position and target
camera.Position = new Vector3(1, 1, 2);
camera.Target = new Vector3(0, 0, 0);
// Add it to the service container
Engine.Services.AddService(typeof(Camera), camera);
// Create a new actor
Actor actor = new Actor(Engine.Content.Load<Model>("Content/ig_box"), new Vector3(0, 0, 0));
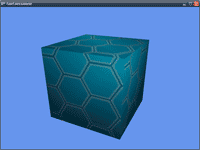
现在,当您运行游戏,您应该在屏幕上看到所绘制的模型。
下次我们将做创建更多的组件!
发布时间:2008/12/25 15:30:30 阅读次数:8893