§14.5挑战:编写自己的改编游戏
本书的最后一个挑战是创建自己的赛车游戏改编版本。您可以实现自己的游戏构思,也可以跟随下面Speedy Racer编写代码的过程。
正如你在本章一开始就看到的,Rocket Commander有相当多的改编版本。仅2006年一年就有超过12个项目,也许还有更多,但相有关人士可能羞于分享他们的游戏或他们不想让别人知道他们使用了Rocket Commander引擎。当然,也有可能是我不知道还有更多的游戏改编版本,它们可能在互联网上某处。
Racing Game和XNA Shooter也有很大的改编潜力。不仅是因为这些游戏不像Rocket Commander那么针对特定情况,而且他们拥有更多可重用的引擎,从而无需从零开始就能够快速地创建新游戏,即使一些使用的技术在新游戏中并不真正需要。
如果你想创建自己的改编游戏或你已经有了新的构思,你就不需要阅读Speedy Race,直接尝试实现自己的第一个游戏吧。在这一章中你学到了足够的知识可以进入到特定的类并根据需要改变它们,使您的新游戏构思得以实施。
示例游戏:Speedy Racer
这里Speedy Racer游戏并没有完全展示出来,创建这样一个游戏对你来说仍是一个挑战,但我会详细讲解。如果你很懒,不想制作Speedy Racer这个游戏,你也可以跳过此步从随书光盘上安装游戏,但我建议你在看实际代码前先试着修改原有的赛车游戏。
第1步:改变汽车模型
由于改编游戏快速创建,而我也请不起一个3D建模师帮我制作一个漂亮的新车,我到互联网去搜索,发现了几个很好的车辆模型,但其中大多数有太多多边形或是陌生的格式,我没发转换文件格式。后来我我放弃了,只使用了一个以前的旧3D模型。图14-21显示了这个赛车模型,约有2.1万个多边形(原始赛车游戏中的赛车模型有约25000个),但没有材质数据。我只增加了一些红色和黑色的材质,但这样做模型已是足够好了,后来我还添加了法线贴图和纹理,使其外观变得更加好。如果你有时间,尽量做得比我好一点。
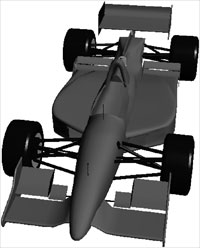
图14-21
第2步:菜单的变化
在Rocket Commander中改变菜单往往涉及到大量的纹理和额外的工作,赛车游戏也一样。改变菜单的确需要花些时间,但只需改变背景纹理和色彩,代码可以保持不变。一些菜单上的逻辑甚至还可以简化一点,以避免重新创建某些纹理。
如果你想添加更多的游戏屏幕,在主菜单添加更多的按钮或处理更多的选项,那么再次阅读本章的游戏屏幕部分会对你帮助很大,你可以找出在哪里插入新代码是最好的。
第3步:新的场景和物体
Speedy Racer使用了相同的场景,但我稍微改变了一点场景的着色使游戏的色彩更加丰富。阴影映射和post-screen着色也发生了变化,使游戏看起来有点不同。可参见第8章了解更多post-screen着色的细节以及如何改变它们,尤其是PostScreenMenu.fx和PostScreenGlow.fx中的色彩校正着色。
下面的代码来自于PostScreenGlow shader。您应该能很容易地改变视觉效果和颜色的代码。一个良好的尖端着色始终是发疯,然后解决更体面的价值观。例如,如果您想测试让游戏呈现偏蓝的色调,你可以添加25%甚至50%的蓝颜色值,并查看结果。也许蓝色看起来不是很酷或你还要疯狂地将蓝色设为10%(这很大),你也可以试着调整一下对比度。Speedy Racer的主要目标不是让其变得更真实,只是与原始赛车游戏看起来不同而已。
float4 PS_ComposeFinalImage20( VB_OutputPos3TexCoords In, uniform sampler2D sceneSampler, uniform sampler2D blurredSceneSampler) : COLOR
{
float4 orig = tex2D(sceneSampler, In.texCoord[0]);
float4 blur = tex2D(blurredSceneSampler, In.texCoord[1]);
float4 screenBorderFadeout = tex2D(screenBorderFadeoutMapSampler, In.texCoord[2]);
float4 ret = 0.75f*orig + GlowIntensity*blur+ HighlightIntensity*blur.a; ret.rgb *= screenBorderFadeout;
// Change colors a bit, sub 20% red and add 25% blue (photoshop values)
// Here the values are -4% and +5%
ret.rgb = float3( ret.r+0.054f/2, ret.g-0.021f/2, ret.b-0.035f/2);
// Change brightness -5% and contrast +10% r
et.rgb = ret.rgb * 0.975f;
ret.rgb = (ret.rgb - float3(0.5, 0.5, 0.5)) * 1.05f + float3(0.5, 0.5, 0.5);
return ret;
} // PS_ComposeFinalImage20(...)
第4步:开得更快
为了使赛车运动得更快但仍保证游戏可玩,你需要对游戏逻辑做出两个主要的改动: 使道路更宽,这样你能更快地通过,还要调整了直线道路的向上向量使车能更容易的转弯。改变道路宽度的代码可在Track命名空间的TrackVertex类中找到,只需改变RoadWidthScale的值,在测试中可设置为50(很疯狂),然后再设置为一些合理的值。
/// <summary>
/// Minimun, maximum and default road width for our track.
/// </summary>
public const float MinRoadWidth = 0.25f,
DefaultRoadWidth = 1.0f, MaxRoadWidth = 2.0f, RoadWidthScale = 13.25f;
// [The constants are then used to generate the left and right track
// vertices ...]
/// <summary>
/// Left side track vertex generation, used for the GuardRail class.
/// </summary>
///
public TrackVertex LeftTrackVertex
{
get
{
return new TrackVertex( pos - RoadWidthScale * roadWidth * right / 2, right, up, dir, new Vector2(uv.X, 0), roadWidth);
} // get
} // LeftTrackVertex
// [etc.]
使汽车开得更快可直接在CarPhysics类中改变下面的代码。不断使用单元测试去测试新的值。
#region Constants
/// <summary>
/// Car is 1000 kg
/// </summary>
const float CarMass = 1000;//1000.0f;
/// <summary>
/// Gravity on earth is 9.81 m//// <summary>
/// Max speed of our car is 275 mph.
/// While we use mph for the display, we calculate internally with
/// meters per sec since meter is the unit we use for everthing in the
/// game. And it is a much nicer unit than miles or feet.
/// </summary>
public const float MaxSpeed = 275.0f * MphToMeterPerSec;
/// <summary>
/// Max. acceleration in m/s^2 we can do per second.
/// We have also to define the max and min overall acceleration we can
/// do with our car (very car specfic, but for this game always the same
/// to make it fair). Driving backwards is slower than driving forward.
/// </summary>
const float MaxAccelerationPerSec = 5.0f,//120.0f,//1000.0f,
MaxAcceleration = 10.0f,//70.0f,//250.0f,
MinAcceleration = -6.0f;//-35.0f;//250.0f;//-40.0f;
/// <summary>
/// Friction we have on the road each second. If we are driving slow,
/// this slows us down quickly. If we drive really fast, this does not
/// matter so much anymore. The main slowdown will be the air friction.
/// </summary>
const float CarFrictionOnRoad = 17.523456789f;//15.0f;//2.5f;
/// <summary>
/// Air friction we get if we drive fast, this slows us down very fast
/// if we drive fast. It makes it also much harder to drive faster if
/// we already drive at a very fast speed. For slow speeds the air
/// friction does not matter so much. This could be extended to include
/// wind and then even at low speeds the air friction would slow us
/// down or even influence our movement. Maybe in a game mod sometime.
/// </summary>
const float AirFrictionPerSpeed = 0.66f;//0.225f;//0.33f;//0.42f;
/// <summary>
/// Max air friction, this way we can have a good air friction for low
/// speeds but we are not limited to 190-210mph, but can drive faster.
/// </summary>
const float MaxAirFriction = AirFrictionPerSpeed * 200.0f;
/// <summary>
/// Break slowdown per second, 1.0 means we need 1 second to do a full
/// break. Slowdown is also limited by max. 100 per sec!
/// Note: This would not make sense in a real world simulation because
/// stopping the car usually needs more time and is highly dependant
/// on the speed resulting in longer stopping distances. For this game
/// it is easier and more fun to just always brake the same.
/// </summary>
const float BrakeSlowdown = 1.0f;
// [etc.]
第5步:添加道具和新声音
这部分工作量最大。为了使游戏更有趣我添加了一些道具(更快的速度,更宽的道路等等)和新的声音。查阅代码可以了解新道具的更多信息。改变代码也要做一点工作,但没有像创建道具和测试它们那么多。
发布时间:2008/12/12 9:33:15 阅读次数:6496