LCD1602液晶显示
LCD1602也叫1602字符型液晶,是一种专门用来显示字母、数字、符号的点阵型液晶模块,能同时显示16*2=32个字符。
LCD1602接口说明:
|
引脚号 |
符号 |
引脚说明 |
引脚号 |
符号 |
引脚说明 |
|
1 |
VSS |
电源地 |
9 |
D2 |
数据端口 |
|
2 |
VDD |
电源正极 |
10 |
D3 |
数据端口 |
|
3 |
VO |
偏压信号 |
11 |
D4 |
数据端口 |
|
4 |
RS |
命令/数据 |
12 |
D5 |
数据端口 |
|
5 |
RW |
读/写 |
13 |
D6 |
数据端口 |
|
6 |
E |
使能 |
14 |
D7 |
数据端口 |
|
7 |
D0 |
数据端口 |
15 |
A |
背光正极 |
|
8 |
D1 |
数据端口 |
16 |
K |
背光负极 |
其中:
- VL(V0):液晶对比度调整端,用于调节显示对比度,一般接10K电位器进行调整。
- RS:数据/命令选择。高电平表示数据,低电平表示命令。
- RW:读写选择。高电平为读,低电平为写。一般我们写入数据进行显示,所以此引脚接地。
- EN:使能信号,配合数据/命令的读写。
- D0-D7:双向数据端。可以使用8根数据线并行操作,也可以使用4根数据线串行操作。
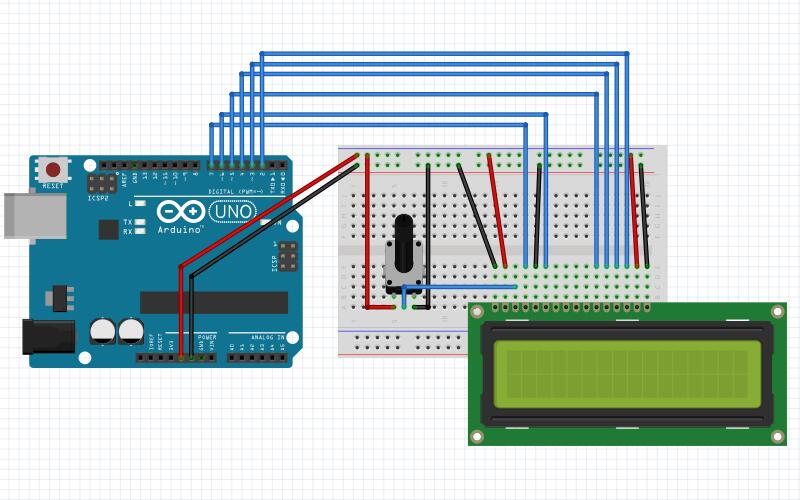
实物连接图
LCD1602的第1、5、16脚接开发板GND;LCD1602第2、15脚接开发板5V;LCD1602的第4、6、11、12、13、14分别连接开发板数字引脚7、6、5、4、3、2;电位器两端引脚分别连接5V和GND,中间引脚连接LCD1602第3引脚。
程序
int LCD1602_RS = 7;
int LCD1602_EN = 6;
int DB[4] = { 2, 3, 4, 5};

/*
   LCD写命令
*/
void LCD_Command_Write(int command)
{
  int i, temp;
  digitalWrite( LCD1602_RS, LOW);
  digitalWrite( LCD1602_EN, LOW);

  temp = command & 0xf0;
  for (i = DB[0]; i <= 5; i++)
  {
    digitalWrite(i, temp & 0x80);
    temp <<= 1;
  }

  digitalWrite( LCD1602_EN, HIGH);
  delayMicroseconds(1);
  digitalWrite( LCD1602_EN, LOW);

  temp = (command & 0x0f) << 4;
  for (i = DB[0]; i <= 5; i++)
  {
    digitalWrite(i, temp & 0x80);
    temp <<= 1;
  }

  digitalWrite( LCD1602_EN, HIGH);
  delayMicroseconds(1);
  digitalWrite( LCD1602_EN, LOW);
}

/*
   LCD写数据
*/
void LCD_Data_Write(int dat)
{
  int i = 0, temp;
  digitalWrite( LCD1602_RS, HIGH);
  digitalWrite( LCD1602_EN, LOW);

  temp = dat & 0xf0;
  for (i = DB[0]; i <= 5; i++)
  {
    digitalWrite(i, temp & 0x80);
    temp <<= 1;
  }

  digitalWrite( LCD1602_EN, HIGH);
  delayMicroseconds(1);
  digitalWrite( LCD1602_EN, LOW);

  temp = (dat & 0x0f) << 4;
  for (i = DB[0]; i <= 5; i++)
  {
    digitalWrite(i, temp & 0x80);
    temp <<= 1;
  }

  digitalWrite( LCD1602_EN, HIGH);
  delayMicroseconds(1);
  digitalWrite( LCD1602_EN, LOW);
}

/*
   LCD设置光标位置
*/
void LCD_SET_XY( int x, int y )
{
  int address;
  if (y == 0)    address = 0x80 + x;
  else          address = 0xC0 + x;
  LCD_Command_Write(address);
}

/*
   LCD写一个字符
*/
void LCD_Write_Char( int x, int y, int dat)
{
  LCD_SET_XY( x, y );
  LCD_Data_Write(dat);
}

/*
   LCD写字符串
*/
void LCD_Write_String(int X, int Y, char *s)
{
  LCD_SET_XY( X, Y );    //设置地址
  while (*s)             //写字符串
  {
    LCD_Data_Write(*s);
    s ++;
  }
}

void setup (void)
{
  int i = 0;
  for (i = 2; i <= 7; i++)
  {
    pinMode(i, OUTPUT);
  }
  delay(100);
  LCD_Command_Write(0x28);//显示模式设置4线 2行 5x7
  delay(50);
  LCD_Command_Write(0x06);//显示光标移动设置
  delay(50);
  LCD_Command_Write(0x0c);//显示开及光标设置
  delay(50);
  LCD_Command_Write(0x80);//设置数据地址指针
  delay(50);
  LCD_Command_Write(0x01);//显示清屏
  delay(50);
}

void loop (void)
{
  LCD_Write_String(2, 0, "Hello World!");
  LCD_Write_String(6, 1, "---Arduino");
}
「LiquidCrystal」是Arduino的液晶驱动库,使用它能很方便的驱动常用液晶显示模块。
const int rs = 7, en = 6, d4 = 5, d5 = 4, d6 = 3, d7 = 2;
LiquidCrystal lcd(rs, en, d4, d5, d6, d7);

void setup() {
  lcd.begin(16, 2);
  lcd.clear();
}

void loop() {
  lcd.setCursor(2, 0);
  lcd.print("Hello World!");

  lcd.setCursor(0, 1);
  lcd.print("Second: ");
  lcd.print(millis() / 1000);
}
文件下载(已下载 4 次)
发布时间:2019/7/11 21:25:55 阅读次数:4481