§13.1牛顿运动定律
让我们快速浏览一下运动学的重要定律。图13-2显示了看到这些物理规则:
第一定律——物体总保持静止或匀速直线运动状态,直到有外来迫使它改变这种状态。这很容易,因为所有物体运动都有一个运动向量或速度向量,除非你施加了力让其减速,加速或改变方向,否则不要改变该值。
第二定律——当施加一个外力时,这意味着你可以使物体加速或减速,如果超过一个维度(3D游戏中有三维),你还可以改变物体运动的方向。在这种情况下你使用向量代替标量,所有向量部分(x、y和z)都将发生变化。由于物体质量永远不变(至少在大多数游戏中是这样),你可以使用简化的F=ma的公式,这里“a”是定义为速度的改变量除以时间改变量:a=dv/dt。
第三定律——每一个作用力都有一个与之大小相等方向相反的反作用力。这意味着如果你有一个力,如地球施加在物体上的引力,则物体也会在地球上施加一个方向相反的反作用力。由于地球比物体质量大得多,所以物体对地球的引力对地球没什么影响。但是,如果你有一个更大的物体,如太阳,地球的引力远远小于太阳的引力,幸好我们的地球总是在轨道上围绕太阳旋转,月球以同样的方式在轨道绕地球旋转。
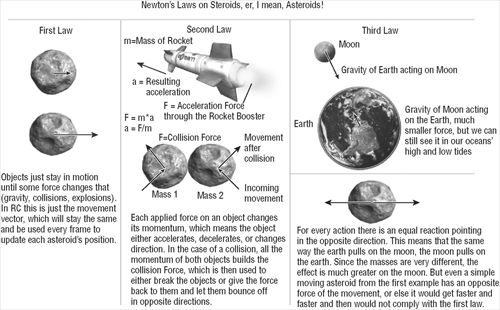
图13-2
牛顿在他的“数学原理”一书中提出了这些定律,首次是万有引力定律,这个定律解释了行星运动以及为什么月球绕地球转而地球绕太阳转。当时这时非常令人激动的,但今天,每所学校的孩子都可以在物理课上计算出这一点,计算机算起这些东西更强大。在Rocket Commander中你已经看到成千上万的小行星各自的相互作用。它们之间不存在引力只是相互碰撞,但添加引力效果改进真实度是一个很大的挑战。
保持简单
由于物理学是一个很大的议题,在游戏中实现物理效果要你全力以赴,所以你应该尽量保持简单。通常你甚至不知道哪个公式是正确的——但只要能工作就行。例如,你不必编写代码去遵循牛顿第一定律,第三定律在很多情况下也可忽略,因为通常你只关心改变物体运动的力。
在你更深入的了解物理世界之前,让我们来看看现有的物理引擎,你应该确保你知道赛车游戏究竟需要什么。如果你需要的只是驾驶汽车并使之停留在地面上,那么没有必要实现一个非常复杂的物理引擎。我真的很希望能有更多时间在赛车游戏中实现物理效果,但游戏必须按时完成,而当时我还有相当多的其他项目。由于这一原因,赛车游戏只使用一个简单的办法去实现物理效果,碰撞的处理也以非常简单的方式完成。即使它仍需要大量的微调,可在下一章中看到,但它运行良好,你可以让汽车在道路上行驶了。
图13-3显示了赛车游戏的基本物理需求。因为你不与在场景中其他物体发生交互,场景物体也不使用物理效果,你完全可以把你的注意力集中在车上而不关心其他东西。
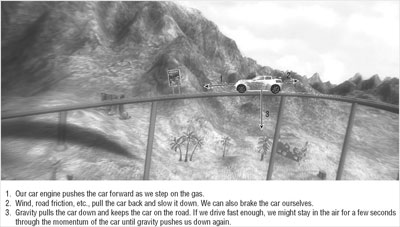
图13-3
这些规则通过几行代码实现,但调整所有的值让车与道路正确互动挺难的:
// [From CarPhysics.cs]
// Handle car engine force
float newAccelerationForce = 0.0f;
if (Input.KeyboardUpPressed || Input.Keyboard.IsKeyDown(Keys.W) || Input.MouseLeftButtonPressed || Input.GamePadAPressed)
newAccelerationForce += MaxAccelerationPerSec;
// [etc.]
// Add acceleration force to total car force, but use the current
// car direction!
carForce += carDir * newAccelerationForce * (moveFactor * 85);// 70);//75);
// Change speed with standard formula, use acceleration as our
// force, gravity is handled below in the ApplyGravity method.
float oldSpeed = speed;
Vector3 speedChangeVector = carForce / CarMass;
// Only use the amount important for our current direction
// (slower rotation)
if (speedChangeVector.Length() > 0)
{
float speedApplyFactor = Vector3.Dot(Vector3.Normalize(speedChangeVector), carDir);
if (speedApplyFactor > 1)
speedApplyFactor = 1;
speed += speedChangeVector.Length() * speedApplyFactor;
} // if (speedChangeVector.Length)
比起我第一次在CarPhysics类的单元测试的帮助下实现物理效果,该代码更复杂一点,但它仍实现了通过键盘使车加速的效果。为了让让汽车比实际方向有所漂移我分解了汽车方向和运动方向。速度用来更新运动矢量的长度,但我遇到了许多问题,为了简化问题我只使用一个速度标值。通过这种方式在反向速度向量的帮助下很容易实现了让驾驶方向落后一点点,而汽车仍然是指向前面。
由于你的赛道并非只是直的,所以你需要通过键盘左右或手柄旋转车。图13-4显示了旋转车的基本规则,这非常简单,通过短短的几行代码就能实现。为了让旋转更加平滑,上一次的旋转量仍要使用,但减少一点。
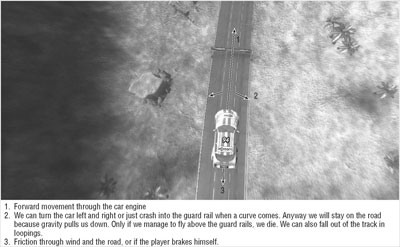
图13-4
// First handle rotations (reduce last value)
rotationChange *= 0.825f;// 75f;
// Left/right changes rotation
if (Input.KeyboardLeftPressed || Input.Keyboard.IsKeyDown(Keys.A))
rotationChange += MaxRotationPerSec * moveFactor / 2.5f;
else if (Input.KeyboardRightPressed || Input.Keyboard.IsKeyDown(Keys.D) || Input.Keyboard.IsKeyDown(Keys.E))
rotationChange -= MaxRotationPerSec * moveFactor / 2.5f;
else rotationChange = 0;
if (Input.MouseXMovement != 0)
rotationChange -= (Input.MouseXMovement / 15.0f) * MaxRotationPerSec * moveFactor;
// Rotate dir around up vector
// Interpolate rotatation amount.
virtualRotationAmount += rotationChange;
// Smooth over 200ms
float interpolatedRotationChange = (rotationChange + virtualRotationAmount) * moveFactor / 0.225f;// / 0.200f;
virtualRotationAmount -= interpolatedRotationChange;
// We can't rotate our car ourself if it is currently not on the ground
if (isCarOnGround)
carDir = Vector3.TransformNormal(carDir, Matrix.CreateFromAxisAngle(carUp, interpolatedRotationChange));
如果你有几个星期的时间来开发游戏,可以有一个更为复杂的方式来处理汽车的物理效果,如果你想要更真实的计算可以使用更多的常量和力让汽车的行为更加真实。但我的解决方案也运行良好。
如果你想查看效果可使用CarPhysics类中的TestCarPhysicsOnPlaneWithGuardRails单元测试。该单位测试开始时很简单,只有通过新的PlaneRenderer类渲染的汽车和地面。接着,添加了护栏和碰撞检测,这将在本章后面讨论。这是这个单元测试的早期版本,它已重新命名为TestCarPhysicsOnPlaneWithGuardRails,这个单元测试只是为处理汽车的基本物理效果显示环境。图13-5显示了结果。通过键盘和输入设备控制赛车(上,下,左,右等等)。
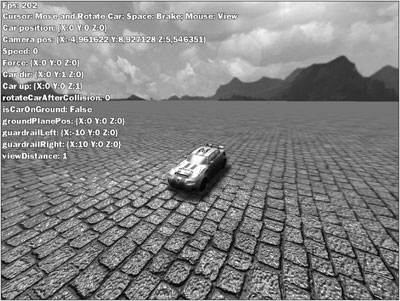
图13-5
static public void TestCarPhysicsOnPlane()
{
PlaneRenderer plane = null;
TestGame.Start("TestCarPhysicsOnPlane",
delegate {
plane = new PlaneRenderer(Vector3.Zero, new Plane(new Vector3(0, 0, 1), 0), new Material("CityGround", "CityGroundNormal"), 500.0f);
// Put car on the ground and use standard direction and up vectors
RacingGame.Player.SetCarPosition( new Vector3(0, 0, 0), new Vector3(0, 1, 0), new Vector3(0, 0, 1));
},
delegate {
// Test slow computers by slowing down the framerate with Ctrl
if (Input.Keyboard.IsKeyDown(Keys.LeftControl))
Thread.Sleep(75);
Matrix carMatrix = RacingGame.Player.UpdateCarMatrixAndCamera();
// Generate shadows, just the car does shadows
ShaderEffect.shadowMapping.GenerateShadows(
delegate {
RacingGame.CarModel.GenerateShadow(carMatrix);
}
);
// Render shadows (on both the plane and the car)
ShaderEffect.shadowMapping.RenderShadows(
delegate {
RacingGame.CarModel.UseShadow(carMatrix);
plane.UseShadow(); });
BaseGame.UI.RenderGameBackground();
// Show car and ground plane
RacingGame.CarModel.RenderCar(0, Color.White, carMatrix);
plane.Render();
// Just add brake tracks (we don't render the landscape here)
RacingGame.Landscape.RenderBrakeTracks();
// Render all 3d objects
BaseGame.MeshRenderManager.Render();
// Add shadows
ShaderEffect.shadowMapping.ShowShadows();
RacingGame.Player.DisplayPhysicsValuesAndHelp();
}
);
} // TestCarPhysicsOnPlane()
重力
在平面上驾驶是很容易做到的,但不是非常有趣,特别是这个赛车游戏还可以让你在循环轨道,隧道,曲线等等上行驶。碰撞检测将在本章后面讨论,但你可以在TestCarPhysicsOnPlane单元测试中添加重力并调整它。
你只需在TestCarPhysicsOnPlane单元测试稍作改变,即在初始化代码中把车提升到离地10米的高处,它应该掉下来,但因为你没有实现真正的物理效果(只有汽车控制,加速,转弯),因此车只是停留在空中(见图13-6 )。
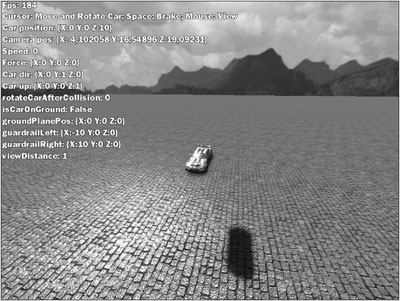
图13-6
// Put car 10m above the ground to test gravity and ground plane!
RacingGame.Player.SetCarPosition( new Vector3(0, 0, 10), new Vector3(0, 1, 0), new Vector3(0, 0, 1));
Player类是从ChaseCamera类继承的,而ChaseCamera类继承自CarPhysics类。这样,所有的汽车控制,物理学,玩家逻辑等可以从同一个player类中处理和访问。ChaseCamera类有两种模式,类似与Rocket Commander的SpaceCamera类的模式:
- Free Camera模式用于所有单元测试。有时候你也可以在单元测试中改变它。
- 默认的Chase Car Game用于游戏。用于菜单或重放游戏过程,当然也用于在游戏中显示和控制汽车。
在初始化中使用以下代码以确保相机被使用,在游戏中你不使用变焦,你可以看到开始时车的拉近过程:
// Make sure we are not in free camera mode and can control the car
RacingGame.Player.FreeCamera = false;
RacingGame.Player.ZoomInTime = 0;
RacingGame.Player.SetCameraPosition(new Vector3(0, -5, 8));
单元测试的其他部分保持不变,重力计算在CarPhysics类的Update方法中,它调用ApplyGravity方法:
/// <summary>
/// Apply gravity
/// </summary>
private void ApplyGravity()
{
// Fix car on ground float distFromGround = Vector3Helper.SignedDistanceToPlane( carPos, groundPlanePos, groundPlaneNormal);
isCarOnGround = distFromGround > -0.1f;
// Use very hard and instant gravity to fix if car is below ground!
float moveFactor = BaseGame.MoveFactorPerSecond;
float maxGravity = Gravity * moveFactor;
// Use more smooth gravity for jumping
float minGravity = -Gravity * moveFactor;
if (distFromGround > maxGravity)
{
distFromGround = maxGravity;
gravitySpeed = 0;
} // if (distFromGround)
if (distFromGround < minGravity)
{
distFromGround = minGravity;
gravitySpeed -= distFromGround;
} // if (distFromGround)
carPos.Z += distFromGround;
} // ApplyGravity()
此代码仅降低了z值知道车到达地面。当你驾驶上山时汽车可能会低于道路,或因为一些精度误差,z值也会被修正使车重回到公路上。
调整要用到许多常数,这些都是在CarPhysics类的一开始被定义的。下面是前三个常数。改变CarMass,例如,如果汽车很重则它几乎贴到地面行驶,或很轻,可在空中飞行很长一段时间:
#region Constants
/// <summary>
/// Car is 1000 kg
/// </summary>
const float CarMass = 1000;//1000.0f;
/// <summary>
///Gravity on earth is 9.81 m/s^2
/// </summary>
const float Gravity = 9.81f;
/// <summary>
/// Max speed of our car is 275 mph.
/// </summary>
//While we use mph for the display, we calculate internally with
// meters per sec since meter is the unit we use for everthing in the
// game. And it is a much nicer unit than miles or feet.
public const float MaxSpeed = 275.0f * MphToMeterPerSec;
// Convert our meter per sec to mph for display.
// 1 mile = 1.609344 kilometers</summary>>
// Each hour has 3600 seconds (60 min * 60 sec).
// 1 kilometer = 1000 meter.
public const float MeterPerSecToMph = 1.609344f * ((60.0f*60.0f)/1000.0f), MphToMeterPerSec = 1.0f / MeterPerSecToMph;
// [etc.] >
你可能几次看到我使用米而不是英尺、英寸,码、英里或在美国使用的格式,很抱歉,世界的其他地方使用米,这样更容易测量和设定常数,我甚至不知道引力常数在其他单位系统中是多大,你可以看到,每当有其他的格式,如Mph(英里每小时)时我使用辅助常数将格式转换。你还可以使用谷歌转换格式。只需输入“1500 meters as miles”,你将获得英里的数值。
新的TestCarPhysicsOnPlane单元测试让你可以控制赛车和正确处理重力(见图13-7)。当你刹车时,它也处理在地面上显示制动轨迹。

图13-7
发布时间:2008/11/4 12:45:44 阅读次数:7836