§11.1整合在一起
在前两章你已经看到了XNA Shooter的一些代码片段了。在开始之前你需要XNA Shooter项目的所有文件,这些文件应首先被建立。该项目需要所有XACT项目的音效,以及shader、字体纹理、测试、菜单等。最后,在添加.x三维模型和纹理文件后您可以继续下去了,并通过Txeture、Shader和Model类中的单元测试对其进行测试。
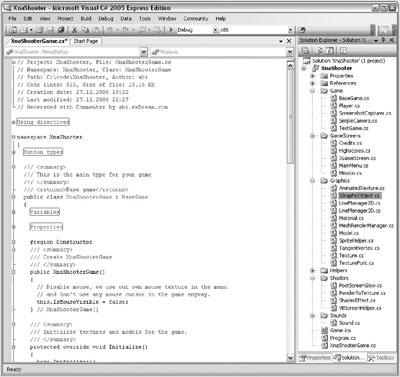
在进行了以下操作后,图11-1显示了名为Xna Shooter的新项目:
- 创建一个名为“XnaShooter”的新Windows XNA游戏项目,从Rocket Commander项目中拖曳所有源代码文件。因为在XnaShooter中不需要,所以下列文件被删除,按命名空间排序:
Game命名空间:Asteroid.cs,BaseAsteroidManager.cs,GameAsteroidManager.cs,Level.cs, PhysicsAsteroidManager.cs,SmallAsteroid.cs和SpaceCamera.cs
GameScreens命名空间:Help.cs,MissionSelection.cs和Options.cs
Graphics命名空间:AnimatedModel.cs和LensFlare.cs
Shaders命名空间:ParallaxShader.cs和PreScreenSkyCubeMapping.cs
- Game1.cs也被移除,RocketCommanderGame类更名为XnaShooterGame。
- 所有文件中被使用的RocketCommanderXna命名空间被替换为为XnaShooter命名空间。
- Mission.cs,Player.cs,MainMenu.cs和XnaShooterGame.cs中的大部分代码被注释,以便编译该项目。
声音
源代码是重要的,但没有纹理,声音和三维模型你没法完成一个真正的游戏。由于在第9章已经讨论过XnaShooter XACT项目,这将是添加到新项目中的第一个东西。加入项目中的唯一一个文件是XnaShooter.xap文件,它使采用了很多.wav文件。我倾向于把所有.wav文件也添加到项目中,因为我想看到有哪些文件被直接用于该项目。
在XACT项目被添加到Sounds命名空间后,你就能更改Sound类并通过TestPlaySounds测试所有的声音。该单元测试并不包括所有的声音,但最重要的音效都测试了。像游戏音乐和爆炸声使用了不只一个声音文件。这意味着,如果你播放爆炸声时,三个爆炸声音文件中的一个会被随机选择和播放。这无需特别代码,一切都在XACT中被设置。
public static void TestPlaySounds()
{
TestGame.Start(
delegate
{
if (Input.MouseLeftButtonJustPressed || Input.GamePadAJustPressed)
Sound.Play(Sounds.Defeat);
else if (Input.MouseRightButtonJustPressed || Input.GamePadBJustPressed)
Sound.Play(Sounds.Victory);
else if (Input.KeyboardKeyJustPressed(Keys.D1))
Sound.Play(Sounds.GameMusic);
else if (Input.KeyboardKeyJustPressed(Keys.D2))
Sound.Play(Sounds.EnemyShoot);
else if (Input.KeyboardKeyJustPressed(Keys.D3))
Sound.Play(Sounds.Explosion);
else if (Input.KeyboardKeyJustPressed(Keys.D4))
Sound.Play(Sounds.Health);
else if (Input.KeyboardKeyJustPressed(Keys.D5))
Sound.Play(Sounds.PlasmaShoot);
else if (Input.KeyboardKeyJustPressed(Keys.D6))
Sound.Play(Sounds.MgShoot);
else if (Input.KeyboardKeyJustPressed(Keys.D7))
Sound.Play(Sounds.GattlingShoot);
else if (Input.KeyboardKeyJustPressed(Keys.D8))
Sound.Play(Sounds.EMP);
TextureFont.WriteText(2, 30, "Press 1-8 or A/B or left/right mouse buttons to play back "+ "sounds!");
}
);
} // TestPlaySounds()
用户界面
现在渲染用户界面和菜单纹理。上一章已经讨论了不少如何处理输入,用户界面和游戏画面的逻辑实现,所以只需添加所需文件(MainMenu.png,MouseCursor.dds和GameFont.png),看一下游戏的屏幕逻辑(见图11-2)。实现主菜单和其他游戏屏幕上无需花太多时间,它们与Rocket Commander非常类似,但是一些复杂的屏幕如Option和Misson Selection被移除,因为XnaShooter中不需要。
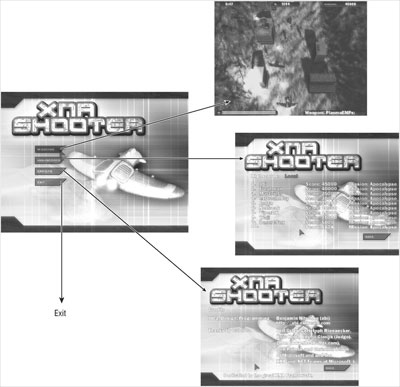
您已经学习了XnaShooter的游戏界面,但整个游戏的逻辑将在本章最后讨论。你只有三个游戏屏幕,它们都很容易实现。主菜单显示4个按钮,将新的游戏屏幕添加到堆栈中,让您可以跳出新增的游戏屏幕返回主菜单。Highscore是Rocket Commander中Highscore的精简版,因为不支持网络,所以只显示本机的Highscore。最后是Credit屏幕,显示出几行文字并加上Back按钮。
快速浏览一下MainMenu的Run方法,该方法处理主菜单和进入其他屏幕的四个按钮:
// Render background
game.RenderMenuBackground();
// Show all buttons
int buttonNum = 0;
foreach (MenuButton butto// Don't render the back button
if (button != MenuButton.Back)
{
if (game.RenderMenuButton(button, buttonLocations[buttonNum]))
{
if (button == MenuButton.Missionsgame.AddGameScreen(new Mission());
else if (button == MenuButton.Highscore)
game.AddGameScreen(new Highscores());
else if (button == MenuButton.Credits)
game.AddGameScreen(new Credits()); new Credits()); dGameScreen(new Credits());
else if (button == MenuButton.Exit)
quit = true;
}
// if buttonNum++;
if (buttonNum >= buttonLocations.Length)
break;
}
// foreach if // Hotkeys, M=Mission, H=Highscores, C=Credits, Esc=Quit
if (Input.KeyboardKeyJustPressed(Keys.M))
game.AddGameScreen(new Mission());
else if (Input.KeyboardKeyJustPressed(Keys.H))
game.AddGameScreen(new Highscores());
else if (Input.KeyboardKeyJustPressed(Keys.C))
game.AddGameScreen(new Credits());
else if (Input.KeyboardEscapeJustPressed)
quit = true;
纹理
除了菜单纹理、鼠标纹理和字体纹理,你需要更多的纹理。首先是你在前一章就见过的HUD纹理和新的NumbersFont.png纹理,NumbersFont.png纹理让你在HUD顶部显示一些彩色的数字。还有许多效果纹理用在特效系统内,这将在本章后面被讨论到。很难解释哪个纹理用在游戏的哪一部分,请看看图11-3,简单解释了每个纹理的用途。
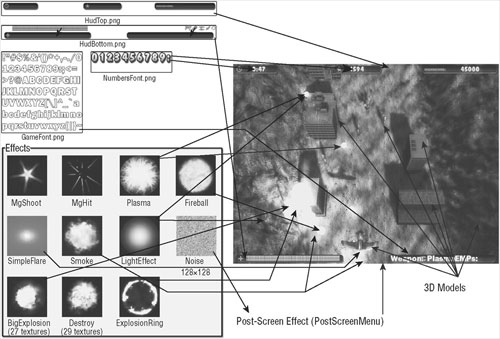
所有纹理都必须添加到项目中,但内容导入器的设置都不尽相同。如鼠标,主菜单,字体纹理不应被压缩成DXT格式(使用DDS的文件),它们仍处于未压缩的32bpp (每个像素的位数)的形式,但其他材质如爆炸效果需要压缩使其变得更小。例如,BigExplosion效果由约30张大小为128×128纹理的纹理组成。没有压缩时一个爆炸效果就约有2 MB。
而通过DXT5压缩你可以降低到0.5MB,让您可以执行好几个爆炸效果,并仍节省了磁盘和显存空间。为了支持alpha通道,应使用DXT5压缩格式代替DXT1,虽然DXT1压缩得更小。
这个游戏约有3 MB的纹理,其中1 MB用于两个爆炸效果,另外1MB用于菜单。其余的用于视觉效果、HUD和字体。特效系统很复杂,通过粒子的相互作用,实现了很酷的爆炸效果。有时特效也整合了物理引擎,允许粒子,烟雾,爆炸与周围环境或自身发生交互。对于XnaShooter,简单的特效系统就足够了。虽然特效很难编写,但很容易改变或增加新的特效到纹理。只要增加一个Add方法,并通过EffectManager类中TestEffects进行单元测试中。
三维模型
这个游戏使用了大量的三维模型(见图11-4)。我一开始只使用了一个飞船模型和一些特效,但不久后我就发现没有至少3到4种不同敌人,游戏将变得很无趣。这些敌人的行为方式在XNA Shooter中有很大的不同:
- OwnShip模型是你自己的飞船。允许你发射MG,Plasma,Gatling-Gun或火箭,您还能发射EMP炸弹杀死屏幕上的所有敌人。您的飞在游戏中是最快的,但如果屏幕中充满了敌人,这就帮不了你了,在敌人击落你之前你必须首先击落它们。你的飞船在游戏中是最快的,但如果屏幕中充满了敌人,这就帮不了你了,在敌人击落你之前你必须首先击落它们。
- Corvette是最基本的敌人,它从左右两边发射MG,生命之不高,武器也不强。主要优点是如果你处在它的射击方向上会立即被击中。如果你没有及时消灭它们,屏幕中充满Corvette,你会不断失去生命值。
- 小型运输舰是运送道具的小飞船,有25%至50%可能载有一些有用的道具,特别是生命值,当你生命值低下时这是很有用的。击落它们还可能获得EMP炸弹。运输舰还携带其他道具,让您可以切换武器。运输舰不发射武器,但你应避免与它们相撞。小型运输舰的生命值比Corvette还低。
- Firebird是一个非常强大的敌人,它们直接对你发射火球。它能计算出你现在的位置迫使你不断闪避火球。它的生命值比其他较小的飞船大一点。不要碰撞Firebirds,这样会极大地降低生命值。如果屏幕上有太多Firebirds,往往只有EMP炸弹可以帮您了。
- Rocket-Frigate(火箭驱逐舰)是游戏中最大的飞船。本来我想在关尾制作一个Boss,但制作三维模型和实现游戏逻辑需要花费太多的时间,如果你对射击游戏真的感兴趣,添加Boss和更多关卡应该不是很难。Rocket-Frigate发射与你类似的火箭,但小很多,也不会造成很大的损害。除了重装甲和高生命值,这个敌人的主要优势是火箭具有追踪能力,它将一直跟踪你的飞船直到耗尽燃料。如果你操作熟练的话,对付一个Rocket-Frigate不难并能仍然击中它,但关尾时要对付多个Rocket-Frigate就小行星是不是一个真正的敌人,它们只是在你周围漂浮阻止您的行动。它们不能射击,但与之碰撞会失去了大量的生命值。普通武器很难击毁它们,但如果有EMP炸弹就可以把它们全消灭。您可能注意到,我借用了Rocket Commander中的小行星模型。
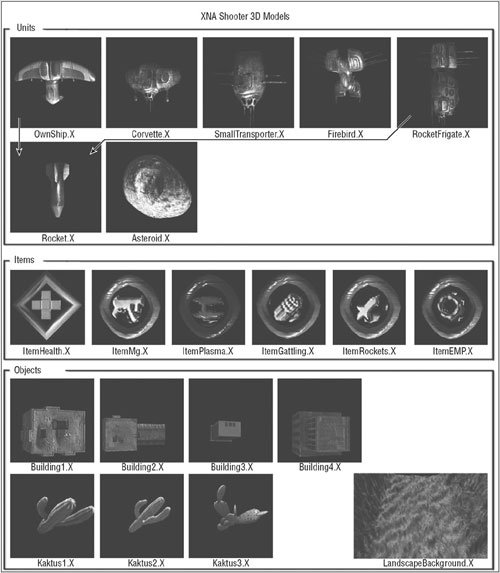
这些敌人对游戏是很重要的,但没有道具会失去很多乐趣,而没有背景景物,看起来会很乏味。道具能回复生命值,补充EMP炸弹或更改四个武器中的一个:MG,Plasma,Gatling-Gun,以及火箭发射器。
背景物体与游戏不发生互动,只是放在背景上并产生阴影。首先, LandscapeBackground.X模型被渲染并在关卡中重复出现。本章后面您将会学到创建过程和产生关卡的细节。LandscapeBackground.X模型渲染后再把建筑物和植物渲染在它上面。由于场景是一个山谷,中间有相同的高度,所以您可以方便地添加建筑物和植物。所有的物体都是随机添加和产生的。您还可以添加更多的物体,改变场景模型列表是很简单的,只需添加另一种模型,它会自动生成在地面上。
动画纹理
在Rocket Commander中您已经使用过动画纹理了,但是你没学过如何实现它们。首先基本你要有一组纹理,能以1/30秒的速度改变。在XNA Shooter有两组动画纹理实现了两个爆炸效果。你只需为每个爆炸效果加载30个纹理并处理它他们,因为你不止一次需要用到这个代码,所以应该抽象到一个新的类:AnimatedTevaxture (见图11-5 )。
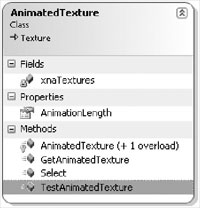
AnimatedTexture的构造函数与Texture类非常相似,但你仍要通过纹理文件名检查纹理。爆炸特效使用连续的纹理名称,如BigExplosion0001.dds,BigExplosion0002.dds, BigExplosion0003.dds等等。下面构造函数中的代码用来加载所有这些文件名进入内部xnaTextures列表。请注意,在初始版本的Rocket Commander代码(Managed DirectX)中加载DDS文件,但在XNA中应编译成.xnb文件,这是Xbox 360平台上唯一的载入纹理的方式(Windows平台上仍支持直接加载DDS文件)。
// Ok, now load all other animated textures
List<XnaTexture> animatedTextures = new List<XnaTexture>();
animatedTextures.Add(internalXnaTexture);
int texNumber = 2;
while (File.Exists(filenameFirstPart + texNumber.ToString("0000")+".xnb"))
{
animatedTextures.Add(BaseGame.Content.Load<Texture2D>( filenameFirstPart + texNumber.ToString("0000")));
texNumber++;
} // while (File.Exists)
xnaTextures = animatedTextures.ToArray();
在Select方法的帮助下您可以选择任何载入的纹理,此类的其他部分和Texture类完全一样。这意味着你可以选择纹理并将其显示在屏幕上,因为内部xnaTexture变量被分配了正确纹理,你也可以对纹理实行shader。您也可以直接调用GetAnimatedTexture访问任何动画纹理。
/// <summary>
/// Select this animated texture as the current texture
/// </summary>
/// <param name="animationNumber" /> Number
public void Select(int animationNumber)
{
if (xnaTextures != null && xnaTextures.Length > 0)
{
// Select new animation number
internalXnaTexture = xnaTextures[animationNumber % xnaTextures.Length];
} // if
}
// Select(num)
Billboards
现在你有了XNA Shooter的所有内容,但仍然需要思考如何来显示这些内容。您没有任何代码去渲染场景、物体和新的特效。在Rocket Commander你只需显示爆炸这个唯一的特效。在您的新游戏中把所有特效直接在屏幕上看起来不是很有说服力。在3D场景中直接以多边形的形式显示特效有这样几个优点:
- 您不必为每个3D特效计算二维位置和大小。当使用三维多边形时他们和其他东西一样被转化到屏幕上。
- 借助于深度缓冲,能将特效显示在物体的前面和后面。这样一来飞船引擎后的照明和烟雾特效即使在飞船其他部分或其他三维物体在前面的情况下也能显示正常。
- 如果您将特效排序,可以通过alpha混合将特效叠加起来。这样,许多特效叠加能产生更好的3D效果。
为了能将3D特效直接显示屏幕上,通常使用Billboard这种技术。Billboard使用3D方形(两个三角形)显示纹理。有时特殊显卡的功能,如点精灵也可以使用。在任何情况下观察Billboard都能看见它们。而对于其他三维多边形,如果它们朝向错误的方向,你就不能看到它们或他们变得扭曲和变小(见图11-6 )。
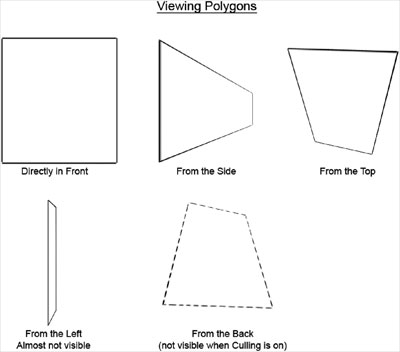
对于某些特效这种行为是好的,例如,一个三维爆炸环从正面看是正确的,但如果从90度角的两侧看,它几乎消失了。大多数特效从旁边看效果不好。爆炸,灯光效果,火焰和等离子球等等特效都是从正面抓取的,但从其他方向看也类似。例如,火球特效,从各个方向看都应是一个球体,不应该被扭曲,变小或消失。为了实现这一点你必须确保你总是能看到特效,即始终将特效多边形转到面向观察者的方向。Billboard类可以帮助你实现这个任务(见图11-7 )。
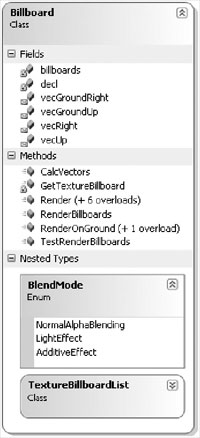
Billboard类中最重要的方法是Render,它将Billboard加入到Billboard列表,在每一帧结束调用RenderBillboards方法时会渲染这个列表。Render方法有6个重载方法,但您也可以调用RenderOnGround方法将Billboard渲染到xy平面上。Render中的一个重载方法还你让你指定右和上的向量。通过这种方式,您可以随意调整飞船爆炸的爆炸环,并还能添加其他爆炸特效。und方法将Billboard渲染到xy平面上。Render中的一个重载方法还你让你指定右和上的向量。通过这种方式,您可以随意调整飞船爆炸的爆炸环,并还能添加其他爆炸特效。
在您查看Render方法之前现看一下Billboard类的单元测试,展示了如何使用这个类:
Billboard.Render(plasma, new Vector3(-40.0f, 0.0f, 0.0f), 5.0f, BaseGame.TotalTimeMs * (float)Math.PI / 1000.0f, Color.White);
Billboard.Render(fireball, new Vector3(-40.0f, +50.0f, 0.0f), 5.0f, 0, Color.White);
Billboard.RenderOnGround(ring, new Vector3(-25.0f, 0.0f, -100.0f), 5.0f, 0, Color.White, vecGroundRight, vecGroundUp);
// etc.
// Render all billboards for this frame
Billboard.RenderBillboards();
在Render方法中vecRight和vecUp向量用于构建Billboard多边形。这些向量可以直接从目前使用的视矩阵中提取。借助于BaseGame类,很容易提取这些向量,通过CalcVectors辅助方法,这些操作会自动在RenderBillboards中完成。
/// <summary>
/// Calc vectors for billboards, will create helper vectors for
///</summary>
///<summary>
/// billboard rendering, should just be called every frame.
///</summary>
// Only use the inverse view matrix, world matrix is assumed to be
// Idendity, simply grab the values out of the inverse view matrix.
Matrix invViewMatrix = BaseGame.InverseViewMatrix;
vecRight = new Vector3( invViewMatrix.M11, invViewMatrix.M12, invViewMatrix.M13);
vecUp = new Vector3( invViewMatrix.M21, invViewMatrix.M22, invViewMatrix.M23);
}
// CalcVectors() ix.M21, invViewMatrix.M22, invViewMatrix.M23);
}
// CalcVectors()
快速浏览一下Billboard类中的Render方法:
/// <summary>
/// Render 3D Billboard into scene. Used for 3D effects.
/// </summary>
///<summary>
/// This method does not support rotation (it is a bit faster).
///</summary>
/// <param name="tex" /> Texture used for rendering
/// <param name="lightBlendMode" /> Blend mode for this effect
/// <param name="pos" /> Position in world space
///Color, usually white
public static void Render(XnaTexture tex, BlendMode lightBlendMode, Vector3 pos, float size, Color col)
{
// Invisible?
if (col.A == 0)
return;
TextureBillboardList texBillboard = GetTextureBillboard(tex, lightBlendMode);
Vector3 vec;
int index = texBillboard.vertices.Count;
vec = pos + ((-vecRight + vecUp) * size);
texBillboard.vertices.Add( new VertexPositionColorTexture( vec, col, new Vector2(0.0f, 0.0f)));
vec = pos + ((-vecRight - vecUp) * size); ector2(0.0f, 0.0f)));
vec = pos + ((-vecRight - vecUp) * size);
texBillboard.vertices.Add( new VertexPositionColorTexture( vec, col, new Vector2(0.0f, 1.0f)));
vec = pos + ((vecRight - vecUp) * size);
texBillboard.vertices.Add( new VertexPositionColorTexture( vec, col, new Vector2(1.0f, 1.0f)));
vec = pos + ((vecRight + vecUp) * size);
texBillboard.vertices.Add( new VertexPositionColorTexture( vec, col, new Vector2(1.0f, 0.0f)));
texBillboard.indices.AddRange(new short[] { (short)(index+0), (short)(index+1), (short)(index+2), (short)(index+0), (short)(index+2), (short)(index+3), }
);
} // Render(tex, pos, size)
如你所见,构造了四个顶点并添加到顶点列表中。每个纹理和光线混合模式被整合到各自的TextureBillboardList中。组成屏幕四边形的两个多边形索引被添加到索引列表。TextureBillboardList中的顶点和索引缓冲区连同RenderBillboards方法中的贴图和shader一起被渲染。
发布时间:2008/10/7 下午1:15:08 阅读次数:7009
