3D系列4.5 在靠近相机的地方添加更多细节

当远距离观察地形时,看起来效果不错。但当相机非常靠近地形时,你会看到每个纹理上独立的像素,这很糟糕,因为在游戏中,大多数情况中相机都会放置在靠近地形的地方。

如何解决这个问题?一个简单的方法是增大纹理坐标,这样更多的纹理会放置在地形上,如下所示,用

terrainVertices[x + y * terrainWidth].TexCoords.Z = x / (float)10; 
terrainVertices[x + y * terrainWidth].TexCoords.W = y / (float)10;

替换:

terrainVertices[x + y * terrainWidth].TexCoords.Z = x / (float)30; 
terrainVertices[x + y * terrainWidth].TexCoords.W = y / (float)30; 

当运行代码后,当相机靠近地形时效果不错,但当相机距离很远时,纹理会变得过小导致你会看到重复的纹理块。

你需要组合这两个方法而不是择其一。这是在像素着色器中实现的:当像素远离相机时,我们会使用大纹理。当像素靠近相机时,我们会使用更小的、更多细节的纹理。两者之间的区域,我们会进行混合。整个操作都是在像素着色器中进行的,因此并不会加重CPU的负担。

如你所见,我们需要每个像素离开相机的距离,所以在MTVertexToPixel结构中添加以下代码:

float Depth : TEXCOORD4; 

这个距离就是在相机坐标中的位置的z坐标,记住,因为这是一个4x4矩阵乘法的结果,所以使用前需要首先除以w分量:

Output.Depth = Output.Position.z/Output.Position.w; 

现在我们可以在像素着色器中访问这个变量,就可以知道每个像素和相机间的距离。在像素着色器中我们需要定义两个变量拥有混合:混合开始时离开相机的距离,混合初末的宽度:

float blendDistance = 0.99f; 
float blendWidth = 0.005f; 
float blendFactor = clamp((PSIn.Depth-blendDistance)/blendWidth, 0, 1); 

最后一行代码是混合函数。所有像素都有一个介于0和1之间的深度值,0对应近裁平面,1对应远裁平面(这两个平面是在投影矩阵中设置的)。使用这个函数,所有离开相机的距离小于0.99的像素的blendfactor为0,所有大于0.99+0.005=0.995的像素的blendfactor为1,两者之间的像素会获得一个经过线性插值的blendfactor。我使用下面的图片形象化了这个过程:

细节混合

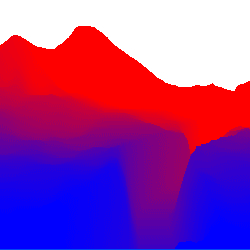
蓝色表示blendfactor为0,红色表示blendfactor为1。blendfactor为0的像素使用高细节纹理,红色部分使用标准纹理。

首先,我们需要计算每个像素的高细节颜色和标准颜色:

float4 farColor; 
farColor = tex2D(TextureSampler0, PSIn.TextureCoords)*PSIn.TextureWeights.x; 
farColor += tex2D(TextureSampler1, PSIn.TextureCoords)*PSIn.TextureWeights.y; 
farColor += tex2D(TextureSampler2, PSIn.TextureCoords)*PSIn.TextureWeights.z; 
farColor += tex2D(TextureSampler3, PSIn.TextureCoords)*PSIn.TextureWeights.w; 

float4 nearColor; 
float2 nearTextureCoords = PSIn.TextureCoords*3; 
nearColor = tex2D(TextureSampler0, nearTextureCoords)*PSIn.TextureWeights.x; 
nearColor += tex2D(TextureSampler1, nearTextureCoords)*PSIn.TextureWeights.y; 
nearColor += tex2D(TextureSampler2, nearTextureCoords)*PSIn.TextureWeights.z; 
nearColor += tex2D(TextureSampler3, nearTextureCoords)*PSIn.TextureWeights.w; 

第一个代码块来自于上一章。对靠近的颜色,我们将纹理坐标乘以3,这样纹理会缩小3倍,细节会增加3倍。有了像素的nearColor和farColor,我们需要根据混合因子将它们混合在一起:

Output.Color = lerp(nearColor, farColor, blendFactor); 
Output.Color *= lightingFactor; 

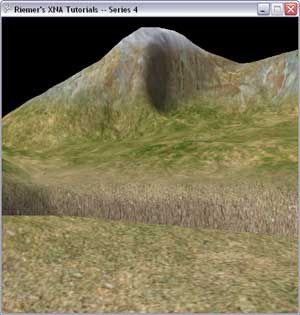
这只是简单的线性插值,当混合因子在0和1之间很有用。当将结果乘以光照因子后,就会获得以下结果:

程序截图

本章是处理地形纹理的最后一章。下一章我们会开始绘制水面,但如果没有天空反射在水面上效果很差。所以首先我们会加载一个带纹理的天空球。你可以做以下练习检验学到的知识:

下面是HLSL的代码:

//----------------------------------------------------
//-- --
//-- www.riemers.net --
//-- Series 4: Advanced terrain --
//-- Shader code --
//-- --
//----------------------------------------------------

//------- Constants --------
float4x4 xView;
float4x4 xProjection;
float4x4 xWorld;
float3 xLightDirection;
float xAmbient;
bool xEnableLighting;

//------- Texture Samplers --------
Texture xTexture;

sampler TextureSampler = sampler_state { texture = <xTexture> ; magfilter = LINEAR; minfilter = LINEAR; mipfilter=LINEAR; AddressU = mirror; AddressV = mirror;};Texture xTexture0;

sampler TextureSampler0 = sampler_state { texture = <xTexture0> ; magfilter = LINEAR; minfilter = LINEAR; mipfilter=LINEAR; AddressU = wrap; AddressV = wrap;};Texture xTexture1;

sampler TextureSampler1 = sampler_state { texture = <xTexture1> ; magfilter = LINEAR; minfilter = LINEAR; mipfilter=LINEAR; AddressU = wrap; AddressV = wrap;};Texture xTexture2;

sampler TextureSampler2 = sampler_state { texture = <xTexture2> ; magfilter = LINEAR; minfilter = LINEAR; mipfilter=LINEAR; AddressU = mirror; AddressV = mirror;};Texture xTexture3;

sampler TextureSampler3 = sampler_state { texture = <xTexture3> ; magfilter = LINEAR; minfilter = LINEAR; mipfilter=LINEAR; AddressU = mirror; AddressV = mirror;};
//------- Technique: Textured --------
struct TVertexToPixel
{
float4 Position     : POSITION;
float4 Color        : COLOR0;
float LightingFactor: TEXCOORD0;
float2 TextureCoords: TEXCOORD1;
};

struct TPixelToFrame
{
float4 Color : COLOR0;
};

TVertexToPixel TexturedVS( float4 inPos : POSITION, float3 inNormal: NORMAL, float2 inTexCoords: TEXCOORD0)
{
    TVertexToPixel Output = (TVertexToPixel)0;
    float4x4 preViewProjection = mul (xView, xProjection);
    float4x4 preWorldViewProjection = mul (xWorld, preViewProjection);

    Output.Position = mul(inPos, preWorldViewProjection);
    Output.TextureCoords = inTexCoords;

    float3 Normal = normalize(mul(normalize(inNormal), xWorld));
    Output.LightingFactor = 1;
    if (xEnableLighting)
        Output.LightingFactor = saturate(dot(Normal, -xLightDirection));

    return Output;
}

TPixelToFrame TexturedPS(TVertexToPixel PSIn)
{
    TPixelToFrame Output = (TPixelToFrame)0;

    Output.Color = tex2D(TextureSampler, PSIn.TextureCoords);
    Output.Color.rgb *= saturate(PSIn.LightingFactor + xAmbient);

    return Output;
}

technique Textured_2_0
{
    pass Pass0
    {
        VertexShader = compile vs_2_0 TexturedVS();
        PixelShader = compile ps_2_0 TexturedPS();
    }
}

technique Textured
{
    pass Pass0
    {
        VertexShader = compile vs_1_1 TexturedVS();
        PixelShader = compile ps_1_1 TexturedPS();
    }
}

//------- Technique: Multitextured --------
struct MTVertexToPixel
{
    float4 Position         : POSITION;
    float4 Color            : COLOR0;
    float3 Normal            : TEXCOORD0;
    float2 TextureCoords    : TEXCOORD1;
    float4 LightDirection    : TEXCOORD2;
    float4 TextureWeights    : TEXCOORD3;

     float Depth                : TEXCOORD4;

};

struct MTPixelToFrame
{
    float4 Color : COLOR0;
};

MTVertexToPixel MultiTexturedVS( float4 inPos : POSITION, float3 inNormal: NORMAL, float2 inTexCoords: TEXCOORD0, float4 inTexWeights: TEXCOORD1)
{    
    MTVertexToPixel Output = (MTVertexToPixel)0;
    float4x4 preViewProjection = mul (xView, xProjection);
    float4x4 preWorldViewProjection = mul (xWorld, preViewProjection);

    Output.Position = mul(inPos, preWorldViewProjection);
    Output.Normal = mul(normalize(inNormal), xWorld);
    Output.TextureCoords = inTexCoords;
    Output.LightDirection.xyz = -xLightDirection;
    Output.LightDirection.w = 1;    
    Output.TextureWeights = inTexWeights;

     Output.Depth = Output.Position.z/Output.Position.w;


    return Output;
}

MTPixelToFrame MultiTexturedPS(MTVertexToPixel PSIn)
{
    MTPixelToFrame Output = (MTPixelToFrame)0;        
    
    float lightingFactor = 1;
    if (xEnableLighting)
        lightingFactor = saturate(saturate(dot(PSIn.Normal, PSIn.LightDirection)) + xAmbient);

         
     float blendDistance = 0.99f;
     float blendWidth = 0.005f;
     float blendFactor = clamp((PSIn.Depth-blendDistance)/blendWidth, 0, 1);
         
     float4 farColor;
     farColor = tex2D(TextureSampler0, PSIn.TextureCoords)*PSIn.TextureWeights.x;
     farColor += tex2D(TextureSampler1, PSIn.TextureCoords)*PSIn.TextureWeights.y;
     farColor += tex2D(TextureSampler2, PSIn.TextureCoords)*PSIn.TextureWeights.z;
     farColor += tex2D(TextureSampler3, PSIn.TextureCoords)*PSIn.TextureWeights.w;
     
     float4 nearColor;
     float2 nearTextureCoords = PSIn.TextureCoords*3;
     nearColor = tex2D(TextureSampler0, nearTextureCoords)*PSIn.TextureWeights.x;
     nearColor += tex2D(TextureSampler1, nearTextureCoords)*PSIn.TextureWeights.y;
     nearColor += tex2D(TextureSampler2, nearTextureCoords)*PSIn.TextureWeights.z;
     nearColor += tex2D(TextureSampler3, nearTextureCoords)*PSIn.TextureWeights.w;
 
     Output.Color = lerp(nearColor, farColor, blendFactor);
     Output.Color *= lightingFactor;

    
    return Output;
}

technique MultiTextured
{
    pass Pass0
    {
        VertexShader = compile vs_1_1 MultiTexturedVS();
        PixelShader = compile ps_2_0 MultiTexturedPS();
    }
}

发布时间:2009/12/14 7:52:33  阅读次数:4907

2006 - 2024,推荐分辨率1024*768以上,推荐浏览器Chrome、Edge等现代浏览器,截止2021年12月5日的访问次数:1872万9823 站长邮箱

沪ICP备18037240号-1

沪公网安备 31011002002865号