3.10 扩展图像内容处理器:灰度变换和处理器参数
问题
你想扩展图像处理器用来处理每个独立像素的颜色。你还想从XNA主项目中改变处理器的参数。
解决方案
在前面的教程中,你知道了如何扩展内容处理器,让你可以处理并改变独立像素的值。
在Processor类中声明的所有公共变量都可以在素材的属性面板中设置。
工作原理
开始的初始化步骤已经在教程3-9中解释过了。复制下列代码让你可以处理图像文件中的所有图像(有些图像文件,例如texCube,包含多个图像):
namespace GrayContentPipeline
{
    [ContentProcessor(DisplayName = "GrayScaleProcessor")]
    public class ExtentedTextureProcessor : TextureProcessor
    {
        public override TextureContent Process(TextureContent input, ContentProcessorContext context)
        {
            TextureContent texContent = base.Process(input, context);
            texContent.ConvertBitmapType(typeof(PixelBitmapContent<Color>));
            for (int face = 0; face < input.Faces.Count; face++)
            {
                MipmapChain mipChain = input.Faces[face];
                for (int mipLevel = 0; mipLevel < mipChain.Count; mipLevel++)
                {
                    ...
                }
            }
            return texContent;
        }
    }
}
在内部的循环中你处理了图像的所有face。首先将当前face转化为一个PixelBitmapContent对象让你可以独立地处理每个像素。你可以立即创建第二个PixelBitmapContent对象,在第二个中存储新的颜色:
PixelBitmapContent<Color> oldImage = (PixelBitmapContent<Color>)input.Faces[face][mipLevel];
PixelBitmapContent<Vector4> grayImage = new PixelBitmapContent<Vector4>(oldImage.Width, oldImage.Height);
注意:对于这个例子来说,你可以简单地用新的颜色值覆盖旧的颜色值。但是,对于很多图像处理技术来说,为了计算像素的新颜色,你往往还需要访问周围像素的原始颜色,如果你能从旧图像分离出一张新图像就不会有任何问题。
如你所见,你可以自由地定义你想接受的颜色格式。本例中,你指定想要读取的原始颜色的格式是Color,但制定新颜色格式为Vector4。
下一步,你遍历图像的所有像素并获取原始颜色:
for (int x = 0; x < oldImage.Width; x++)
    for (int y = 0; y < oldImage.Height; y++)
    {
        Color oldColor = oldImage.GetPixel(x, y);
    }
一旦知道了原始颜色,你就可以定义对应的灰度颜色了。不要简单的将三个颜色通道取平均值,因为人眼对绿色更加敏感。而且每个颜色通道使用一个介于0至255之间的整数表示的,但是,当你创建一个新颜色时,你需要使用介于0与1之间的浮点数表示颜色值。这意味着你需要将初始颜色值除以255:
Color oldColor = oldImage.GetPixel(x, y);
float grayValue = oldColor.R * 0.299f / 255.0f;
grayValue += oldColor.G * 0.596f / 255.0f;
grayValue += oldColor.B * 0.211f / 255.0f;
float alpha = oldColor.A / 255.0f;
Vector4 grayColor = new Vector4(grayValue, grayValue, grayValue, alpha);
grayImage.SetPixel(x, y, newColor);
这可以将图像的所有像素替换为对应的灰度颜色。在两次循环后,确保将新颜色复制到当前的图像face中:
input.Faces[face][mipLevel] = grayImage;
调试内容处理器
你常常需要调试内容管道。这比调试普通的项目难,因为在编译时往往会忽略断点,你不得不手动将一个调试器连接到内容项目中。例如,你想调试项目中的图像中心的像素,可以使用以下代码:
if ((x == oldImage.Width / 2) && (y == oldImage.Height / 2))
{
    System.Diagnostics.Debugger.Launch();
}
当编译项目时,Visual Studio会提醒你指定使用哪个调试器,选择New Instance of Visual Studio。
一旦调试器开始运行,你可以在任何你想插入断点的地方调用System. Diagnostics. Debugger. Break( )。
定义处理器参数
通过在中添加共有变量你可以让你的处理器变得更加灵活。例如,将下列代码添加到Processor 类的顶部: public float interpolation = 0.8f; 当你编译项目时,你可以从XNA主项目中设置这个值,如图3-15所示。
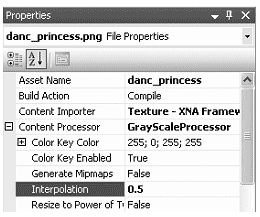
图3-15 设置自定义处理器的参数
你可以将这个变量用在内容处理器的任何地方。本例中,我们可以使用这个变量在普通的带颜色的图像和新的灰度图像间进行插值,如果interpolation的值为0,则将带颜色的像素存储在新图像中,如果这个值为1,则存储灰度图像。
Vector4 grayColor = new Vector4(grayValue, grayValue, grayValue, alpha);
Vector4 origColor = oldColor.ToVector4();
Vector4 newColor = Vector4.Lerp(origColor, grayColor, interpolation);
grayImage.SetPixel(x, y, newColor);
代码
下面是灰度图像处理器的完整代码:
namespace GrayContentPipeline
{
    [ContentProcessor(DisplayName = "GrayScaleProcessor")]
    public class ExtentedTextureProcessor : TextureProcessor
    {
        private float interpolation = 0.8f;

        public float Interpolation
        {
            get { return interpolation; }
            set { interpolation = value; }
        }

        public override TextureContent Process(TextureContent input, ContentProcessorContext context)
        {
            TextureContent texContent = base.Process(input, context);
            texContent.ConvertBitmapType(typeof(PixelBitmapContent<Color>));

            for (int face = 0; face < input.Faces.Count; face++)
            {
                MipmapChain mipChain = input.Faces[face];
                for (int mipLevel = 0; mipLevel < mipChain.Count; mipLevel++)
                {
                    PixelBitmapContent<Color> oldImage = PixelBitmapContent<Color>)input.Faces[face][mipLevel];
                    PixelBitmapContent<Vector4> grayImage = new PixelBitmapContent<Vector4> (oldImage.Width, oldImage.Height);
                    for (int x = 0; x < oldImage.Width; x++)
                        for (int y = 0; y < oldImage.Height; y++)
                        {
                            Color oldColor = oldImage.GetPixel(x, y);
                            float grayValue = oldColor.R * 0.299f / 255.0f;
                            grayValue += oldColor.G * 0.596f / 255.0f;
                            grayValue += oldColor.B * 0.211f / 255.0f;
                            float alpha = oldColor.A / 255.0f;
                            Vector4 grayColor = new Vector4(grayValue,grayValue, grayValue, alpha);
                            Vector4 origColor = oldColor.ToVector4();
                            Vector4 newColor = Vector4.Lerp(origColor, grayColor, interpolation);
                            grayImage.SetPixel(x, y, newColor);
                        }
                        input.Faces[face][mipLevel] = grayImage;
                }
            }
            return texContent;
        }
    }
}

发布时间:2009/6/19 7:29:10 阅读次数:4495
