2.2 彩色影像数据流
原文地址: http://www.cnblogs.com/yangecnu/archive/2012/03/31/KinectSDK_Application_Fundamentals_Part1.html 。
Kinect有两类摄像头:红外摄像头和普通的视频摄像头。视频摄像头提供了一般摄像头类似的彩色影像,这种数据流是三种数据流中使用和设置最简单的。因此我将他作为Kinect数据流介绍的例子。
使用Kinect数据流也有三步。首先是数据流必须可用。一旦数据流可用,应用程序就可以从数据量中读取数据并对数据进行处理和展现。一旦有新的数据帧可用,这两个步骤就会一直进行,下面的代码展现了如何初始化ColorImage对象。
public KinectSensor Kinect
{
    get { return this._Kinect; }
    set
    {
        if(this._Kinect != null)
        {
            UninitializeKinectSensor(this._Kinect);
            this._Kinect = null;
        }


        if(value != null && value.Status == KinectStatus.Connected)
        {
            this._Kinect = value;
            InitializeKinectSensor(this._Kinect);
        }
    }
}

private void InitializeKinectSensor(KinectSensor sensor)
 {
     if(sensor != null)
     {
         ColorImageStream colorStream = sensor.ColorStream;
         colorStream.Enable();
        sensor.ColorFrameReady += Kinect_ColorFrameReady;
        sensor.Start();
    }
}


private void UninitializeKinectSensor(KinectSensor sensor)
{
    if(sensor != null)
    {
        sensor.Stop();
        sensor.ColorFrameReady -= Kinect_ColorFrameReady;
    }
}
上面的代码对之前Kinect属性进行了修改,加粗为修改部分。新添加的两行调用了两个方法,分别初始化和释放KinectSensor和 ColorImageStream对象。InitializeKinectSensor对象调用ColorImageStream的Enable方法,注册ColorFrameReady事件并调用start方法。一旦打开了传感器,当新数据帧到达时就会触发frameready事件,该事件触发频率是每秒30次。
在实现Kinect_ColorFrameReady方法前,我们先在XAML中添加一些代码,每次调用frame-ready事件时,我们会从帧数据中创建一张位图并加以显示:
<Window x:Class="KinectApplicationFoundation.MainWindow"
        xmlns="http://schemas.microsoft.com/winfx/2006/xaml/presentation"
        xmlns:x="http://schemas.microsoft.com/winfx/2006/xaml"
        Title="ColorImageStreamFromKinect" Height="350" Width="525">
    <Grid>
        <Image x:Name="ColorImageElement"/>
    </Grid>
</Window>
然后,在Kinect_ColorFrameReady方法中,我们首先通过打开或者获取一个frame来提取获Frame数据。ColorImageFrameReadyEventArgs对象的OpenColorImageFrame属性返回一个当前的ColorImageFrame对象。这个对象实现了IDisposable接口,所以可以将这个对象包含在using语句中。在提取像素数据之前需要使用一个byte数组保存获取到的数据。FrameObject对象的PixelDataLength对象返回数据和序列的具体大小。调用CopyPixelDataTo方法可以填充像素数据,然后将数据显示在image控件上,具体代码如下:
private void Kinect_ColorFrameReady(object sender, ColorImageFrameReadyEventArgs e)
{
    using(ColorImageFrame frame = e.OpenColorImageFrame())
    {
        if(frame != null)
        {
            byte[] pixelData = new byte[frame.PixelDataLength];
            frame.CopyPixelDataTo(pixelData);
            ColorImageElement.Source = BitmapImage.Create(frame.Width, frame.Height, 96, 96, PixelFormats.Bgr32,
                            null, pixelData, frame.Width * frame.BytesPerPixel);
        }
    }
}
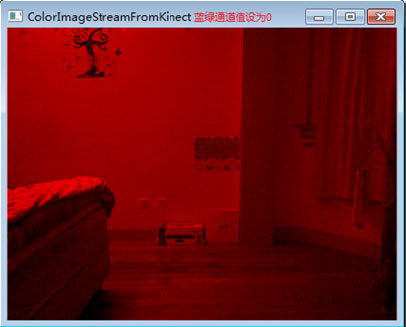
运行程序,就能得到从Kinect获取的视频信息,如下图所示这是从Kinect彩色摄像头获取的我房间的照片。和一般的视频没什麽两样,只不过这个是从Kinect的视频摄像头产生的。

性能改进
上文的代码中,对于每一个彩色图像帧,都会创建一个新的Bitmap对象。由于Kinect视频摄像头默认采集频率为每秒30帧,所以应用程序每秒会创建30个bitmap对象,产生30次的Bitmap内存创建,对象初始化,填充像素数据等操作。这些对象很快就会变成垃圾等待垃圾回收器进行回收。对数据量小的程序来说可能影响不是很明显,但当数据量很大时,其缺点就会显现出来。
改进方法是使用WriteableBitmap对象。它位于System.Windows.Media.Imaging命名空间下面,该对象被用来处理需要频繁更新的像素数据。当创建WriteableBitmap时,应用程序需要指定它的高度,宽度以及格式,以使得能够一次性为WriteableBitmap创建好内存,以后只需根据需要更新像素即可。
使用WriteableBitmap代码改动地方很小。下面的代码中,首先定义三个新的成员变量,一个是实际的WriteableBitmap对象,另外两个用来更新像素数据。每一幅图像的大小都是不变的,因此在创建WriteableBitmap时只需计算一次即可。
InitializeKinect方法中加粗的部分是更改的代码。创建WriteableBitmap对象,准备接收像素数据,图像的范围同时也计算了。在初始化WriteableBitmap的时候,同时也绑定了UI元素(名为ColorImageElement的Image对象)。此时WriteableBitmap中没有像素数据,所以UI上是空的。
private KinectSensor _Kinect;
private WriteableBitmap _ColorImageBitmap;
private Int32Rect _ColorImageBitmapRect;
private int _ColorImageStride;
private byte[] _ColorImagePixelData;

private void InitializeKinectSensor(KinectSensor sensor)
{
    if(sensor != null)
    {
        ColorImageStream colorStream = sensor.ColorStream;

        colorStream.Enable();

        this._ColorImageBitmap          = new WriteableBitmap(colorStream.FrameWidth, colorStream.FrameHeight,
                            96, 96, PixelFormats.Bgr32, null);
        this._ColorImageBitmapRect      = new Int32Rect(0, 0, colorStream.FrameWidth, colorStream.FrameHeight);
        this._ColorImageStride          = colorStream.FrameWidth * colorStream.FrameBytesPerPixel;
        this.ColorImageElement.Source   = this._ColorImageBitmap;
        this._ColorImagePixelData       = new byte[colorStream.FramePixelDataLength];

        sensor.ColorFrameReady += Kinect_ColorFrameReady;
        sensor.Start();
    }
}
还需要进行的一处改动是,对ColorFrameReady事件响应的代码。如下图。首先删除之前创建Bitmap那部分的代码。调用WriteableBitmap对象的WritePixels方法来更新图像。方法使用图像的矩形范围,代码像素数据的数组,图像的Stride,以及一个偏移(offset),偏移量通常设置为0,表示我们将替换图像中的每个像素。
private void Kinect_ColorFrameReady(object sender, ColorImageFrameReadyEventArgs e)
{
    using(ColorImageFrame frame = e.OpenColorImageFrame())
    {
        if(frame != null)
        {
            byte[] pixelData = new byte[frame.PixelDataLength];
            frame.CopyPixelDataTo(pixelData);
            ColorImageElement.Source = BitmapImage.Create(frame.Width, frame.Height,
                            96, 96, PixelFormats.Bgr32, null, pixelData, frame.Width * frame.BytesPerPixel);
        }
    }
}
基于Kinect的应用程序在无论是在显示ColorImageStream数据还是显示DepthImageStream数据的时候,都应该使用WriteableBitmap对象来显示帧影像。在最好的情况下,彩色数据流会每秒产生30帧彩色影像,这意味着对内存资源的消耗比较大。WriteableBitmap能够减少这种内存消耗,减少更新图像带来的内存开辟和回收操作。毕竟在应用中显示帧数据不是应用程序的最主要功能,所以在这方面减少内存消耗显得很有必要。
简单的图像处理
每一帧ColorImageFrame都是以字节序列的方式返回原始的像素数据。应用程序必须以这些数据创建图像。这意味这我们可以对这些原始数据进行一定的处理,然后再展示出来。下面来看看如何对获取的原始数据进行一些简单的处理。
private void Kinect_ColorFrameReady (object sender, ImageFrameReadyEventArgs e)
 {
     using(ColorImageFrame frame = e.OpenColorImageFrame())
     {
         if(frame != null)
         {
             byte[] pixelData = new byte[frame.PixelDataLength];
             frame.CopyPixelDataTo(pixelData);

             for(int i = 0; i < pixelData.Length; i += frame.BytesPerPixel)
             {
                 pixelData[i] = 0x00; //Blue
                 pixelData[i + 1] = 0x00; //Green
             }

             this._ColorImageBitmap.WritePixels(this._ColorImageBitmapRect, pixelData, this._ColorImageStride, 0);
         }
     }
 }
以上的代码关闭了每个像素点的蓝色和绿色通道。for循环遍历每个像素,使得i的起始位置总是该像素的第一个字节。由于数据的格式是Bgr32,即RGB32位(一个像素共占4个字节,每个字节8位),所以第一个字节是蓝色通道,第二个是绿色,第三个是红色。循环体内的两行代码将第一个和第二个通道设置为0。所以输出的代码中只用红色通道的信息。这是最基本的图像处理。
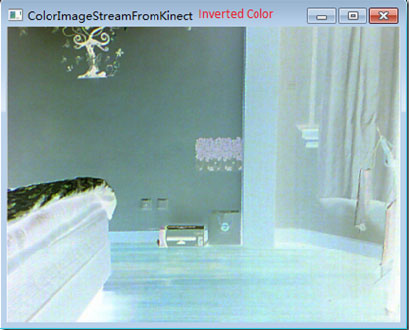
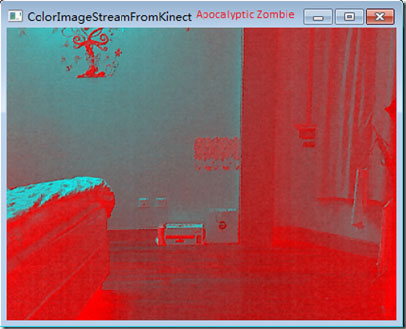
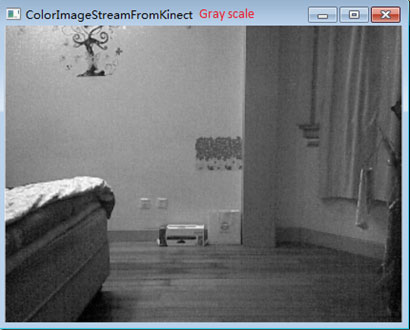
代码中对像素的操作类似于像素着色器(pixel shader)中的函数,可以实现很复杂的算法。你可以试试下面列表中的一些像素着色器伪代码,只需将这些代码替换到for循环中即可,然后看看图像的显示结果。这类操作通常很消耗计算资源。
Inverted Color-反转色(时常所说的照片底片,也就是普通胶卷冲洗出来的底片叫做负片,负片的颜色是我们实际拍摄图像的反转色,要制成照片还需再重新曝光,通过扩印或放大成照片,才变成了与所拍摄景物相同色彩的影像。)
pixelData[i]=(byte)~pixelData[i];
pixelData[i+1]=(byte)~pixelData[i+1];
pixelData[i+2]=(byte)~pixelData[i+2];
Apocalyptic Apocalyptic Zombie-反转红色通道并交换蓝绿通道
pixelData[i]= pixelData[i+1];
pixelData[i+1]= pixelData[i];
pixelData[i+2]=(byte)~pixelData[i+2];
Gray scale-灰度
byte gray=Math.Max(pixelData[i],pixelData[i+1]);
gray=Math.Max(gray,pixelData[i+2]);
pixelData[i]=gray; pixelData[i+1]=gray;
pixelData[i+2]=gray;
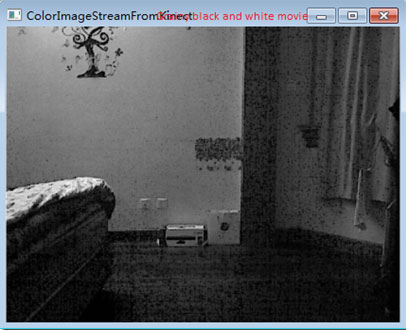
Grainy black and white movie
byte gray=Math.Min(pixelData[i],pixelData[i+1]);
 gray=Math.Min(gray,pixelData[i+2]);
 pixelData[i]=gray; pixelData[i+1]=gray;
 pixelData[i+2] =gray;
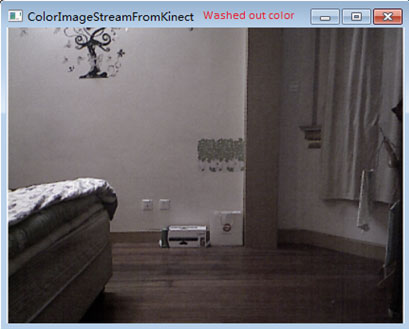
Washed out color
double gray=(pixelData[i]*0.11)+(pixelData[i+1]*0.59)+(pixelData[i+2]*0.3);
double desaturation=0.75;
pixelData[i]=(byte)(pixelData[i]+desaturation*(gray-pixelData[i]));
pixelData[i+1]=(byte)(pixelData[i+1]+desaturation*(gray-pixelData[i+1]));
pixelData[i+2]=(byte)(pixelData[i+2]+desaturation*(gray-pixelData[i+2]));
High saturation
if (pixelData[i]<0x33||pixelData[i]>0xE5)
{
    pixelData[i]=0x00;
}
else
{
    pixelData[i]=0Xff;
}
if (pixelData[i+1]<0x33||pixelData[i+1]>0xE5)
{
    pixelData[i+1]=0x00;
}
else
{
    pixelData[i+1]=0Xff;
}
if (pixelData[i+2]<0x33||pixelData[i+2]>0xE5)
{
    pixelData[i+2]=0x00;
}
else
{
    pixelData[i+1]=0Xff;
}

截图
有时候,可能需要从彩色摄像头中截取一幅图像,例如可能要从摄像头中获取图像来设置人物头像。为了实现这一功能,首先需要在界面上设置一个按钮,代码如下:
<Window x:Class="KinectApplicationFoundation.MainWindow"
        xmlns="http://schemas.microsoft.com/winfx/2006/xaml/presentation"
        xmlns:x="http://schemas.microsoft.com/winfx/2006/xaml"
        Title="ColorImageStreamFromKinect" Height="350" Width="525">
    <Grid>
        <Image x:Name="ColorImageElement"/>
        <StackPanel HorizontalAlignment="Left" VerticalAlignment="Top">
            <button click="TakePictureButton_Click" content="Take Picture" />
        </StackPanel>
    </Grid>
</Window>
点击按钮事件的处理代码如下:
private void TakePictureButton_Click(object sender, RoutedEventArgs e)
{
    string fileName = "snapshot.jpg";

    if(File.Exists(fileName))
    {
        File.Delete(fileName);
    }

    using(FileStream savedSnapshot = new FileStream(fileName, FileMode.CreateNew))
    {
        BitmapSource image = (BitmapSource) ColorImageElement.Source;

        JpegBitmapEncoder jpgEncoder = new JpegBitmapEncoder();
        jpgEncoder.QualityLevel = 70;
        jpgEncoder.Frames.Add(BitmapFrame.Create(image));
        jpgEncoder.Save(savedSnapshot);

        savedSnapshot.Flush();
        savedSnapshot.Close();
        savedSnapshot.Dispose();
    }
}
为了演示,上面的代码中在当前目录创建了一个文件名。这是一种简单保存文件的方法。我们使用FileStream打开一个文件。JpegBitmapEncoder对象将UI上的图像转换为一个标准的JPEG文件,保存完后,需要调用对象的flush方法,然后关闭,最后释放对象。最后三步不是必须的,因为我们使用了using语句,但是我们通常都会显式写出确保资源可以被正确释放。
文件下载(已下载 1650 次)发布时间:2013/2/14 21:33:19 阅读次数:5062
